Friday, May 28, 2021

Batter Up! PARTY FAVORS?!?! Yes please! May 2021 Paper Pumpkin Alternate Project #2


DO YOU WANT TO KNOW HOW TO TURN YOUR PAPER PUMPKIN CARDS INTO THESE FUN PARTY FAVORS OR TREAT HOLDERS? If so, you are in the right place!


Aren't they cute!!!!!!!!!!!!!!!!!!!!!!!!! This kit has such a strong, distinct theme this month and the stamps and die cuts themselves are BIG, so from a visual standpoint it really stands out and from a "nostalgia" standpoint, the look and feel of the projects we make with it transport us to some really fun memories.

Whenever I get a Paper Pumpkin kit I can almost instantly see an alternate I want to make with it and that is what you are seeing today. I visualized this party favor or snack treat bag because (since I love snacks) the first I think of when I see anything baseball theme is... FOOD! LOL I opened this kit and I immediately thought of a cracker jack box. I thought of popcorn. I thought of chewing gum (because they included it in the kit). I thought of peanuts. I just immediately wanted to create a holder for popcorn.

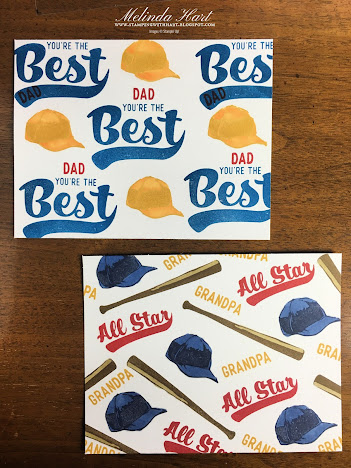
CREATING BACKGROUND PATTERNS WITH YOUR PAPER PUMPKIN STAMP SET


If you are new to creating backgrounds I have a few tips but the most important one is to relax and enjoy the stamping. Don't be afraid to mess up or get it "perfect." Just stamp. Some tips: 
- stamp images at a slight angle in different directions
- use multiple colors
- I stamp the full images where they will fit on the cardstock first and then fill in the open spaces and edges with partial stamps (see corners)
-Use one of your favorite patterns of Designer Series Paper as a reference or guide. How did the designers create their patterns?

I love stamp sets that include words and objects of the same theme. That makes for great backgrounds! Just have fun with it. 

I used leftover card bases to create these two backgrounds but you can also use a full cardstock sheet and really stamp your heart out. 

I also stuck to the coordinating colors of this month's Paper Pumpkin kit. 


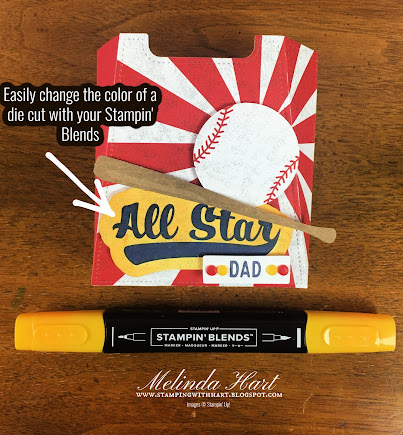
My go-to dies for Treat Boxes like this (especially with a sports theme) are the ALL DRESSED UP DIES. In my book, they are a must-have die set. 


The shape of this - minus the straps - basically becomes a French fry shaped holder. You can certainly fit other things in here like baseball cards or Big League Chew (if that's still a thing), but I personally see these as party favors for a baseball theme birthday party or a fun tailgate party or even favors for a baseball game. I promise their popcorn will taste even better because they got it from the cutest treat holder they've ever seen!!! LOL

 I used Tear and Tape Adhesive to assemble the box. There is a side tab at the end of each panel to adhere sides. Then adhere the small tabs to the mid-size tab. Adhere the largest tab to the mid size tab to create your treat bag base (the bottom).

ALTERNATE PRODUCTS USED

-Stampin' Blends (because I'm addicted) Night of Navy Light/ Mango Melody Light/ Dark

-1 1/2" circle punch *no longer in catalog but use what you have or a die of similar size

-All Dressed Up Dies

-Paper Snips

-Coordinating Inks/ Cardstocks of the colors of the kit which are: Real Red, Night of Navy, Soft Suede, Smoky Slate, Bumblebee and Pacific Point 


STAMPING WITH HART SCHEDULE UPDATES (if you are new to blog)

If you are new to my blog, my new "go live on Facebook" schedule is 7:30 p.m. EST on Thursdays and Sundays. I typically post the blog post tutorial and publish the "edited" version of the replay on YouTube the next day, if the schedule allows. The Facebook Business page is where we chat and show more behind the scenes - community - type stuff. YouTube is pretty much strictly for the tutorials so I will edit out the conversation and banter before posting a replay to YouTube. So, just an idea for the current schedule and how things work for Stamping with Hart at the moment in terms of social media/ blog stuff.

DID YOU KNOW? This is the last week for Stampin' Up!'s JOIN+ promotion! If you have a shopping list you can save $56 on product when you purchase the starter kit! Plus FREE Shipping! If you have questions do not hesitate to ask! This promotions ends 5/31/2021!

Join by clicking here: JOIN TODAY!

Monday, May 24, 2021

Tree Lined Edge Treat Bag (Great for Father's Day Gift Packaging)!


Hello Outdoor Lovers! Or crafters who have Outdoorsmen/women in their lives (like me)!

Before I get into this nature-y treat bag blog post, let me just say I edited the livestream down to just the tutorial, but forgot to layer in background music when I speed up certain parts of the video. Forgive me!


Aren't they fun?! Great for the nature lover, outdoorsman/woman or upcoming treat packaging for Father's Day! 

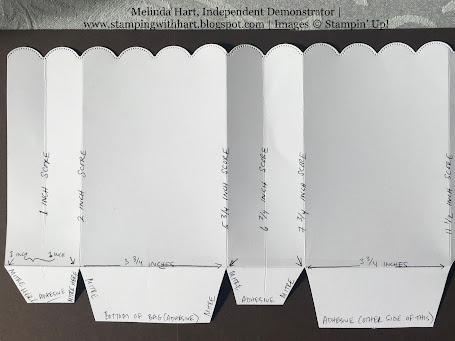
TREAT BAG MEASUREMENTS! - The same as the Scalloped Treat Bag Tutorial from last week. I will include pictures again here. Just pretend its tree lined edges instead of scallops.


I chose a sheet of the Designer Series Paper from the Beauty of the Earth Suite so I wouldn't have to use a "fill" stamp on my little tree-line stamp from Mountain Air. You could also use a 12 x 12 sheet of cardstock. In my video I had to use cardstock because I ran out of this DSP pattern, ugh! We make it work, right?

Cut to 12 x 8. You will score (horizontally) at the 6 inch mark. Those two inches will become the bottom of the treat bag later.

You will take your tree line die and line it up with the edge of your DSP/cardstock to cut in the edge of your treat bag. You will repeat this twice across the bag and run it through your Stampin' Cut & Emboss Machine.


Measurements for scoring the vertical lines: 
  • 1 inch
  • 2 inches
  • 5 3/4 inches
  • 6 3/4 inches
  • 7 3/4 inches
  • 11 1/2 inches
Cutting in your tabs on the bottom of the treat bag: 

  • Cut at the 2 inch score line and stop at the horizontal score line
  • Cut at the 5 3/4 inch line and stop at horizontal score line
  • Cut at the 7 3/4 inch line and stop at the horizontal score line
  • Cut the 11 1/2 inch piece off below the horizontal score line
Trim the 2 inch tabs in half and mitre each
Trim off about a quarter inch of the 3 3/4" tabs (this becomes the base of your bag) and mitre each 
For the half inch strip above the horizontal score line, mitre both edges. This becomes the tab you will use to glue your bag together at the side.
Adhere your smaller tabs to the base tabs and your treat bag is assembled!

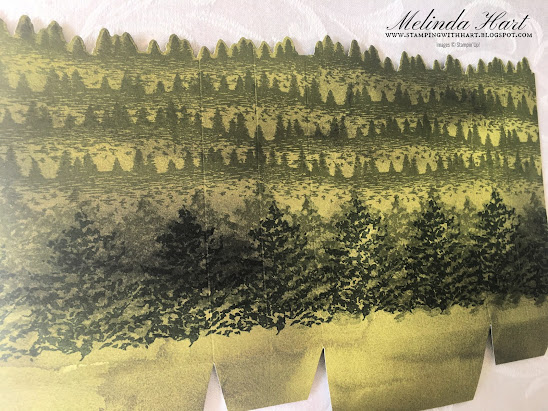
THE STAMPING! (All the trees - a Lovely Dense Forest look)

Now it's time for some stamping! 

Using Old Olive Ink and Clear Block "I" (this is a longer stamp) line up at the top of the treat bag and stamp your image. You will do this twice at the top of the treat bag. There will be 3 small gaps. This stamp is forgiving. Just ink the edge of the stamp and blend in those three spots.

You will do several rows with this stamp all the way across your treat bag. I alternated the placement of the trees so they didn't line up exactly each time with the row above it. When you have about 3 inches left on your treat bag above the horizontal score line, you will switch to the tree stamp (large tree) from Beauty of Friendship stamp set. Also in Old Olive for the base layer. The detail stamp for the big tree will be inked in Evening Evergreen. See that last row in the pictures below. The details are darker along the horizontal score line.


The treat bag after it's been stamped all the way across above the horizontal score line

Pictured: The arrows point to the dies I used on this treat bag for the two trees and the DSP I cut it with (all from the same sheet)

For the die cutting using the Beautiful Trees dies (part of the Beauty of the Earth Suite) I used the largest tree base, detail die for the biggest tree and the middle size triangle tree base. I cut the detail die again to fit the middle size tree I just trimmed off a section. You will cut BOTH of the tree trunks/ branches dies provided. The biggest tree trunk is not pictured. This is the mid size tree trunk.


Die cut all of your tree pieces. Adhere the tree trunk to the tree base of each tree with multipurpose glue. Add that top detail layer with Stampin' Dimensionals. I used the sides of the Dimensionals and cut them into smaller pieces so I could hide it behind the detail pieces.

Position the largest tree higher on the bag and the middle size tree so the bottom of the tree trunk is at the bottom of the treat bag. Stamp and die cut your sentiment. I used "You Truly Inspire Me" in Old Olive ink. I used the coordinating rectangle to cut out the sentiment. 

I chose Pacific Point to cut out the birds and dabbed on an eye with a Sharpie. Your Stampin' Blends would also be perfect. I perched one bird on the sentiment and one in a tree. I loved that final touch. I chose that color since its my son's favorite and one of these will go to his Daddy!

NOTE: If you choose to personalize your bag saying 'Dad' or Grandpa... I used the Playful Alphabet Dies there. (Not pictured)


So whether you choose a two-tone look like the treat bag on the left (above pictured) or a full sheet of the DSP like the one on the right (definitely the easier option) they both are fun and all about the lush Summer green forest! 

DID YOU KNOW?

There is a major deal on the Starter Kit in May (2021) Now until May 31st you can get $155 worth of product for $99, plus FREE SHIPPING! 

I'd love to have you join my team! What does that mean? While you are an active demonstrator you will receive a 20% discount on your product. If you decide not to meet your quarterly minimum you will go back to being a customer. You will never be pressured by me to sell. The majority of demonstrators are "hobby" demonstrators, meaning they do not sell but they do enjoy the demonstrator perks: first access to catalogs, first access to purchase new products and preorder products. Be a part of amazing crafting community and enjoy your 20% discount. I'm here to answer any questions! Let me know at stampingwithhart@gmail.com. 

If you are interested in a stamping business? Let me know and I'll be happy to guide you on your crafting dream journey! 

Purchase the Starter Kit here: Purchase the Starter Kit

Thank you for spending your time with me and for visiting my blog! I'd love to hear from you. Let me know your thoughts on the project if you are comfortable leaving a comment. You can also find me on YouTube, Facebook, Pinterest and Instagram at Stamping with Hart.

Happy Crafting!


Saturday, May 22, 2021

Paper Pumpkin Alternate May 2021: Gift Card Holder (Batter Up! Kit from ...


Today I have a quick and easy gift card holder for you! The only extras you will need outside of your Paper Pumpkin Kit are Paper Snips, Tear and Tape Adhesive, the largest Stitched So Sweetly Die (and your Die Cut & Emboss Machine), and a Stampin' Blend Marker in Real Red Dark.

You will cut your card base at the score line with the Paper Trimmer. We will be using the pattern side but you could save the other piece to make another gift card holder.


The card base is 5 1/2" - Score at 1/4" mark. Flip the card base and then trim 1/4" so the card base is now 5 1/4"

Take that score line at the 1/4" mark (pictured below) and line the score line at the 2 1/2" inch mark and score again.


Mitre the corners of the 1/4" section

Place Tear & Tape Adhesive on the bottom inside of the holder (see arrow) and also on the Pattern paper side of the tab and then seal. I use my Bone Folder to get a good seal.

We now have our super cute Gift Card Holder pocket!


I chose the largest die from the So Sweetly Stitched Dies for this sentiment and used the Mini  Cut & Emboss Machine to cut it. 


Use Your Stampin' Blend in Real Red Dark to make your border around the stitched pattern


Add your embellishment dots in red or yellow from the kit. Pop up sentiment on Stampin' Dimensionals from your kit and voila! You are done! SO QUICK AND SO EASY!!!!!!!!!!!!!!


I hope you loved today's project! Happy Crafting!


Thursday, May 20, 2021

Color & Contour Fun Continued! Two more card ideas (originally shown during Annual Catalog Launch)

 As promised on May 4, 2021, here is the tutorial for the cards I had briefly shown during my Catalog Launch walkthrough. They are so SPRING to me! I love them!


The Fresh Freesia Card actually coordinates with the Scalloped Edge Treat Bag from my last blog post & video. (See picture)


The Polished Pink card - my current fave In Color - is literally splashed with bright color throughout the whole card! The Color & Contour Bundle is a set that you will use again and again (as you can see I have been doing) since the catalog launch! 


I promise I will take a break from this set to feature other new fabulous stamp sets in the weeks to come but for today I want to deliver on my promise and share this tutorial with you. I am in full Spring mode in terms of card design. It's the combination of the new In Colors and flowers, I think. 

CARD 1 of 2:

THANK YOU FOR EVERYTHING (Polished Pink) CARD MEASUREMENTS:

Card Base: 5 1/2 x 8 1/2" in Polished Pink Cardstock - Score at 4 1/4"

Layer 1: Basic White Scalloped Edge Rectangle (the largest in the Scalloped Contours Dies set)

Embellishment 1: 4 - Die Cut Flower Heads

Embellishment 2: 4 - Evening Evergreen Flower Stems

Embellishment 3: Open Weave Ribbon in Polished Pink

Embellishment 4: 12 - Genial Gems in Gold (3 are at the center of each flower)

Inside Layer: Basic White - 2nd largest Scalloped Rectangle in Scalloped Contours Die

Color & Contour Stamp Set:

Stamps we used on this card:

"Thank You for Everything" Sentiment Stamp

Splatter Pattern Stamp

Flower Head Outline Stamp

Note: I chose to color in my flower with Stampin' Blends. If you prefer "fill" stamps that easily color in the outline, this stamp set has a flower head fill stamp! This is a "two step" stamp set with coordinating dies if you decide to purchase the bundle. Just a reminder you save 10% when you purchase a bundle.

Let's go through the steps in pictures: 


Stamping the outline flower in Memento Tuxedo Black Ink since I will be coloring in the flowers with alcohol markers (Stampin' Blends). The Memento ink will not smear or bleed with these markers.


Here is the Stampin' Blends Polished Pink Combo (Light and Dark) shades. I used Light on two flowers and Dark on the other two. I did no special shading or blending here. My intent was to show off the difference in shades since Polished Pink is a new color that debuted in the 2021-2022 Annual Catalog from Stampin' Up!


Coloring Flower Image with Polished Pink LIGHT Stampin' Blend


Even though this die cuts out a different flower and stem stamp in the Color & Contour Bundle, I am going to use the stem of this and glue the flowers I just colored onto it. So we only need the die here with Evening Evergreen cardstock. You will need 4 stems for this card and 3 for the other card in this blog post.


How fun is this splatter stamp?! Using it as a background on this card in Polished Pink. Focused on staying inside the rectangle. Overlap is totally fine. Let this be a worry free stamping job!


Arrange your bouquet after you have assembled your flowers. I chose to pop up my flowers on Stampin' Dimensionals. Add your Open Weave Ribbon bow in Polished Pink. I adhered mine with Tear and Tape Adhesive. You could also hot glue. Use a stronger adhesive with a 3D embellishment like ribbon if you want it to stay put for awhile. I added Genial Gems in gold in the centers of each flower, 2 per flower. 


The last step is to add your second scalloped rectangle to the inside of the card. I did not add a picture of that here but you can see the video tutorial on YouTube which is linked to this blog. 

CARD 2

THANK YOU CARD (Coordinates with Scalloped Gift Bag)

Card Base: 5 1/2 x 8" in Basic White Cardstock - Score at 4"

Layer 1: 4 - Fresh Freesia Scalloped Edge Strips (one side scalloped per strip) placed back to back

Layer 2: 2 - Gingham Designer Series Paper Strips in Fresh Freesia

Layer 3: 3- 1/2" strips of Fresh Freesia Cardstock

Layer 4: Thank You Sentiment (Smallest Scallop Edge Rectangle Die)  

Embellishment 1: 3 - Die Cut Flower Heads

Embellishment 2: 3 - Evening Evergreen Flower Stems

Embellishment 3: Open Weave Ribbon in Fresh Freesia (The bow and 3 strips that cover the 1/2 inch cardstock layers)

NOTE: I ran out of Genial Gems. If I had them they'd be in the center of the flowers like the card above so if you'd like to add those I just wanted to mention this.

Color & Contour Stamp Set/ Stamps we used on this card:

"Thank You for Everything" Sentiment Stamp (Stamped "Thank You" only)

Flower Head Outline Stamp

I will not be using as many photos for this card because the flower process is exactly the same just with Fresh Freesia Stampin' Blends instead of Polished Pink. 

Here I wanted to show the Scallop Edge Die I used on the Treat Bag and now for the Fresh Freesia cardstock layers of this card.

CUT: 1 1/2" x 4 Freesh Freesia Cardstock Strips (you need 4 of them for this card)

Line up the Scallop Edge Die pictured below on the edge of each strip. I noted in my video and I want to note here that I didn't perfectly line up the scallop edges per strip. You could do that. I did not. I thought it looked really pretty even though the scallops were a little different per strip.

Once you cut in your scallop edge, take each piece and trim it down to 1 inch. Save that 1/2 strip from each piece. We will use those for another layer.


Place the scallop strips back to back and I placed them toward the edge of the card on each side so there is enough room in the middle for that 1/2 inch Fresh Freesia strip.


Once you have your scalloped edge strips placed on your card next you will add your Gingham DSP Layers.

CUT: 1 x 4 inch strips (2 of them) of the Gingham Designer Series Paper. You can find this pattern in the Pansy Petals Designer Series Paper Pack.

Place and adhere the Designer Series Paper layers over your scallop edge strips in the center.

The next step is to take the 1/2 inch Fresh Freesia Cardstock strips and we are going to place that in the center of the Gingham DSP (BUT before we add those 1/2 inch strips we are going to wrap them with ribbon! So FANCY!) See pictures below for placement of layers and ribbon.


After you get all of your cardstock, DSP and Ribbon layers done you will add your Freesh Freesia flowers. Even though coloring and assembly not pictured it is the same process as the first card. I chose Three Flowers. The middle flower is higher toward top of card. The two side flowers are about middle and angled so the stems point and will be covered by the sentiment rectangle.


Stamping "Thank You" sentiment it would not fit in the smallest rectangle if I included the whole phrase so I covered the words I did not want to stamp and inked "Thank You" in Fresh Freesia to get this simplified Thank You sentiment.


Here are a few differences I wanted to point out with the original card and then the follow up card I created to match the Treat Bag from last week's blog/ tutorial.

The first card does not include the Gingham DSP. (Still beautiful!) Used a different sentiment and Evening Evergreen ink. I added Genial Gems in gold to the centers of each flower (3 per center).

The second card includes the Gingham DSP, has the Thank You sentiment (to coordinate with the Treat Bag sentiment) it is stamped in Fresh Freesia ink and I used a bow above the Thank You sentiment after I ran out of the Genial Gems. 


Here again is a picture of the coordinating Treat Bag and Card. Which is your favorite? Let me know!


HERE IS THE YOUTUBE VIDEO TUTORIAL! 


Monday, May 17, 2021

Scalloped Edge Treat Bag (Color & Contour Bundle)

I have a fun project for you today! I originally made this on a Facebook Live 5/16/2021 but I flubbed the measurements so I edited it to repost to make it easier to follow how to make this treat bag!

This features the Color & Contour Bundle and the gingham paper from the Pansy Petals Designer Series Paper.

So here we go! 


Corrected measurements as follows: 


You will use a 12 x 12 sheet of cardstock. I chose Basic White. It felt very Spring!

Cut to 12 x 8. You will score (horizontally) at the 6 inch mark. Those two inches will become the bottom of the treat bag.

You will take your scalloped die and line it up with the edge of your cardstock to cut in the edge of your treat bag. You will repeat this twice across the bag.


Measurements for scoring the vertical lines: 

  • 1 inch
  • 2 inches
  • 5 3/4 inches
  • 6 3/4 inches
  • 7 3/4 inches
  • 11 1/2 inches


Next we will cut in our tabs below the horizontal score line...


Cut at the 2 inch score line and stop at the horizontal score line
Cut the 2 inch tab in half
Mitre the corners (repeat with the other 2 inch tab further into the treat bag) See pictures


You will see in the picture what the finished tabs look like...


And here the measurements are written onto the bag in case that makes this easier! 


Add whatever stamping or decorative elements (like Designer Series Paper layers) before you adhere your base. If you'd rather assemble the treat bag first and then decorate, that works too. Whatever your preference.

I then cut two pieces of the gingham DSP to 3 3/4 x 5" and adhered those to the 3 3/4 inch panels to the card lining the DSP up with the bottom score line. This creates a scalloped Basic White border at the top which I really loved!


You will assemble your treat bag. I like to place adhesive on the end tab (at the 11 1/2 inch mark) Cut the tab off below the horizontal score line and mitre those edges on the tab. Line up the opposite end of the bag. I like to use the score line at the bottom where the tabs are to make sure it lines up straight.

Use a stronger adhesive since this bag will hold a small gift. I like Tear and Tape Adhesive or Stampin' Seal +

DECORATIVE LAYER (Finishing touch of the Treat Bag)

For the Fresh Freesia Scalloped layer, it's the third largest die in the bundle and I die cut a piece of the Fresh Freesia cardstock.

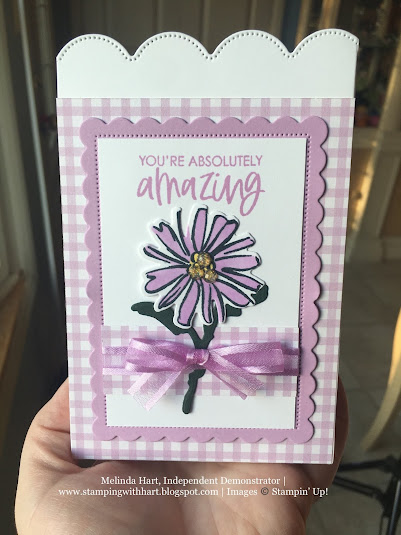
The inside Basic White rectangle is 2 3/4 x 4". I stamped "You're Absolutely Amazing" in Fresh Freesia ink at the top of the Basic White rectangle.

Cut another piece of the Gingham DSP at 1 x 4" and I chose to wrap that strip with the Fresh Freesia Open weave ribbon before adhering to the bottom third of the rectangle.

I stamped the "outline" flower stamp in Memento Tuxedo Black Ink because I wanted to use my Stampin' Blends to color the flower. (Also in Fresh Freesia) If you do not like using markers, there is a fill stamp for this outline flower in the Color & Contour stamp set. Options!

I cut the die cut flower/ stem in Evening Evergreen cardstock. You do not need the whole flower piece. I trimmed off top half so I could glue our die cut Fresh Freesia flower onto the stem. 

Adhere flower center just below the sentiment. I slipped the stem behind the ribbon.

Tie a bow with the Fresh Freesia Ribbon and adhere it to the card. I placed mine on the stem where the gingham strip is on the rectangle.

Finish off the decorative layer with the Genial Gems in gold in the centers of the flower. I did three per flower in a triangular shape.

DID YOU KNOW?

There is a major deal on the Starter Kit in May (2021) Now until May 31st you can get $155 worth of product for $99, plus FREE SHIPPING! 

I'd love to have you join my team! What does that mean? While you are an active demonstrator you will receive a 20% discount on your product. If you decide not to meet your quarterly minimum you will go back to being a customer. You will never be pressured by me to sell. The majority of demonstrators are "hobby" demonstrators, meaning they do not sell but they do enjoy the demonstrator perks: first access to catalogs, first access to purchase new products and preorder products. Be a part of amazing crafting community and enjoy your 20% discount. I'm here to answer any questions! Let me know at stampingwithhart@gmail.com. 

If you are interested in a stamping business? Let me know and I'll be happy to guide you on your crafting dream journey! 

Purchase the Starter Kit here: Purchase the Starter Kit

Thank you for spending your time with me and for visiting my blog! I'd love to hear from you. Let me know your thoughts on the project if you are comfortable leaving a comment. You can also find me on YouTube, Facebook, Pinterest and Instagram at Stamping with Hart.

Happy Crafting!


October 2024 Paper Pumpkin UNBOXING: Nests of Christmas WOW! (and one "a...

You can subscribe to Paper Pumpkin with me as your demonstrator here:  https://www.paperpumpkin.com/en-us/sign-up/?demoid=2212777 If you do ...