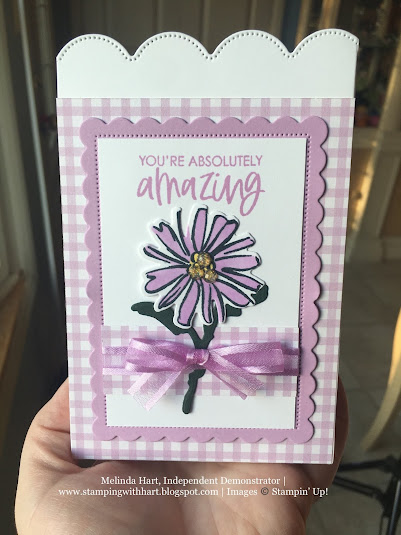
I have a fun project for you today! I originally made this on a Facebook Live 5/16/2021 but I flubbed the measurements so I edited it to repost to make it easier to follow how to make this treat bag!
This features the Color & Contour Bundle and the gingham paper from the Pansy Petals Designer Series Paper.
So here we go!
Corrected measurements as follows:
Cut to 12 x 8. You will score (horizontally) at the 6 inch mark. Those two inches will become the bottom of the treat bag.
You will take your scalloped die and line it up with the edge of your cardstock to cut in the edge of your treat bag. You will repeat this twice across the bag.
Measurements for scoring the vertical lines:
- 1 inch
- 2 inches
- 5 3/4 inches
- 6 3/4 inches
- 7 3/4 inches
- 11 1/2 inches
Next we will cut in our tabs below the horizontal score line...
Cut at the 2 inch score line and stop at the horizontal score line
Cut the 2 inch tab in half
Mitre the corners (repeat with the other 2 inch tab further into the treat bag) See pictures
You will see in the picture what the finished tabs look like...
And here the measurements are written onto the bag in case that makes this easier!
Add whatever stamping or decorative elements (like Designer Series Paper layers) before you adhere your base. If you'd rather assemble the treat bag first and then decorate, that works too. Whatever your preference.
I then cut two pieces of the gingham DSP to 3 3/4 x 5" and adhered those to the 3 3/4 inch panels to the card lining the DSP up with the bottom score line. This creates a scalloped Basic White border at the top which I really loved!
You will assemble your treat bag. I like to place adhesive on the end tab (at the 11 1/2 inch mark) Cut the tab off below the horizontal score line and mitre those edges on the tab. Line up the opposite end of the bag. I like to use the score line at the bottom where the tabs are to make sure it lines up straight.
Use a stronger adhesive since this bag will hold a small gift. I like Tear and Tape Adhesive or Stampin' Seal +
DECORATIVE LAYER (Finishing touch of the Treat Bag)
For the Fresh Freesia Scalloped layer, it's the third largest die in the bundle and I die cut a piece of the Fresh Freesia cardstock.
The inside Basic White rectangle is 2 3/4 x 4". I stamped "You're Absolutely Amazing" in Fresh Freesia ink at the top of the Basic White rectangle.
Cut another piece of the Gingham DSP at 1 x 4" and I chose to wrap that strip with the Fresh Freesia Open weave ribbon before adhering to the bottom third of the rectangle.
I stamped the "outline" flower stamp in Memento Tuxedo Black Ink because I wanted to use my Stampin' Blends to color the flower. (Also in Fresh Freesia) If you do not like using markers, there is a fill stamp for this outline flower in the Color & Contour stamp set. Options!
I cut the die cut flower/ stem in Evening Evergreen cardstock. You do not need the whole flower piece. I trimmed off top half so I could glue our die cut Fresh Freesia flower onto the stem.
Adhere flower center just below the sentiment. I slipped the stem behind the ribbon.
Tie a bow with the Fresh Freesia Ribbon and adhere it to the card. I placed mine on the stem where the gingham strip is on the rectangle.
Finish off the decorative layer with the Genial Gems in gold in the centers of the flower. I did three per flower in a triangular shape.
There is a major deal on the Starter Kit in May (2021) Now until May 31st you can get $155 worth of product for $99, plus FREE SHIPPING!
I'd love to have you join my team! What does that mean? While you are an active demonstrator you will receive a 20% discount on your product. If you decide not to meet your quarterly minimum you will go back to being a customer. You will never be pressured by me to sell. The majority of demonstrators are "hobby" demonstrators, meaning they do not sell but they do enjoy the demonstrator perks: first access to catalogs, first access to purchase new products and preorder products. Be a part of amazing crafting community and enjoy your 20% discount. I'm here to answer any questions! Let me know at stampingwithhart@gmail.com.
If you are interested in a stamping business? Let me know and I'll be happy to guide you on your crafting dream journey!
Purchase the Starter Kit here: Purchase the Starter Kit
Thank you for spending your time with me and for visiting my blog! I'd love to hear from you. Let me know your thoughts on the project if you are comfortable leaving a comment. You can also find me on YouTube, Facebook, Pinterest and Instagram at Stamping with Hart.
Happy Crafting!


No comments:
Post a Comment