(2) 2 x 11" Strips scored every 1/2" (Basic White Cardstock)
(2) 2-3/8" Circle Punch Pieces
(1) 1 x 5-1/2" Strips from desired color cardstock
(1) Die Cut Decoration
INSTRUCTIONS
Score a full sheet of 8-1/2 x 11" Basic White Cardstock every 1/2" with the Simply Scored Scoring Tool.
Turn cardstock length wise and cut 2" strips. You will get 4 for every sheet. You will need two strips to make this rosette.
Add desired ink with Blending Brushes. Fold on the score lines. Think mountain-valley fold.
Use a hot glue gun to glue the two strips together. Once it forms a circle you can push down and then push inward and glue your rosette in the center. Add your circle piece here or your decorative die cut.
Cut two strips 1 x 5-1/2" in desired color cardstock. Using the Banners Pick-a-Punch punch a banner end into each strip and glue together so they look like a prize ribbon and then glue to the back of the rosette.
Today’s Alternate Card Idea is a Step Fold Pop Card or a ‘Tier card.’ I am never quite sure what to call it but it's easy and it's ADORABLE! We are working with the October 2023 Paper Pumpkin Kit: Home for the Holidays and I will list alternate products used for these cards as well.
October 2023 Paper Pumpkin Coordinating Colors
We have one fun fold today in two different layouts: vertical and horizontal just like the kit cards this month.
Insert for Card: 4 x 5-1/4" (use the back of the Paper Pumpkin card base)
HORIZONTAL Card Base: 5-1/2 x 8-1/2" Score: 4-1/4"
The only measurement that changes is the length from 4-1/4 to 5-1/2 for the step panels so it lines up with the the horizontal card base. All score lines are exactly the same.
TO DECORATE HORIZONTAL CARD
Trim the top of the card front on horizontal kit card to 1-1/2 x 5-1/4"
Top pop panel: same layer, cut the next part to 1-3/8 x 5-1/4"
Bottom pop panel: 7/8 x 5-1/4" or use the the die cut piece of 4 houses on the front panel. Trim end
OPTIONAL: add die cut trees on the top pop panel behind houses
INSTRUCTIONS:
Add the two pop up panels first starting with the bottom panel (4 x 4-1/4") piece
Burnish score lines with Bone Folder for crisp folds
Line 1/2" flap with the edge of the card front so the pop up panel is folding inward at the bottom of the card front
Fold in the 1/2" panel on the opposite end of pop up piece and add adhesive
Fold panel back so both 1/2" panels line up and touch back-to-back on card base and press down
The bottom pop up square should be in place
For the top pop up tier, there are two 1/2" panels on either end of this piece (3-1/2 x 4-1/4" piece)
Add adhesive to both 1/2" panels on one side because the one 1/2" gets glued to the bottom pop up and the other 1/2" gets secured to the card
Add adhesive to the outer most 1/2" panel at the top of the upper pop up panel
Press the bottom pop up mechanism so it's flat against the card base
Fold the top panel flap back and press down to adhere the glue
You want both 1/2" inch panels folded back on the top piece but only the edge has the tear and tape
Now you can pop up both panels together and decorate
Once you've added your pop up mechanisms the hard part is done and your fun fold is created!
Now, to decorate, because we do not have DSP, we are going to use the scenes on the card fronts in the kit along with the die cuts to decorate these cards.
Top panel layer: Trim vertical card front scene to 2-3/4 x 4"
Top pop panel layer: 1-3/8 x 4" or use the full die cut piece (vertical with two houses on it) and trim about 1/2" off of the bottom
Bottom pop panel layer: 7/8 x 4" or use the full die cut piece with the single red house and trim about 1-1/8" inches off of the bottom
ADHESIVE PLACEMENT ON POP OR STEP LAYERS
Just be sure to place the glue at the bottom only of each layer. Because this is a fun fold the glue only goes on the area where it will be glued to the pop up panel. It needs to move when the card is folded closed and then opened.
STAMPING
Use the banners in the kit to stamp sentiments in Real Red ink. Stamp greeting on inside layer and add to card. You can also stamp the snowflakes in Balmy Blue ink or the House stamp image in Balmy Blue ink, if desired.
Layer the banner over the glitter pieces in the Paper Pumpkin Kit for added sparkle.
P.S. - DON'T FORGET THE AWESOME GLITTER GLUE! It's a great accent on the rooftops/ snow.
ST. NICHOLAS ALTERNATE
Measurements exactly the same as vertical card above.
You will need:
Die Cut Chimney (Cherry Cobbler Cardstock) (Saint Nicholas Dies)
Die Cut Chimney Top (Cherry Cobbler Cardstock) (Saint Nicholas Dies)
Die Cut St. Nicholas (Traditions of St. Nick DSP)
Die Cut Snow Cap for Chimney Top (leftover piece of white card in kit or Basic White Cardstock)
Rustic Christmas Countdown Kit Sequins *Optional*
INSTRUCTIONS
Trim feet off of St. Nick and glue behind the chimney. Add chimney top with dimensionals. Glue snow cap to top of chimney top. Add glitter glue. Add to the bottom pop panel, center. Careful to keep glue low so St. Nick moves with the card as it pops up and down.
I hope you enjoyed today's alternate card ideas for the Paper Pumpkin Kit!
Are you subscribed to the November Paper Pumpkin kit?
Tri Fold Pocket Cards with Meandering Meadow Suite
TRI FOLD POCKET CARD
Card Base: 8-1/2 x 9" Score: 3 and 6" on the 9" side, score at 3" on the 8-1/2" side (Fresh Freesia Cardstock)
(3) OUTSIDE DSP Panels: 2-1/2 x 5"
(3) OUTSIDE Glimmer Paper Panels: 2-3/4 x 5-1/4"
(6) INSIDE DSP Panels
(3) Inside Pocket Panels 2-3/4 x 5"
(3) Bottom panels: 2-3/4 x 2-3/4"
(2) Pocket Card Inserts 2-3/4 x 5-1/4"
(1) Die Cut Deckled Circle 1-3/8" size (for sentiment) (Basic White Cardstock)
(1) Die Cut Deckled Circle 1-1/2" size (for layer) Three Color Glimmer Paper in Highland Heather
(1) Piece of the Center Stripe Ribbon (About 12-15" depending on size of bow you want)
Bird & Dragonfly Embellishments
NOTE: I also did a version where the DSP is just under 3" so you could also try 2-7/8" measurement if you want to show more DSP and don't need glimmer paper
INSTRUCTIONS
Score your card. Fold pocket and burnish edges with bone folder so you can get a nice crisp fold. Gluing the pocket panel is optional. I did one with adhesive and one without and I preferred the one without adhesive. If you glue the pockets, be sure to punch your half circles with the 2" Circle Punch on each pocket panel first.
Start assembling and gluing the DSP pieces. I chose a different pattern for the outside than the inside. Glimmer paper is optional but so pretty on the outside of your card. Once outside panels are done, glue the inside pocket DSP panels and then the smaller cut DSP pieces for the front pocket.
I chose for the DSP to match. Meaning, the inner pocket piece matches the outer pocket piece so it looks like one continuous piece of DSP. You can choose different patterns here if you like. I prefer florals and meadows so I went with that choice.
For the stamping:
There are two inserts for your pockets. On one, I stamped the girl with tea or coffee from the Coffee with Friends stamp set in the lower corner with Memento Tuxedo Black ink. I colored with Stampin' Blends in the following:
Top: Fresh Freesia Combo
Pants: Night of Navy Combo
Skintone: Lightest Combo of Natural Tones Blends
Hair: Pebbled Path Combo
Inside of Tea Cup: Copper Clay
I did NOT color the cup or the steps
Outlined entire image with Pool Party Dark, softened edges with Color Lifter
Boots: Fussy Cut Green DSP to make boots for her feet!
On the other panel I stamped in the wheel barrow and used the same shades of blends except no
Night of Navy.
Stamp greeting in Highland Heather ink on the Deckled Circle Die Cut.
OPTIONAL: Stamp greeting directly onto the DSP in the center panel on the sky if desired with
Garden Meadow Stamp Set.
Once your card is assembled and everything is stamped, add your inserts inside the pockets and
a packet of tea or a little surprise in one of the pockets.
Fold closed and tie shut with ribbon. Add
the Deckled Die Cut to the layering glimmer paper and pop on the front with pop dot.
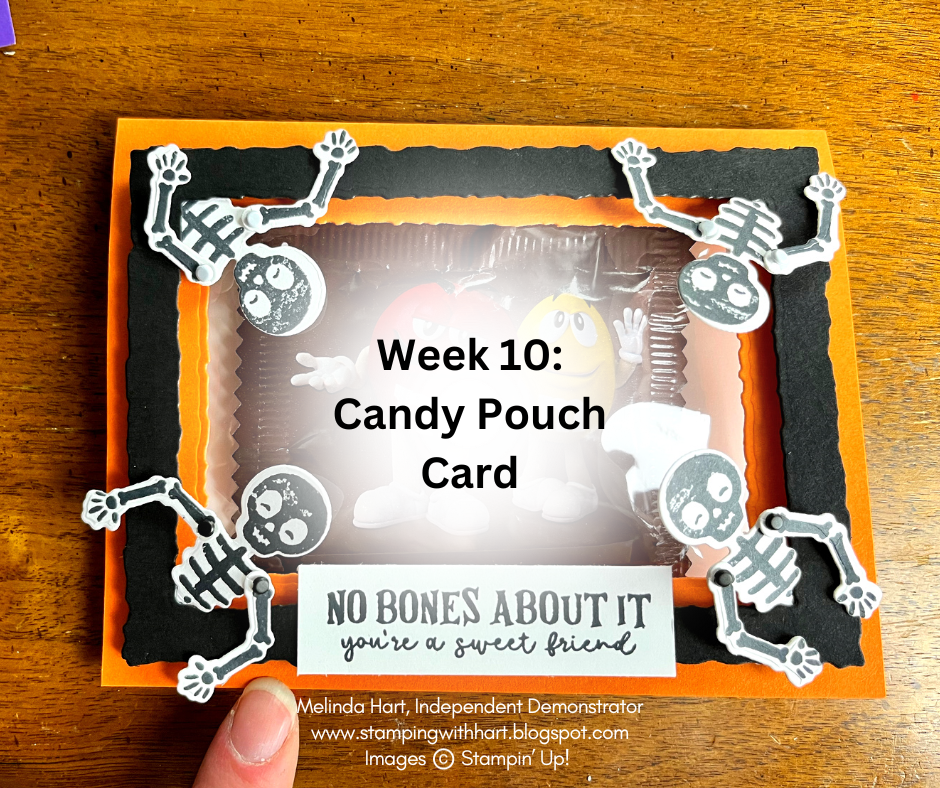
One Horse Open Sleigh Suite Version *Online Exclusive Available Now*
Card Base: 5-1/2 x 8-1/2" Score: 4-1/4" (Pumpkin Pie or Gorgeous Grape Cardstock)
(1) Deckled Rectangle Frame - Die cut using 3 x 4-3/8" nested inside 3-3/4 x 5 (Basic Black or Pumpkin Pie Cardstock)
(4) Skeleton Trunk Die Cuts (Basic White Cardstock) Bag of Bones Dies
(4) Left Arm Die Cuts (Basic White Cardstock) Bag of Bones Dies
(4) Right Arm Die Cuts (Basic White Cardstock) Bag of Bones Dies
(8) Round Brads
(1) Medium Clear Envelope
(1) Inside Layer : 4 x 5-1/4" (Basic White Cardstock)
(1) Basic White Rectangle for Sentiment: 3/4 x 2-3/4
NOTE: For the Ghost theme, use 10 Die Cut Ghosts, 1 Die Cut Boo from Tricks & Treats and 6 Die Cut Bats from Bag of Bones.
INSTRUCTIONS
Stamp the skeleton trunks and arms with the Bag of Bones Stamp Set coordinating stamps in Memento Tuxedo Black ink. Stamp "No Bones About it..." greeting on the Basic White rectangle piece in black also. Stamp "Happy Halloween" also in black on the inside panel, center. Set aside.
Take the 2-1/2 x 4" size Deckled Rectangle and cut the center out of the card front. Die cut your frame next using the 3 x 4-3/8" nested inside 3-3/4 x 5 Deckled Rectangle Dies on a piece Basic Black for the skeleton card or Pumpkin Pie Cardstock for the Ghost card.
With your Take Your Pick Tool use the pointed side to poke holes into the shoulder joint of the arm and the trunk. Feed the brad through to connect the pieces so the arm is interactive, Repeat for all skeletons right and left. I folded my brads inward. I recommend adhering them with tape to keep them from moving.
Place Tear and Tape adhesive on the pelvis of each skeleton and then glue behind the 4 corners of the die cut deckled rectangle frame. Position arms where desired.
Place foam adhesive strips around the back of deckled frame and then adhere to card.
Place candy (I recommend something flat-ish) inside the clear envelope with the flap seal on the end with candy.
Place adhesive (I used tear and tape) on back of card insert. Fold the clear envelope so half is tucked in back, add more adhesive to it and then add to inside of card so the candy is center in the window of the card.
I hope you enjoyed today's project!
Happy crafting!
Friendly reminder for Paper Pumpkin friends: You have until November 10, 2023 to subscribe to the Warm Wishes Paper Pumpkin Kit! There is also an add-on available right now called Warm Wishes Cards & Envelopes.
For those of you who've been considering the hobby discount, the 35/35 Starter Kit offer ends October 31, 2023
Remember, You can either choose $125 of products and pay $64.35 (save 35%) or choose $168.75 in products and pay $99 (35% more product)
FREE SHIPPING on the Starter Kit and free admission to the virtual OnStage Stampin' Up! event in November ($77 valuie)
Meandering Meadow Suite shown in today's video is an upcoming Online Exclusive that will be released by Stampin' Up! to customers on November 7, 2023.
Demonstrators can "preorder" it now.
This month from October 3 -31, 2023 there is a 35/35 Starter Kit promotion and you can include preorder items, like Meandering Meadow, in your starter kit. If you have questions, email me: stampingwithhart@gmail.com.
SAVE 35% - Option 1 Starter Kit: $125 worth of products (of your choice) for $64.35
35% MORE PRODUCT - Option 2 Starter Kit: $168.75 in product of your choice for $99 (before tax)
FREE SHIPPING on Starter Kits
During this 35/35 starter kit offer from Stampin' Up! you will also get free admission to the OnStage Virtual Event for Demonstrators in November. This is a value of $77
(1) Dracula Head Die Cut (Tricks & Treats Dies) Glow-in-the-Dark Specialty Paper
(1) Frankenstein Head Die Cut (Tricks & Treats Dies) Glow-in-the-Dark Specialty Paper
(1) Something Fancy Die Cut (Something Fancy Dies) Basic Black Cardstock (2-1/2" size die)
(2) Flame Die Cuts (Legendary Ride Dies) Glow-in-the-Dark Specialty Paper
(2) Haunted House Die Cuts (Tricks & Treats Dies) Glow-in-the-Dark Specialty Paper
(1) Basic White Cardstock Strip: 1 x 6" Score at 1-1/2" on each end of strip
INSTRUCTIONS
Shiny side of Nested Treat Box is the food safe side or the inside of the box. The matte side is the outside. Assemble box.
Glue Basic Black panels to Nested Treat Box.
Stamp stars stamp in all four corners of the 4 Parakeet Party panels in VersaMark ink. Stamp the "Trick or Treat" greeting on one of the panels in VersaMark as well. Use black heat emboss powder and heat set with heat tool (all of the panels). Glue to each side of box.
Stamp the Dracula hair stamp in VersaMark ink on the Dracula die cut. Stamp the Frankenstein face (but not the hair) in VersaMark ink under the Dracula hair line. Sprinkle Black Heat Emboss Powder. Brush away excess and heat set with heat tool. NOTE: I recommend the anti-static tool even on the Glow in the dark paper but the consistency of the paper still makes the powder stick in various places. Brush away.
Place the Something Fancy Die Cut directly onto the VersaMark ink pad. Saturate. Sprinkle with black powder and heat set. (This will be her hair)
Take the edge of the face die cut at the hair line and saturate with VersaMark pad. Use black powder and heat set the edge of hairline so there is no white showing.
Glue hair to face.
Take the Frankenstein die cut and trim off the hair so only the bolts are showing. Place behind her face so the bolts line up under her ears and glue.
Take the Basic White strip and fold in on the score lines on each side. Once folded, pull back the corner on each side so it resembles a collar. Glue the 1" square of glow in the dark paper (this is for the neck) in the center and glue shirt shut. Fold the edges on each side backward and glue to treat box. Place her head on dimensionals and add just above the shirt.
Use the black enamel effects basics on her bolts. Finish with green tinsel gem at the base of her collar.
Stamp two haunted houses in VersaMark ink. Sprinkle with black emboss powder. Heat set. Add to sides of box with dimensionals.
Card Base: Very Vanilla Cardstock (2 Pieces cut to 6 x 6")
DSP Layer (Shaded Spruce Check Pattern) (6 x 6") Joy of Christmas DSP
10 Die Cut Pine Branches (Very Vanilla Cardstock) Christmas Classics Dies
5 Double Berry Die Cuts (Real Red Cardstock)
5 Single Berry Die Cuts (Real Red Cardstock)
4 Die Cut Holly Leaves (Shaded Spruce Cardstock) Christmas Classics Dies
5 Red Gems (from Loose Holly Gems and Sequins)
4 Holly Sequins
1 Piece large check ribbon (About 10 to 12 inches)
Instructions
Glue DSP to one of the Very Vanilla cardstock pieces. Run with through Stampin' Cut and Emboss Machine with the Deckled Circle Dies in 5-3/4" and then the inner circle size is 3"
Place the smaller circle in the center and when you run through it will look like a wreath.
Run the back of the card through now with just the 5-3/4" deckled circle die.
Score the top of the back panel at 1" mark
NOTE: Optional that you can line up the deckled circles to match exactly. I recommend a clip to hold the panels in place once you line them up if you choose.
Place adhesive above the score line only. Glue the front panel to the back panel.
Stamp greeting from Christmas Classics Stamp Set in Real Red ink in the center of the wreath with the card closed.
Stamp 10 pine branches - 5 in Old Olive and 5 in Shaded Spruce ink. Add additional color (same shade as branch) with Blending Brush (optional)
Arrange your branches in a circle in the center of the wreath ring. Once you have your layout, start gluing them down with dimensionals. They will slightly overlap.
Take the 4 die cut holly leaves and arrange them on the inner part of the wreath. They will be half on the wreath and then half of each holly leaf with frame the greeting. ONLY GLUE the part of the leaf that will be on the wreath. If you glue the whole leaf you won't be able to open the card.
Once you have your holly leaves positioned around the stamped greeting glue the part of each leaf that will be on the wreath circle layer.
Add the die cut berries in clusters of 3 on each Shaded Spruce branch.
Add the red gems to the center of each berry cluster with a glue dot.
Add the holly leaves sequins around the large die cut holly to add a little sparkle to the card.
Finish by tying ribbon into a bow and securing to wreath with a glue dot.
ISN'T IT SOOOO MUCH FUN!!!!!!!!!!!!!!!!!!!!!!!
I hope you enjoyed today's tutorial. The products used list is below.
REMINDER! Today is the LAST DAY FOR FREE SHIPPING!
Also, today we got the FIRST LOOK at the November Paper Pumpkin Kit and these incredible add on cards which are available to active Paper Pumpkin subscribers right now!
November Paper Pumpkin Kit: Warm Wishes
Warm Wishes Add-On Cards & Envelopes AVAILABLE TO PURCHASE NOW! $14.00 for 20 Cards & Envelopes!
Welcome to Week 8 of the 12 Weeks of Halloween! Time to make some simple card layouts in bulk with Them Bones DSP and cardstock. This is simple stamping and minimal die cutting, mostly just cut layers with the Paper Trimmer.
Card Base: 4-1/4 x 11" score: 5-1/2" (Basic Black)
(2) Basic White Layer: 4 x 5-1/4" (One outside and one inside the card)
Plaid DSP: 3-3/4 x 5" (Them Bones DSP)
Basic Black Strip: 1 x 4"
Basic White Die Cut (Autumn Leaves Dies)
(1) Die Cut Cat (Them Bones DSP)
Copper Clay Textured Ribbon (About 4-1/2")
(3) Adhesive Backed Sparkle Gems
INSTRUCTIONS
Stamp greeting in Pumpkin Pie ink.. Glue the Basic White pieces to the card front and the other to the inside of the card. Glue the DSP panel to card front next.
Glue the ribbon to the Basic Black strip. Adhere strip to card front. Place center.
Add the die cut with dimensionals to the center of the strip. Glue the cat die cut next to the greeting.
Finish with sparkle gems in gold.
CARD 2
NOTE: If you have a full 12 x 12 sheet you can get 6 cards
Card Base: 4-1/4 x 11" score: 5-1/2" (Starry Sky Cardstock)
Basic White Layer 1: 4-1/8 x 5-3/8"
Graveyard DSP: 4 x 5-1/4"
Die Cut for Sentiment (Autumn Leaves Dies)
Pebbled Path Textured Ribbon (About 3-1/2")
(3) Sparkle Gems in Silver per card
Basic White Layer: 4 x 5-1/4" (for inside the card)
INSTRUCTIONS
Stamp "Happy Halloween" from Bag of Bones stamp set with Pebbled Path ink.
Glue the Basic White panel (4-1/8 x 5-3/8" size) to card front. Glue the DSP panel next. Cut banner edges into ribbon and glue to card. Place die cut over it with dimensionals. Finish with sparkle gems.
CARD 3
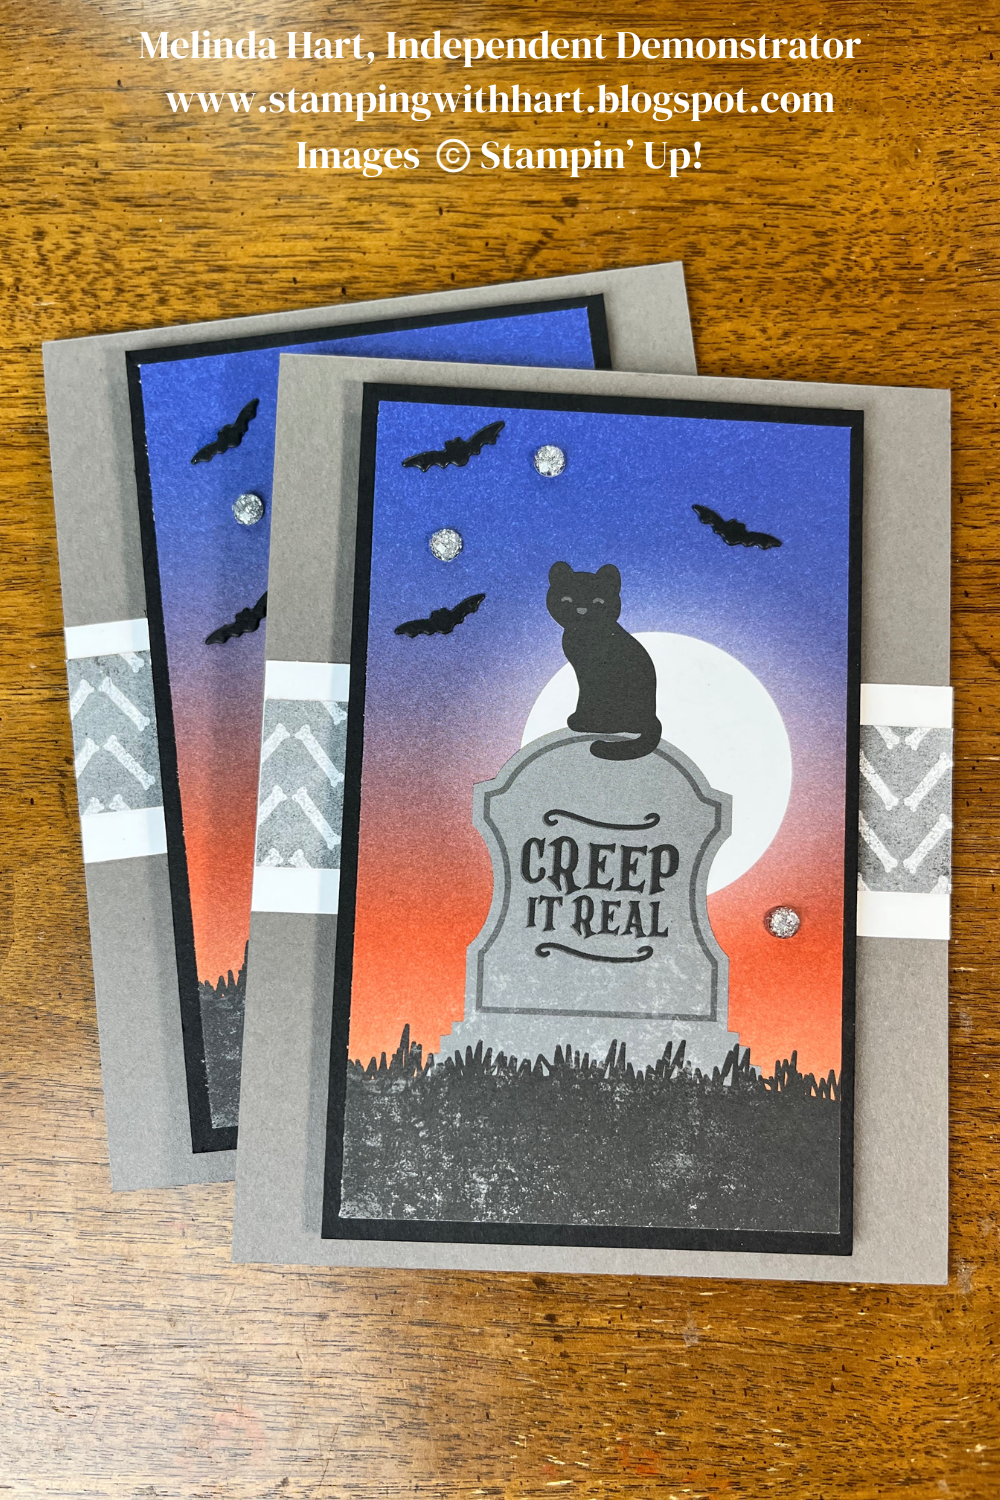
Card Base: 4-1/4 x 11" score: 5-1/2" (Pebbled Path Cardstock)
Cat on Grave Stone DSP: 3 x 5" (Them Bones DSP)
Basic Black Layer: 3-1/4 x 5-1/4"
Bones Pattern DSP: 1 x 4-1/4"
Basiic White Strip: 1-1/2 x 4-1/4"
(3) Die Cut Bats in Basic Black Cardstock (Bag of Bones Dies)
(3) Sparkle Gems
Basic White Layer: 4 x 5-1/4" (for inside the card)
INSTRUCTIONS
Glue the Basic White and Bones DSP to the card base. Glue the Cat on Grave stone DSP to the Basic Black panel. Place this panel on dimensionals and add to card. Finish with silver sparkle gems.
CARD 4
Card Base: 4-1/4 x 11" score: 5-1/2" (Basic Black)
(2) Basic White Layer: 4 x 5-1/4" (One outside and one inside the card)
Bones Pattern DSP: 3-3/4 x 5" (Them Bones DSP)
Night Scene Gate DSP Panel (cut in half) 3 x 4-1/2"
Basic White Layer: 3-1/4 x 4-3/4"
Starry Sky Metallic Woven Ribbon (About 15" or enough to wrap around panel twice)
(1) Die Cut in Basic White (Tricks & Treats Dies)
(3) Sparkle Gems Silver
INSTRUCTIONS
Stamp Trick or Treat in Pebbled Path ink onto the die cut.
Glue Basic White panels to card front and inside of card. Glue the Bones DSP next.
Glue the scene DSP to the smaller white panel. Wrap the ribbon around it twice so it looks like it's wrapped around the fence. Add this panel to card. Add the die cut to the card (somewhere around the gate) I cut this scene in half so one half has a moon and the other does not. If you don't see a moon, place center. If you don't want to cover the moon, place to the side of fence.
Finish with Sparkle Gems.
CARD 5
Card Base: 4-1/4 x 11" score: 5-1/2" (Pumpkin Pie Cardstock)
Basic White Layer: 4 x 5-1/4" (for inside the card)
INSTRUCTIONS
Stamp Trick or Treat from Tricks & Treats Stamp Set in Pumpkin Pie ink onto the die cut.
Glue the Basic Black strip center on the card first. The Basic White strip next. Glue the twine to the Bats DSP layer and glue to card.
Adhere the Basic White panel to the spotlight panel. Add skeleton with mini dimensionals to the spotlight panel. Adhere this whole pan to card with dimensionals. Tuck die cut next to skeleton lower right. Finish with sparkle gems.
CARD 6
Card Base: 4-1/4 x 11" score: 5-1/2" (Pumpkin Pie Cardstock)
Pebbled Path Layer: 4 x 5-1/4"
(1) Basic White Layer: 4 x 5-1/4" (inside card)
Tombstone Pattern DSP: 3-3/4 x 5" (Them Bones DSP)
Basic White Strip: 1-1/4 x 3-3/4"
(1) Die Cut Ghost (Tricks & Treats Dies)
(1) Die Cut Headstone (Bag of Bones Dies) 2023-2025 Luster Paper in Pebbled Path
(3) Adhesive Backed Sparkle Gems in gold
INSTRUCTIONS
Stamp greeting in Pebbled Path ink to the left of the Basic White strip. Happy Halloween is from Bag of Bones Stamp Set. Adhere Pebbled Path panel and then DSP.
Glue Basic White strip down and adhere the Tombstone and Ghost to the right. Place ghost on dimensionals. Finish with sparkle gems.
I hope you enjoyed this week's projects. You can refer to the chart for measurements I used to create cards in bulk with DSP but don't feel like it has to be followed exactly. This is just a guide. For the most part, I was working with partial pieces and scraps but this is a nice chart for simple sizes and layouts.
How are you doing with your goal of the number of boxes/ cards you would like to make this year? We're counting down now and once we hit October 1, 2023 it's definitely time to creating in bulk if that's what you need for your trick or treaters and/ or events.
Today's project: Window Envelope Treat Boxes!
Treat Box Size: 2-1/4 x 3-1/2 x 1"
(1) DSP Window Panel: 2-1/8 x 3-3/8"
(1) Window Sheet Panel: 2-3/16 x 3-7/16"
(2) DSP Strips: 7/8 x 2-1/8"
(2) DSP Strips: 7/8 x 3-3/8"
(You choose which die cuts you'd like to decorate with) I will list what I used below.
INSTRUCTIONS
Glue the DSP front panel by gluing only around the edges and adhering to center of envelope box panel. Take desired die and cut a window in center of panel.
TIP: Fold one flap inward and line up box so the other flap is inside the plate. You don't want to dent it while running through Stampin' Cut & Emboss Machine.
Remove the center panel you just cut. Save for another project.
Add window sheet to the inside of this panel. I recommend Stampin' Seal+ for this.
Glue the side the DSP panels on. Fold on score lines and assemble box.
NOTE: There is a matte side and a shiny side to this box. The matte side should be face up prior to assembly. You can do your stamping on the matte side as well. The "shiny" side is the inside of box or the food safe part of the box.
Adhere the box flaps which already have adhesive tabs.