Thursday, March 24, 2022

LAST CHANCE LIST is here! Shop Retiring Items Before They are Gone!


It's Here!


This is an exciting time! Here is a link with my Host Code: https://www.stampinup.com?hostcode=PCJ7MFAW Get a FREE Embellishment with a $50.00 purchase (before tax).


Monday, March 21, 2022

Paper Pumpkin March 2022 ALTERNATE IDEAS: Beyond the Horizon Card Kit


Here are some alternate cards from the March 2022 Paper Pumpkin Kit

Here are the Cards as Designed by Paper Pumpkin for the March Kit

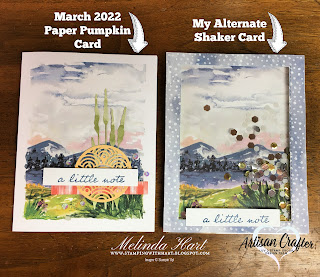
One of my alternates was a very simple modification into a Shaker Card
You can see the similarities between the Paper Pumpkin Card and My Alternate

Here are 3 Alternate Card Ideas Using the BONUS Stamp Set
and the Coordinating Colors from the March Paper Pumpkin Kit

Speaking of the coordinating colors... here is a chart I created
using a stamp from the kit and the colors listed on the instruction sheet
Note: 2 Blues, 2 Greens, 2 Oranges and 1 Yellow (so I added So Saffron so I could also have a second yellow to work with for the two step BONUS Stamp Set)

Even the box is cute! And if you want to see the unboxing and assembly video
that is available as a replay on my Facebook page (Stamping with Hart)

Slimline Alternates! I wanted to create an option where
fussy cutting was not necessary and this is what I came up with!


Bumblebee Floral Alternate Card (Bonus Stamp Set)

Bumblebee/ Misty Moonlight Slimline Alternate Card

Pale Papaya/ Calypso Coral Slimline Alternate Card


In this video tutorial I decided to show a little behind the scenes of my steps to creating alternate cards with Paper Pumpkin kits. It can vary from month to month but there are 3 tips I tend to use with every alternate and it tends to extend the use of your kit:

  • ALTERNATE DESIGN TIP #1: Cut up the envelopes and use patterns as Designer Series Paper
  • ALTERNATE DESIGN TIP #2: Stamp without a plan. Just get a feel for the look of the stamps that come in your kit and this can really help jumpstart ideas
  • ALTERNATE DESIGN TIP #3: Utilize the coordinating colors. So much of my design is because of the color combinations and the coordinating products in those shades that I have on hand. Go for the staples first like ink and cardstock but if you coordinating markers, ribbon, gems... play with those elements and before you know it you'll have alternates.
  • ALTERNATE DESIGN TIP #4: Use a stamp positioning tool (the Stamparatus) to make two step stamping easier... or to make multiples of a card in varying colors. 
When you are starting out with Paper Pumpkin you do not worry about anything other than what comes in the kit. If you are LOVING your kits... if you have started to add products in when you start assembling cards... you are ready for alternate projects.

It's like a craft box challenge every month to get these kits and then see what else I can get out of them or what other ideas I can provide to you so you can really maximize the use and value of your kits.

I hope you enjoyed today's alternate projects! In case you needed measurements for the alternate cards:

THE SLIMLINE CARD
  • Card Base: 8-1/2 x 7 and scored at 3-1/2
  • Basic White Layer: 3 x 7-1/4"
  • Misty Moonlight or Calypso Coral Layer: 3-1/4 x 7-1/2"
THE FLORAL FUSSY CUT FLOWERS CARDS
  • Card Base: 5-1/2 x 8-1/2 and scored at 4-1/4"
  • Stitched Rectangle 1: 2-1/2 x 4
  • Stitched Rectangle 2: 3-1/2 x 4-3/4"

Sunday, March 20, 2022

Thank You Cards for Him


Thank You Cards for Him (Three Ideas)

Today's tutorial is all about a handmade thank you. This is ideal for men or for the nature lover you need to send a heartfelt thank you to. I will be using the Very Vanilla Note Cards and Envelopes for all of the cards today. These are already pre-cut and scored so I will not be listing measurements on the card sizes. The product list is below if you'd like more information on the cards used today.

I used the Stitched Rectangle Dies to cut out the Fluid 100 Watercolor Paper. I also them for the Neutrals 6 x 6 Designer Series Paper. Rectangle Sizes: 2-1/4 x 3-1/2" - 2-5/8 x 4" - 3 x 4-3/8"

This tutorial features the Wildlife Wonder Stamp Set

There are two simple techniques used on these cards. The first is adding ink to the embossing folder before running the cardstock through. The second technique is to color the animals with water painters and re-inker drops in the desired colors. I used Smoky Slate and Soft Suede. The bear that looks more red-brown is Early Espresso.

I recommend the Fluid 100 Watercolor Paper which is safe when coloring with water. I also recommend the Stayz On ink which is a solvent ink and is safe to use with water coloring images. If you do not have watercolor paper I have been told the Shimmery White Cardstock also does well with watercolor. I have not tried it personally. Do not use Basic White. It will curl and/ or warp when water is applied.

I will be using a simple watercolor technique with Water Painters and our Re-Inkers
I will be using the Stayz On Ink which is compatible with water coloring.

If you do not wish to ink your embossing folder I completely understand. The Bark 3D embossing folder looks beautiful without inking as well. If you do want to try the ink, you can press the pad directly onto the folder or transfer ink with a brayer or brush. I just inked the folder with my ink pad. Run it through your Stampin' Cut & Emboss Machine. Use folders 1 and 4 when embossing.

Die cut your watercolor paper and designer series paper pieces as well with the Stitched Rectangle dies.

Stamp your images in Stayz On ink. Use your water painters to color your animals. The more water the softer the look. The less water the more intense the color. An even mix of water and color is pretty much the majority of the color used here and only takes a few minutes. If you want more detail take some of the water from your brush. In some cases, use the full color and don't dilute with water. You can always layer color too so don't be afraid to start lighter and build your color until you are happy.

Assemble your cards. I did use the Foam Adhesive Sheets as essentially one big dimensional on the back of the rectangles with the stamped images.

And you are done! I let the texture of embossing be the star rather than adding additional embellishments. You can go either way and they will look great. This is a clean, simple card look. 

I hope you enjoyed today's tutorial! The product list is below if you'd like more information on what was used today.  

This is the card created in the tutorial. Colors: Mossy Meadow & Soft Suede

Early Espresso Re-Inker (Bear),
Soft Suede Classic Stampin' Pad on the Bark Embossing Folder

Smoky Slate Ink on the Bark Embossing Folder,
Smoky Slate Re-Inker to watercolor the wolf and rock


Tuesday, March 15, 2022

A Hack When You are Learning to Blend Alcohol Markers


Are you a beginner when it comes to using alcohol markers? Do you struggle with shading your images? Today I will be highlighting some common issues or mistakes when using the Stampin' Blends alcohol markers and a workaround to make the learning process of highlight/ shadow easier on your alcohol marker journey. 


If you are experiencing bleeding outside of the lines of your stamp 
or uneven/ muddy blending then this is the blog post for you.
I have a workaround to avoid these issues if you are just learning
about alcohol markers

Pictured: Sweet Little Boxes from Stampin' Up! Decorated in
Three Different Themes: Birthday, Baker/Kitchen and Easter

Instructions below! Video tutorial for strawberry box and written instructions for Easter and What's Cookin' versions.


Create this treat box:

  • Emboss the Sweet Little Box with Ornate Floral 3D Embossing Folder
  • Die cut Granny Apple Green Plaid DSP (from Brights 6 x 6 DSP Pack) with Stitched Rectangle (Size:  )
  • Die cut Tasteful Label in Basic White Cardstock
  • Assemble Treat Box
  • Wrap Real Red Ribbon around the treat box with Tear & Tape Adhesive added to ribbon
  • Place Dimensionals on Stitched Rectangle
  • Stamp outline of strawberry, leaf and stem in Memento Tuxedo Black Ink (full color)
  • Stamp off 2 times and then stamp fill for strawberry, stem and leaf in Memento (it should appear light gray after two stamp offs)
  • Color your strawberry with Stampin' Blends in Poppy Parade Dark/ Light following technique in the video
  • Same with stem and leaf but with Granny Apple Green Stampin' Blends Combo
  • Punch out with the punch from the Sweet Strawberry Bundle
  • Stamp birthday sentiment from Sweet Strawberry onto the Tasteful label die cut to the left in Memento Tuxedo Black (full color)
  • Position strawberry to the right
  • Use Pool Party Light Stampin' Blends to shade around the strawberry on the Tasteful Label Die Cut
  • Glue Tasteful Label Die Cut to Stitched Rectangle
  • Add Dimensional to Strawberry. Glue stem to top of strawberry
  • Place leaf wherever you like. I tucked mine behind the strawberry.
  • Add Real Red Bow with Glue Dot (small bow recommended)
  • Add Gems if desired (I used the From My Heart Faceted Gems in Red)


Create this treat box:

  • Assemble your treat box (adhesive is already on the box flaps)
  • In Memento Tuxedo Black ink, stamp off two times and then stamp the bowl, spook, rolling pin and measuring cups so they appear a soft gray in shade even though its black ink
  • Follow the coloring steps in the video in the following Stampin' Blends shades:
    • Misty Moonlight Light (Shadow area of bowl)
    • Balmy Blue Dark (lighter shade)
    • Misty Moonlight Dark (for the stripe on bowl in darker areas, Misty Moonlight Light)
    • Rolling Pin: Soft Suede Dark and Light and touches of Ivory
    • Gray Granite Light/ Dark and Smoky Slate Light (Smoky Slate in the darkest shadow areas, the Gray Granite Dark as the medium tone and Gray Granite Light for lightest shade)
    • Color Lifter I added this to a few highlight spots on cups and spoon
  • Stamp Happiness is Homemade in Soft Suede ink (used Banner from Tasteful Labels Dies)
  • Die cut your pieces
  • Adhere ribbon to box (this is the Faux Suede ribbon) just like first box
  • Build your pieces - I put Dimensionals on all of the kitchen items and sentiment
  • I used the Brushed Metallic Dots as embellishment in the brownish tone


Create this treat box:

  • Assemble your treat box
  • With Memento Tuxedo Black Ink stamp off two times and then stamp your chicks. I used two of them.
  • Stamp basket weave pattern from Natural Textures Host Stamp Set in Memento ink
  • Following the coloring instruction in the video tutorial with the following shades:
    • Daffodil Delight Combo and a Touch of Pale Papaya Dark as the darkest tone
    • Pumpkin Pie Dark for Beaks and Feet
    • Bronze/ Ivory Combo for the basket
  • Die cut Granny Apple Green Plaid DSP Pattern (same as the strawberry box) from Brights DSP pack in largest die from Tasteful Labels
  • Die cut the basket pattern with the medium size Hexagon die from Beautiful Shapes dies, trim off the top so it looks more like a shaped basket, adhere Polished Pink open weave ribbon, also tie a bow with same ribbon and adhere to basket with a glue dot
  • Fussy cut chicks
  • Stamp sentiment "for you" from the What's Cookin' stamp set on die cut circle from Tasteful Labels dies
  • Put chicks in baskets (I used dimensionals on basket and chicks)
  • Add a piece of Polished Pink ribbon as the handle of the basket. Tuck ribbon out of sight on back of basket. I recommend glue dots or Tear and Tape Adhesive
  • Add gems in Polished Pink (2021-2023 In Color Gems)


Stampin' Blends: Smoky Slate Combo, Granny Apple Green Combo,
Poppy Parade Combo & the Color Lifter to achieve the perfect strawberry... almost

What's Cookin' Bundle is ON SALE! During the month of March 2022
you can get this bundle 20% off and the art on this stamp set 
will work as an effective guide as you learn where to create highlight/ shadow
with your Stampin' Blend alcohol markers.

Thank you so much for stopping by the blog today! I have been taking an alcohol marker class and learning some amazing things. I consider myself new on this journey. I typically do very basic coloring but as I play and learn new techniques I like to share them with you as you go on your alcohol marker/ blending journey.

If I try something that doesn't work. I will share that too and that's what started today's blog post because I couldn't achieve a certain blending technique I had been taught in a way that I felt satisfied.

Like many of you, alcohol marker blending can sometimes be very frustrating especially when we make mistakes or feel like we ruined an image we spent time coloring. While I was playing with this "gray shadow" technique I experienced bad blending, over blending, bleeding outside of the lines and wearing down the tips of my markers.

I knew there had to be an easier way to create shadow as I learn how to create shadows with blending and so I am sharing my "hack" or my "workaround" with you. 

Fill stamps or Distinkive Stamps where the artists have already built in the shading for us but keeping the ink light... but still safe to use with alcohol markers.

Memento Tuxedo Black ink is water based which means it is safe to use with alcohol markers. These two products will not blend into each other or smear or blur like what could happen with other inks. But I didn't want my images to be black. I want it to look like I am an expert colorist. I just want a gray shadow. So, we will stamp off twice and then with a light gray guide we color with our desired marker shades.

In the video tutorial I demonstrate with the Sweet Strawberry Stamp Set. This stamp set is what's called a "two step" stamp set where there is an outline stamp and a fill stamp. Well, if you have several two step stamp sets on hand, try this! You may love it!

I demonstrate both blending with the gray alcohol markers under the red and then the stamped fill image under the red and both can achieve a "shadow" look. You can decide which you like better. I liked the fill stamp shade with the blends better, but again, I am not at an expert alcohol shading level. Like many of you I am learning. So this is my workaround. This is what I wanted to share.

I have a list of products used below that you can click on and purchase if you'd like. I only demonstrate the strawberries online on the video but I have two other samples here on the blog to show this hack works with different sets.

And can we talk about how adorable those Sweet Little Boxes (treat boxes) are??? I'll admit I hadn't used them for Valentine's Day but they are great! So cute. You can even emboss the boxes too. 

I hope you enjoyed my alcohol marker "hack" for creating shadows. Stay tuned for more tips!


Friday, March 11, 2022

How to Make Beautiful Tulip Easter Cards


Today I have a product "mashup" for you. This means I am using more products than usual and I am incorporating more than one stamp set and die set. I will have all of the products linked below.


I will also be talking a little about In Colors today. I recommend you purchase any 2020-2022 In Color products before they retire in end of April/ beginning of May.

In Color Collections have multiple coordinating products
you can choose from such as cardstock, ink, refills, ribbon,
designer series paper, embellishments, markers, etc.
Typically, when the color collection retires so do the coordinating color products.

Today we will be using the 2021-2023 In Color Collection! The good news is these colors are sticking around for another year and they are perfect for your Spring and Easter card designs.

This In Color Collection is perfect for Spring! Today's projects
were designed to show how you can coordinate all of those In Color 
products to make beautiful cards, in this case, for Easter. This color collection is 2021-2023.

In Colors used: Fresh Freesia & Soft Succulent


This card uses Pale Papaya and Evening Evergreen In Colors.


This card uses Soft Succulent and Polished Pink In Colors.


Monday, March 7, 2022

Create Simple Floral Spring Cards in 2022


Today's cards are simple. The first card is a clean layout and the second card incorporates some die cutting, but essentially these cards were designed to stamp in repeat or multiples.

We will be using the Hydrangea Haven Bundle which is a multi-step stamp set. This simply means that the color added to the flower and the leaves are separate stamps.

My #1 recommendation for multi step stamping is to use a stamping tool. Stampin' Up! has the Stamparatus which is an awesome stamp positioning tool to make this process quick and easy.

The Stamparatus comes with two plates and we will be using both of them in today's project.

STAMPARATUS STEPS:
  • Place the full hydrangea stamp on the first plate. I usually place the stamp on the base and pick it up with the plate once its been positioned to stamp where I want on the cardstock
  • Place the hydrangea stamp (the one that will color the image) on top of the stamped hydrangea, position where you'd like it and pick it up with the second plate
  • NOTE: The fill stamps are of a watercolor type design and are not meant to be an exact match to the hydrangea image. Just get it to a place where you are happy with it 
  • Turn the second plate over. Position the leaves fill stamp over the stamped hydrangea until you like the positioning and pick up with the plate
  • I like to mark my scrap paper so if I accidentally lose my place I can reposition the cardstock
  • Make sure you use the black foam mat that comes with your Stamparatus because the hydrangea stamps are photopolymer and the foam pad helps get that perfect crisp image.
CARD MEASUREMENTS:

Card Base: 5-1/2 x 8-1/2 score at 4-1/4"
Layer (Basic White) 4 x 5-1/4"


Simple Cards with Hydrangea Haven Bundle
Hydrangea Haven is on sale - 20% off March 1 -31, 2022


If you haven't heard of the Savings are in Bloom event select items are 20% off from March 1 - 31, 2022. The Mini Stampin' Cut & Emboss Machine is marked down from $60 to $48 and select bundles that are compatible with the Mini are also 20% off including Hydrangea Haven Bundle.

Thank you for spending time with me on the blog today.

I have included my Host Code link with the products listed below. The Host Code is good until 3/20/2022 and when you spend $50 or more (before tax) you will receive a free embellishment from me.

Thank you and happy crafting!


Thursday, March 3, 2022

Easter Card Class Ordering Special: ONE WEEK ONLY!


REPLAY NOW AVAILABLE! 


Easter Friends Cardmaking Class: Get 5 Card Kits when you spend $50.00 (before tax)
with me in the online store. Receive a FREE Gift of the Soft Succulent Open Weave Ribbon
 when you use the Host Code: J9NF9VBE

SHOP WITH HOST CODE: https://www.stampinup.com?hostcode=J9NF9VBE

SHOP THE PRODUCTS OF THIS CLASS BELOW

WHAT YOU GET WITH THE ORDERING SPECIAL:

When you place a $50.00 or more order (before tax) with me in the online store using Host Code J9NF9VBE between March 3-10, 2022, you will receive:
  • 5 Card Kits (picture shown before) 
    • Note: If you are new to card kits it means I cut and score the card bases for you and the layering Designer Series Paper and Die Cuts and pack it up with envelopes and mail it to you just as you see in the picture below. You do the stamping, coloring optional and gluing of your cards
  • PDF Tutorial with Measurements and Instructions PLUS a detailed breakdown on the 3D fur coloring technique using Stampin' Blends Alcohol Markers
  • Video Replay Tutorial Link 
  • FREE Gift! When you use the Host Code during the Ordering Special I will include a bolt of the Soft Succulent Open Weave Ribbon which was used on the cards in this class

The 5 Card Kits you will receive when you place your order during the Ordering Special


Card 1 of 5

A Look at the Inside of the Card

Card 2 of 5

Card 3 of 5

Card 4 of 5
Alternate Ribbon Option

Card 5 of 5, Layout 2


Tuesday, March 1, 2022

Simple Fun Fold Card for the Sports Fan


Welcome! Today's blog is about easy to make fun fold cards for him or for the sports fans in your life! I am using the Hey Sports Fan Suite today and the coordinating colors for the suite in inks and cardstock. I'll list those below.


One Fun Fold: 5 Card Layout Ideas!


CARD MEASUREMENTS:

4-1/4 x 11" Cardstock (cut one sheet of 8-1/2 x 11 cardstock in half)
  • Trim off 1-3/4" *This becomes the extra "fun" piece of the card*
  • Score the card base at 1-7/8" at each end of the card
  • Cut Designer Series Paper to 1-5/8 x 4 (you will need 2 of these)
  • Cut Designer Series Paper to 1-1/2 x 4 (for the "extra panel you trimmed off first)
  • Cut Very Vanilla or Basic White piece for the inside of card to 4 x 5-1/4"
  • Die cut some of the tickets from the Designer Series Paper that coordinates with the ticket dies in the Hey Sports Fan suite. You can use these to add some character and fun to your cards without doing a ton of detail work. Keeps the layout simple but the die cuts really pop! 
  • Finish with those Resin Star embellishments! For the guys *the dads, the birthday boys, etc" less is more I think

Evening Evergreen Cardstock & Ink with Coordinating Designer Series Paper

Night of Navy Cardstock & Ink with Coordinating Designer Series Paper

Bumblebee Cardstock & Ink with Coordinating Designer Series Paper

Poppy Parade Cardstock & Ink with Coordinating Designer Series Paper


SHOP WITH ME! Here are the product links if you are interested in re-creating these cards!

My 2024-2026 In Color Club Starts May 1st! IMPORTANT CHANGES!

Questions? Email me: stampingwithhart@gmail.com