If you have been to your local grocery store then you may have already started seeing the displays of stuffing, turkey broth and cranberries like I have. And it's gotten to me!
Here is my first Thanksgiving card ideas of the 2021 season and yes, it is only two days before Halloween but crafters are always planning (slightly) ahead right?
PRODUCTS USED:
What's Cookin' Dies
Words Wishes Dies
Sahara Sand, Basic White and Basic Black Cardstock
Brushed Metallic Cardstock
Memento Tuxedo Black Ink
Stampin' Blends: Poppy Parade Light, Old Olive Light and Crumb Cake Light
Paper Trimmer
Stampin' Cut & Emboss Machine
Banners Pick a Punch
Stampin' Seal+
Fine Tip Glue Pen
Round and Square Brads (Black Square Brad)
Take Your Pick Tool
CARD MEASUREMENTS:
Card Base: 5-1/2 x 8-1/2" scored at 4-1/4"
Outside and Inside Card Layer (Basic White): 4 x 5-1/4" (You need two of these)
Basic Black Banner: 1 x 4-1/4" and on the live Pumpkin Pie Banner: 1 x 4-1/8"
NOTE: I discovered when the banner was at 4-1/4" it went slightly off of the card so the reduced it to 4-1/8" on the livestream.
All of the Cookin' Dies and the Thanksgiving Word Die Cuts were in the Brushed Metallic Cardstock (gold).
INSTRUCTIONS:
Take the trio of vegetables stamp (tomato, celery and mushroom) and stamp them all around the border of the Basic White cardstock layer in Memento Tuxedo Black Ink. Color the tomatoes with Stampin' Blend Poppy Parade Light, Mushroom in Crumb Cake (I only added a hint of color where the shading was on the stamp so the mushrooms still looked white with a hint of color) and then the celery in Old Olive Light. I did not do any special blending. I kept the coloring simple.
One of the incredible aspects of the "Distinkive" stamp line is all of the detail and shading already added to the images. If you prefer not to color in the images they will still look amazing. I would only recommend the Memento ink if you plan to shade with alcohol markers. This is ensure the ink doesn't bleed.
Die cut your pieces in Brushed Metallic Cardstock. I chose the gold sheet.
Once your pieces are die cut, use your Take Your Pick tool (the sharp pokey edge) to pierce a hole into the Basic White Layer where you'd like your Cutting Board and Kitchen Utensils to hang. I chose just under the stamped frame of veggies as if the utensils and cutting board were hanging on a kitchen wall.
I did them one at a time meaning I pierced the center hole first and then added the square brad to secure the cutting board before piercing the second hole. I'd do the same thing, secure the utensil with the brad and then pierce the third hole, etc. You could pierce them all at once but I was just eyeballing the die cut placement. I didn't have official measurements so that is entirely up to you.
Stamp your inside sentiment. I chose "Sending You a Dash of Kindness..." and then stamped the trio of veggies right next to the sentiment and colored those with the same Stampin' Blends as well.
PLAYING WITH THE BUNDLE
I did not get a chance to fully dive into this bundle yet but I did at least get a chance to stamp each image in Crumb Cake and then stamped them in Memento Tuxedo Black Ink and then die cut the pieces. I wanted to show you what the images look like without any coloring. Are they absolutely incredible? I LOVE this set. There are so many wonderful things to create with this bundle. This is in the 2021-2022 Annual Catalog from Stampin' Up! and when you purchase the bundle you can save 10%.
Stamped Images in Crumb Cake Ink and Die Cut with Coordinating Dies
The What's Cookin' Bundle can be found on Page 34 in the Stampin' Up! Annual Catalog 2021-2022 (or click the shop link above for shortcut to online store)
I hope you enjoyed this card project. One question I asked on my Facebook Live that I would also like to ask you: DO YOU WANT TO SEE MORE IDEAS FOR THANKSGIVING?
I would love to know if you create any handmade cards, treat boxes, favors, bags, any tablescape pieces like name cards or place holders? Do you make invitations or recipe cards for holiday parties or gatherings? If there is anything you'd like to see let me know. I want to be sure you are getting the inspiration you'd like during the holidays. There is no wrong answer. If you prefer to jump into Christmas let me know!
HOST CODE:
My Host Code expires on 10/31/21. There are still a few days left to get a free embellishment from me if you spend $50 or more with me before tax in the online store. Enter this code at checkout and it is how I will know to send you your gift: 4MFA2P3N
EMAIL LIST:
I am going to be announcing two really fun things on November 1st! My email list is the first place I share all new classes, events, products, promotions, Facebook Live card previews, etc. If you haven't already signed up I'd love to have you join the list. You can sign up for emails here: https://lp.constantcontactpages.com/su/GLk7fdL
STARTER KIT:
One thing I've decided to do is make sure I provide information regarding the Starter Kit in every blog post. If you love Stampin' Up! and spend regularly you should know the Starter Kit is the best deal Stampin' Up! has to offer. You save $26.00 on product. The value is $125 - you choose the products you want - and only spend $99.00. You get FREE Shipping which another great savings! And, no, you are not required to sell. The majority of Stampin' Up! demonstrators are "hobby" which means they enjoy the discounts, first access to catalogs, products and preorders and demonstrators are part of a community of crafters who regularly share creative ideas and inspiration. If you have any questions about the Starter Kit I'm happy to help. You can email me: stampingwithhart@gmail.com
I'm back with the background stamping! This time we are stamping various background ideas using the Penguin Place Stamp Set.
Three backgrounds stamped using Penguin Place Stamp Set from Stampin' Up!
What I wanted to show with this video and demonstration were three different options from very simple backgrounds to multi-stamp, multi color backgrounds. A stamp set like Penguin Place where you can easily build characters and scenes are perfect, in my opinion, for creating fun backgrounds. Some call it creating our own Designer Series Paper only I stamped it on 6 x 6 Basic White Cardstock.
The size of the cardstock you use is up to you and it's a perfect way to use up scrap pieces as well.
Stampin' Up! had created Designer Series Paper to coordinate with this bundle during Saleabration but when that promotion ended that paper was no longer available. Don't stress because you will be able to make adorable patterns on your own and it is not difficult at all. If you want to keep it very basic, start just with one stamp and over time you can create more elaborate backgrounds.
A FEW TIPS for Stamping Backgrounds with Photopolymer Stamps (see through clear stamps):
1.) FOAM PAD or MAT - I recommend using a foam pad which creates a nice cushion to ensure perfectly stamped images each time. If you are using this type of stamp and aren't getting even stamping or full images, adding that cushion may solve your issue. I used the foam pad that comes with Stamparatus. It's a go-to for me.
2.) DETAILS and WELL INKED PADS - The details on a photopolymer stamp can have etching as thin or delicate as a strand of hair so if you press it onto an ink pad that is very juicy or over-inked you can lose the details (like the bow on the present stamp or the reflective parts of the balloon stamp) and did this to me during the demonstration. If you look closely on the pictures you will see where a few balloons did not stamp with the reflective parts. Tap lightly on the ink pad, don't press hard. You can use a bone folder or credit card and run it over the top of the ink pad to redistribute the ink or even stamp off. I personally like to use Stampin' Spots (from Paper Pumpkin kits) because they aren't as inky as some of my full size ink pads.
3.) SIMPLY SHAMMY - Have a quick cleaner on hand if you are using the same stamp with multiple colors. This will make the process go much faster. I love the Simply Shammy! It's always on my table.
Simple Background: One stamp (snowflake cluster) , One theme (Winter), One Ink (Balmy Blue)
Two stamps: Balloon and Happy Birthday 5 Colors: Soft Seaform, Balmy Blue, Fresh Freesia, Just Jade Calypso Coral 1 Marker (Stampin' Write Black), Birthday Theme
I hope you enjoyed today's blog! Here are the completed cards I created using the backgrounds.
Before I wrap up here are a few links in case you'd like to shop with me, use my current Host Code or purchase the Starter Kit!
Host Code: When you spend $50 or more (before tax) with me listed as your demonstrator in the online store between October 7-31, 2021, use this code at checkout and you will receive a free embellishment from me. Your order will ship from Stampin' Up! Your Host Code gift will ship from me.
This is the best deal Stampin' Up! has to offer and if you love what you see on this blog, if you love Stampin' Up! products and are spending regularly, consider the starter kit. It's like being a VIP. First access to catalogs, new products, preorders, get discounts and be a part of a fun, crafty community. Get inspired! And save! FREE SHIPPING and a $26 discount on your starter kit products. Value: $125, you pay $99. During the holidays if you appreciate a good deal... this is it! And if you have questions I am happy to help. The #1 question: Do I have to sell if I sign up? No, you do not. I will never pressure someone to sell. Enjoy the discount and perks as a hobby shopper. If it isn't for you then you can go back to being a customer.
Hello and welcome! I was slightly late getting this posted but here we go! I tried doing a Facebook Live yesterday but technical difficulties got the better of me so I pre-recorded this to make it easier to watch in time for the weekend!
Before I get into it, I have a HOST CODE and I want you to know that when you spend $50 or more (before tax) in the online store with me listed as the demonstrator I will send a FREE Embellishment. This offer is from me and is good between October 7-31, 2021. The products you order from Stampin' Up! will come from them and the Host Code gift will be shipped from me. Be sure to use this code at checkout in the online store so I know to send you your gift. HOST CODE: 4MFA2P3N
The October 2021 Paper Pumpkin Kit: Peaceful Christmas, in my opinion, perfectly captures Christmas and here are some fun alternate ideas for you.
I am using the 3-1/8 x 3-1/8" Clear Acetate Boxes and creating belly bands as well as 3 x 3 card ideas that will fit inside the box for adorable stocking stuffers, mini gifts and favors - possibly at your Christmas cardmaking Paper Pumpkin party!
What will fit in these boxes? Tea Bags, Jewelry, monetary gifts, candy, cookies, treats and cute compact crafts (like Stampin' Spots) of course!
These are projects that are perfect for scraps and you can really maximize the use of your kits.
The coordinating colors were used on the projects: Real Red, Basic Gray and Shaded Spruce (with Silver accents).
For the 3 x 3 Cards:
If using cardstock, cut a piece 3 x 6 and score at 3 inches. If using card bases in the Paper Pumpkin kit but cutting to 3 x 3, I suggest using the score line at the 3 inch mark and trim. Turn card base until your card is 3 x 6 and your score line will already be at the 3 inch mark.
For the layering piece: 2-3/4 x 2-3/4"
Have fun combining the embellishments you like best from the kit!
3 x 3 Mini Cards and Envelopes - This kit has stamps and die cuts the perfect sizing for mini cards and treat boxes
For the Acetate Card Box Belly Bands:
I used the card bases from the kit which measure 8-1/2" in length.
Pictured below, two different size bands (2 inches & 1-1/2")
Cut the width to the size you prefer. Leave the length at 8-1/2.
SCORE at 2-1/8, 3, 6-1/8 and 7 inches
There will be an extra score line from the card base being pre-scored. You can either cover it entirely with a layer or cover partially with embellishments. Nobody will notice, in my opinion, but if you prefer to cover it entirely I do show an option for that as well.
Here are the clear acetate boxes with Belly Bands using the Paper Pumpkin kit
So many possibilities! You can get many belly bands and mini cards even with just one Paper Pumpkin box
I hope you enjoyed today's blog.
SIGN UP FOR PAPER PUMPKIN! If you are new to Paper Pumpkin it is a monthly subscription box from Stampin' Up! Each month is a different theme, colors, etc. Each kit is all-inclusive meaning you have what you need inside each box to make the projects as designed by Paper Pumpkin, or you can go outside of the box and create fun alternate card, treat or miscellaneous treat projects!
This is the best deal Stampin' Up! has to offer and if you love what you see on this blog, if you love Stampin' Up! products and are spending regularly, consider the starter kit. It's like being a VIP. First access to catalogs, new products, preorders, get discounts and be a part of fun, crafty community. Get inspired! And save! FREE SHIPPING and a $26 discount on your starter kit products. Value: $125, you pay $99. During the holidays if you appreciate a good deal... this is it! And if you have questions I am happy to help. The number 1 question: Do I have to sell if I sign up? No, you do not. I will never pressure someone to sell. Enjoy the discount and perks as a hobby shopper. If it isn't for you then you can go back to being a customer.
Stampin' Up! has announced a 24 Hour Stamp Sale is happening tomorrow on select stamp sets! This is exciting and a great opportunity to shop sets you've had your eye on or even for someone else you know loves to stamp as much as you do!
Shop here at Midnight Mountain Time and just in case you don't know I have a HOST CODE! When you spend $50 or more with me in the online store between October 7-31, 2021
How to use a Host Code: when you shop with me in the Online Store (make sure Melinda Hart is listed as the demonstrator). Add items to your online cart and when you follow the steps to check out there will be an option to add a Host Code. Use the Host Code above and I will know you send you your gift. The Host Code embellishment ships from me to you, not from Stampin' Up! Just to be clear. Your Stampin' Up! order will ship to you. The host code gift will ship from me. It's my thank you this month.
Remember, this sale is only 24 hours and items can go quickly so happy shopping and I'm here if you have questions! stampingwithhart@gmail.com
It's halfway through October so if you still need some last minute Halloween packaging ideas I have them for you!
Festive and Bright + Ombre Gift Bags + Tailored Tags will get you some WOW results! Also, grab that Stamparatus. It's your best friend for this project and, well, if you like to follow me. I use it all of the time.
Last week on my live I was pleasantly surprised by how well the Ombre Gift Bags heat embossed so I decided to give another go using Festive & Bright. I used the Bundle but you can also just use the stamp set.
Festive & Bright is my favorite bundle in the holiday catalog (aka the Mini July to December 2021 Catalog from Stampin' Up!) It is so unique and it covers multiple holidays and occasions. I like sets that do multiple things. I also like to stamp in repeat - - a lot. (Hence, the Stamparatus)
PRODUCTS USED ON THESE GIFT BAGS:
Ombre Gift Bags*
Festive & Bright Bundle*
Frightfully Cute Bundle
Cutest Halloween Stamp Set
Tailor Made Tags Dies*
Stamparatus*
Black Glitter Paper*
Gingham Ribbon (Black & White / Bumblebee)*
2021-2023 In Color Ribbon: Pale Papaya & Evening Evergreen
Stampin' Cut & Emboss Machine*
Starred items were used on almost or every bag.
SHOP WITH ME! I have a Host Code and when you shop online with me as your demonstrator and spend $50 before tax you will receive a FREE EMBELLISHMENT from me between October 7-31, 2021. Use this HOST CODE 4MFA2P3N at Checkout so I know to send you the embellishment. Expires 10/31/2021.
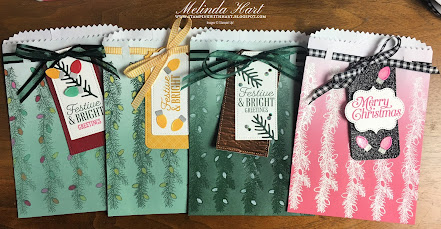
Here are some photos of the Ombre Gift Bags to give you lots of ideas and options. I may have added something here or there from another set but overall you will need: Stamparatus, Ombre Gift Bags, Festive & Bright Bundle and Tailored Tags.
Polished Pink Ombre Gift Bag Perfectly Plaid Sentiment Stamp/ Polished Pink Ink White Heat Emboss Powder Black Glitter Paper Stampin' Blends in Smoky Slate Light & Polished Pink Light Color Lifter
Pale Papaya Ombre Gift Bag Black Heat Emboss Festive & Bright Background Stamping Tailor Made Tags: Black Glitter Paper & Basic White Witches Hat and Sentiment are from Frightfully Cute Cute Stars Adhesive Backed Sequins
Soft Succulent Ombre Gift Bag Festive & Bright Garland Stamped in Evening Evergreen Mango Melody Light/Dark and Smoky Slate Light Stampin' Blends for Bulbs Bumblebee Gingham Ribbon, Bumblebee 6 x 6 DSP
Soft Succulent Ombre Gift Bag Evening Evergreen Stamped Garland, Ribbon and Die Cut Branch Stampin' Blends for Bulb Shading: Real Red, Bermuda Bay, Mango Melody, Polished Pink, Pumpkin Pie
Pale Papaya Ombre Gift Bag Gingham Ribbon Festive & Bright Background Garland in Memento Tuxedo Black Stampin' Blends: Pumpkin Pie, Blackberry Bliss, Basic Black Tailor Made Tags Dies in Black Glitter Paper & Basic White Sentiment from Cutest Halloween Witch from Frightfully Cute
Evening Evergreen Ombre Gift Bag Evening Evergreen Ink, Ribbon, Branches and Gems Clear Heat Emboss Garland Festive & Bright/ Sentiment Brushed Metallic Cardstock Embossed with Bark 3D Embossing Folder
Fresh Freeshia Ombre Gift Bag Cute Halloween Bundle Ghosts are from the Festive & Bright Bundle Gray Granite Ribbon Black Glitter Paper and Basic White Tailor Made Tags Dies
ABOUT THE MAKING OF THE GIFT BAGS
I wanted ink stamped images and heat embossed images so you could decide what you'd like to try. I also colored some of the images with Stampin' Blends and left others just stamped or heat embossed, to give options there as well. Both are adorable!
Personally, I like to add a specialty element when I can so with Tailor Made Tags Dies I used the Black Glitter Paper for the larger tag and also the Brushed Metallic Cardstock on a Large Tag.
The ribbon I liked best was the Gingham (Black and White or Bumblebee) but the 2021-2023 In Color Ribbon *that perfectly matches the Ombre Gift Bags* were also fantastic with these projects.
If you are part of an "In Color Club" and you aren't using your bags or inks or ribbons, get them out because this is the perfect project! And even if you don't need a gift bag, this is also perfect for a card layout.
You can decide how simple or how advanced you'd like your gift bags to be. I think the die cuts from Festive & Bright are SO SWEET and SO PERFECT on the tags. Between those vintage lights, the ghost and the branch, it couldn't be more perfect.
I did incorporate an exacto knife or craft knife to make small slits in the gift bag so I could slide the ribbon through. This is an optional step. You may not want ribbon all the way around. Maybe you just want an accent or bow. I like to give options and I wanted to thread my ribbon in to the top of the bag.
Place a ruler across your gift bag and cut at the 3/4 and 1 inch mark. Also cut at 3-3/4 and 4 inch marks. Press down but be careful not to rip the bag. It should penetrate the front and back of bag but if not you can cut the marks on the back as well. I chose to hold up my bag to make sure I did not re cut the front. I just followed the impression with the craft knife and it sliced easily. See video for instructions.
Thread your ribbon through the back and front grooves. You want your ends in the front so you can add tags and tie your bow. I used anywhere from 28-32 inches of ribbon. You can decide how big you want your bow/ tails.
TIP: You can test opening your gift bag. The ribbon shouldn't affect your ability to put anything in it and when tying your ribbon just be mindful of not tying bow too tight. You do not want to curl in the edges of the bag.
TIP: If you color with the Stampin' Blends place a piece of scrap cardstock inside the bag first so your blends don't bleed through the back of the bag.
TIP: If you you heat emboss your bag be sure to use your anti static tool. I stamped two garlands, heat embossed, then the other three. I used the Versa Mark ink for the heat embossing with the "Basics" pack (black and white heat embossing).
I hope you enjoyed these gift bag ideas! Thank you so much for spending time here on the blog with me.
THE STARTER KIT
Stampin' Up! offers an incredible deal when you purchase the starter kit. $26 in savings and FREE SHIPPING! You choose $125 in product, pay only $99 and that's just the beginning of the fun. As a demonstrator you get first access to catalogs, new products and preorders! You get to join an amazing crafting community and you do not have to sell. You will enjoy a 20% discount and gets lots of inspiration. If you love a great savings or want to get the biggest bang for your buck I suggest this option. If you have questions I am happy to answer them. Contact me anytime: stampingwithhart@gmail.com.
This past Thursday I had created a bunch of watercolor angels when I was experimenting with the watercolor pencils. An idea popped in my head to create a sentiment background for my leftover angels after the last tutorial.
The For Unto Us Stamp Set has one theme. All of the stamps are sentiments (with the exception of a star stamp) and it perfectly compliments the Angels of Peace Stamp Set.
I decided to get out the Stamparatus, arrange the sentiments from For Unto Us and I even added a few from Angels of Peace to create a background pattern I could stamp again and again.
This is my layout if you like to have the same layout.
You may notice one of the stamps is positioned sideways. I think it's like a puzzle. I like that it is visually interesting but if you prefer just one sentiment all across a page or just in one direction you can absolutely do that. I recommend grabbing a few of your favorite sheets of Designer Series Paper that have words as the background and check out what their artists have done. You can get so many layout ideas from your favorite paper stash!
Heat Emboss Powders in White, Black and Clear on Melon Mambo,
Basic White and Daffodil Delight Cardstock
Every time I start making Christmas cards I want to heat emboss. They just go hand in hand for me. Stampin' Up! has a few options available. Two different variety packs. Black, White and Clear in one set and Metallics (Copper, Gold and Silver) in the other set. Stampin' Up! also has a heat tool available too.
Use this Host Code at checkout: 4MFA2P3N and you will receive a FREE embellishment from me if you shop from October 7-31, 2021.
If you haven't already tried heat embossing this is such a fun technique and gives such a fantastic look to your cards. The shine, the raised emboss pattern will catch the eye of your card recipient.
You can heat emboss the Ombre Gift Bags too! And with the Stamparatus you can stamp right to the edge with a professional look and finish! The Soft Succulent bag is more subtle with the Clear Heat Emboss and the Evening Evergreen stands out with the White Heat Embossing.
And just in case you wanted to try heat embossing on the Brushed Metallic cardstock... it also turns out beautifully!
Bermuda Bay Cardstock and Angel with Clear Heat Embossing
Daffodil Delight Cardstock and Angel with Clear Heat Emboss
Real Red inked edges with Sponge Dauber and Melon Mambo Cardstock and Angel
Old Olive Ink Shading with the Sponge Dauber Around Edges
STARTER KIT INFORMATION
What is the Starter Kit: https://www.stampinup.com/join?demoid=2212777This is best deal Stampin' Up! has to offer. When you join you get to put together $125 worth of products (your choice, you customize your kit) but you only pay $99. That's $26 in savings! In addition, you get FREE SHIPPING on the Starter Kit. You will enjoy a 20% discount on your purchases as a demonstrator and there is no requirement to sell. Many of our demonstrators are "hobby" demonstrators where they enjoy the discount, first access to catalog launches, new products and preorders. There is a community where you can share cards and project ideas. It's so much fun! This is a good option to consider if you like a great deal or if you are regularly spending $100 or more on orders. If you have any questions I'm happy to answer them for you. You can email me: stampingwithhart@gmail.com. If you do not wish to continue as a demonstrator you can go back to being a regular customer. If you are someone who is interested in the business side of Stampin' Up! I am too! And I'll be happy to share more about that aspect but if only if you'd like to hear more. I will not pressure anyone to sell! I hope that helps!
EMAIL LIST
Don't miss a thing! When you sign up for my email list you will be the first to hear about new classes, events, Facebook Live project previews and more. https://lp.constantcontactpages.com/su/GLk7fdL
Thank you for spending time with me on the blog today! I hope you enjoyed this idea and find it helpful as you plan your Christmas cards this season! Please leave a comment if you have time. I love to hear from you! Have a great day!
When I play with a new product I like to test the shades even if I know what they look like in the cardstock and ink. I knew I wanted to try the angel in each of the colors and create a card series.
The main thing I want to say here is that I had not done a ton of research. I just got the pencils out and started coloring. I watched the first video on YouTube and thought, I just want to play. And so that's what I did.
I did two different looks with the dress.
FULL color gowns - where I colored in every inch of the dress
Outline color - where I literally traced the lines of the stamped image and then activated the lines with water for a soft, watercolor look
I loved both looks. Daffodil Delight in full color is beautiful and bold. When I think of an angel I think of bold color or emotion, like something that commands your attention but it is just breathtaking.
The softness of just the outlined dresses is what I think of when I see watercolor, more of a diluted soft wash. Ethereal almost which is how most angels are portrayed in decor or imagery today.
A few tips:
Of the three water painters (each brush is a different size, large, medium and small) I felt I had most control coloring the dresses with the middle brush. I liked the small brush for the delicate and smaller sections like the hair, face, hand and dove. The largest brush, in my opinion, is more suited for creating a watercolor background or wash. I thought it too bulky for the angels. I'd say play with all three brushes and see what you like best.
I mixed Calypso Coral and Daffodil Delight to make a peachy color for the skin tone. You have a lot of blending ability with watercolor. I feel like so many things crafters do set right away. Watercoloring is very relaxing if you are in the mood to blend.
Watercolor paper - I used the Water Color paper Stampin' Up! has in the annual catalog but I've heard the Shimmery White Cardstock is also a good option for this technique.
Full disclosure: I didn't have the right ink when I did my live but I made it work. Use a permanent, archival ink like Stayz On or you can heat emboss too. That will ensure ink does not smear with water painters. Do not use water based ink and even though I mostly got away with Memento ink, just know it is not ideal and did bleed slightly. A workaround is not to color directly on the stamped lines. Color around them and shade next to or around them and just blend the watercolor pencil.
Layering is a pretty look. You can let an image dry and go back in to do additional shading. I haven't played too much with this but I've seen some pretty gorgeous samples done this way. If you are into fine detail shading you will love that look.
The less water the more bold the color. The more water the softer or washed out it looks.
Go for damp to wet when you push the water onto your painter brush heads. If its dripping or sopping wet its too wet. Dab it off before returning to your project unless you are going for that look.
The more pressure you apply to your pencil the more defined the line remains even when you color it with water. It blends but is still also a defined line. The less pressure you'd never know it was a pencil before paint, honestly.
The whole time I worked and played with these pencils I thought of my son. He hasn't tried them yet but it has that wow factor and magic like change kids adore! I think this would be a really fun craft or art project to do with your children or grandchildren. If you are a teacher this would be great for your students! Let's be real. Teachers are a step ahead and probably already have these in class!
NEW HOST CODE:
From October 7-31, 2021 when you spend $50 or more with me in the online store you will receive a FREE embellishment from me. 4MFA2P3N
JOIN: There are many benefits to purchasing the Starter Kit and I will always mention it because its the best deal but in addition to picking whatever items you'd like in your kit, free shipping $26 off the price, you get first access to catalogs, new product launches and preorders. This means you get to shop the goodies before customers do! There's so much inspiration to be shared as a Luvly Stamper! You also get 20% off purchases as an active demonstrator. If you ever have questions about this I'm happy to talk with you about it. If you are really interested but just feel unsure, you never know until you try it. If you decide you want to go back to being a customer you just cycle out. Nothing bad happens. It's such a great opportunity but I know things that are new can seem intimidating or scary. It's really not. I'm so happy I decided to purchase the starter kit when I did and even though its a big savings, for me it was a big purchase. I understand that side of it too but there is so much value in the Starter Kit. I highly recommend it.
EMAIL LIST: I always recommend you join my email list and for many reasons. It's the first place I announce everything new Stamping with Hart/ Stampin' Up!. When Facebook went down the other day, my backup to reach all of you was my email. I was still able to communicate. With technology things happen but this way we have direct way to communicate. I share all new events, classes, Facebook Live project previews, Host Codes, new product launches and more. Lots of fun and lots to share there!