Scary Cute Bundle + Window Wishes Bundle Gingham Cottage DSP in Pumpkin Pie
Card Measurements:
Slimline Card Size: 7 x 8-1/2" Score at 3-1/2"
Designer Series Paper Layer: 3-1/2 x 8-1/2" (Gingham Cottage DSP)
3 Die Cut Window Frames
7 or 8 Die Cut Bats
Banner Sentiment in Basic White from Scary Cute Bundle
This card has some die cutting to it today. Cut 3 windows into the DSP layer. Cut 3 window frames out of Basic Black DSP and layer over the window panels in the DSP.
TIP:
Use the Stamparatus for the Scary Cute stamps if you have one! You can line everything up, stamp three images at once and stamp in repeat until you get the desired silhouette for your trick or treaters. I like a really crisp, black silhouette so I stamped 3 or 4 times.
You can see all of the details on my video tutorial above or in the project sheet!
FOR THE CHRISTMAS CARD VERSION
Family & Friends Stamp Set + Window Wishes Bundle Gingham Cottage DSP in Real Red
Same measurements and layout but we are swapping out Scary Cute for the Family & Friends Stamp Set. This creates beautiful Christmas scenes, perfect for a window card!
I chose to color this version with a variety of bright colored Stampin' Blends for the light strands. Traditional Christmas colors for their outfits and trees.
In this version we are using Real Red Gingham Cottage DSP and Basic White window frames.
I have a product list below. My Host Code for September is linked to the products but just a reminder the September Host Code expires on September 30, 2022.
Hello! It's my FAVORITE time of the month and if you subscribe to Paper Pumpkin I bet it's yours too! This month's kit is starting to arrive at everyone's doorstep or mailbox and we are all starting to play and create with our kits!
Pictured: Alternate AND original Paper Pumpkin Treat Boxes September 2022 Paper Pumpkin Kit: Spooky Treats
Every month I feature ALTERNATE PROJECTS to give Paper Pumpkin subscribers additional ideas as to how to use not only the consumable parts of the kits (the paper, the adhesive and die cuts) but also fun ways to use the exclusive stamps in every month's kit.
I am absolutely passionate about Paper Pumpkin because it's fun, its easy, it's budget friendly and there's always an element of surprise. I see each month's box as a craft challenge: what else can I make from this in addition to the super cute projects the Paper Pumpkin team created?
Before we dive into the alternate ideas today, have you signed up for the October kit yet? It's called the "Ho Ho Ho" kit and it has a coordinating kit coming in November! October's kit will be card projects. November's kit will be coordinating gift tags. Get into the Christmas spirit with Paper Pumpkin! Sign up today! Deadline for the October kit is 10.10.2022. Click here to sign up or learn more: https://www.paperpumpkin.com/en-us/sign-up/?demoid=2212777
Ok, let's talk about alternates for September's kit!
ALTERNATE #1 - Embossing the Treat Box
ALTERNATE Products you need:
Charming Landscapes Embossing Folder (The Town Scene)
Smoky Slate (or any gray) ink
Basic Black Cardstock
Basic White Cardstock
Scary Silhouette Dies (The Haunted House in black, Moon and Banner Dies in white)
Scary Cute Stamp Set ("Say Boo and Scary On") sentiment stamp
Stampin' Cut & Emboss Machine (Regular or Mini will do)
PAPER PUMPKIN Pieces you need:
Black Base Box
Fresh Freesia Wrap Piece for Box
Adhesive Stars (Large and Small)
Ghose Die Cut
Tear & Tape Adhesive
Mini Dimsensionals
INSTRUCTIONS
Ink the side of the folder with the Stampin' Up Logo in Smoky Slate ink. Place the Fresh Freesia Box Wrapper in the folder. Close. Run through Stampin' Cut & Emboss Machine. Place wrapper around the box and adhere with Tear and Tape.
To decorate your box, glue the haunted house die cut *using Basic Black cardstock for the house* to the banner after you've stamped your sentiment in gray. Place on dimensionals on lower left side of treat box front. Take the ghost on dimensionals and place upper right covering the Christmas tree and candy cane. Add moon die cut top left. Place several stars around the scene.
ALTERNATE #2 - Window Scene, Plaid Wrapper
ALTERNATE PRODUCTS you need:
Scary Silhouette Dies (Frame and coordinating Tree Detail Die)
Basic Black Cardstock
Window Sheet (Size: 3 x 2-1/2")
Memento Tuxedo Black Ink
PAPER PUMPKIN Kit Pieces You Need:
Orange Box Base
Plaid Wrapper
Happy Halloween Stamp
Fresh Freesia Rectangle Sentiment Die Cut (for stamp)
Mini Dimensionals
Tear and Tape
INSTRUCTIONS
Die cut the tree scene into the 2-1/2 inch (inner panel) on the wrapper. Make sure it's within the score lines.
Take the detail die and the coordinating frame with a separate piece of basic black cardstock and run through the Stampin' Die Cut & Emboss Machine. By running both dies through together at the same time you are cutting the frame out with the tree scene. The inner die only cuts into paper. The outer frame cuts the piece out. This will create a frame you can glue over the panel that has the trees cut in. That is how you get the window into your treat box.
Add Tear and Tape to the back four corners of the tree scene. Add a couple of adhesive dots to the branches where you won't see them on the other side. Remove backing from adhesive and press the window sheet down.
Flip the panel and warm up score lines.
OPTIONAL: Stamp the base of the inside box with black ink and either stars or bats. Assemble box. Wrap the wrapper around it and glue with Tear and Tape.
Stamp Happy Halloween onto the Fresh Freesia rectangle die cut. It is long and thin to match the stamp. Place on mini Dimensionals and add to bottom of the box front.
ALTERNATE #3: Making Use of the Stamp Set with Peek-a-Boo Treat Bags
Craft Brown & White Peek-a-Boo Bag Options
ALTERNATE Products you will need:
Peek-a-Boo Treat Bags
Basics Embossing Powders (Black, White, Clear)
Embossing Buddy
VersaMark Ink
Heat Tool
Glitter Washi Tape in Orange and Black
Beautiful Shapes Dies Hexagons (1-3/4 and 2" size hexagons)
Basic White Cardstock
Pumpkin Pie Cardstock
Pumpkin Pie Ink
Memento Tuxedo Black Ink
PAPER PUMPKIN Products you will need:
Bats stamp (for white bag)
Spider and Web stamps (for craft brown bag)
Trick or Treat stamp (for white bag)
Enjoy This Spooky Treat stamp (for craft brown bag)
Circle Die Cut from the Kit
INSTRUCTIONS
Use Embossing Buddy to run over the treat bags prior to stamping with VersaMark. This prevents the powder from sticking anywhere other than the inked images.
Stamp in VersaMark ink on the paper parts of the bag. Create an up down pattern with the webs so you have room between them to stamp some spiders, but stamp all webs first. Use white heat emboss powder. Set with Heat Tool. Then stamp spiders in VersaMark. Cover with black emboss powder. Heat set.
For the bag with the bats it's just the one stamp and black emboss powder.
Stamp Enjoy This Spooky Treat in Memento Tuxedo Black ink onto the circle die cut. This will go with the craft brown bag.
Stamp Trick or Treat in Pumpkin Pie ink onto th 1-3/4" hexagon die cut.
OPTIONAL: If you'd like to heat emboss this sentiment like I did in the video tutorial, use your Stamparatus so you can stamp in the same place twice. Stamp first in Pumpkin Pie. Use Simply Shammy to clean stamp. Ink again in VersaMark and stamp sentiment in same place. Then you can do your embossing steps as usual using clear powder so it's a shiny Pumpkin Pie sentiment! It's fun and goes with the white treat bag.
Ok, next add your Washi Tape to the Peek-a-Boo seams that meet the paper and simply trim off at edge of bag. Do this twice. Black for the craft brown bag and orange washi for the white bag.
Add sentiments lower right with Tear &Tape or Stampin' Seal+
NOTE ABOUT HEAT SETTING THE PEEK-A-BOO Bags: I noticed when I heat embossed the Peek a Boo bags that they became a little sticky on the inside. I believe my heat tool was too high. Use the low setting on your heat tool or place a piece of cardstock or chipboard inside the bag prior to heat setting the powder.
Of course, you can use regular ink in place of this as well and not worry about heat embossing with the bags. Definitely options! But I just wanted to mention that for any of you who really do love heat embossed holiday projects like I do. You can try it both ways and see what works best.
I hope you enjoyed today's alternate ideas. I plan to create a second round of projects including cards because I really do need to make the most of this month's kit! I rely heavily on Paper Pumpkin for my son's class and also for our Trick or Treaters!
Today I have a couple of fun cards with the Yeti to Party Bundle but I also want to highlight the Perfect Partners promotion that is happening ONLY in the month of September.
Some of our favorite stamp sets have temporarily been paired with coordinating dies. You can save 10% on the bundles or purchase the items separately. The dies will no longer be available after September. Don't miss the Perfect Partners!!!
Here are each of the bundles from Perfect Partners:
I recommend three shades, a light, medium and dark alcohol marker in the same color family (in this case Brown/Black for the Bigfoot/ Grays for the Yeti)
Start with the lightest shade, build with medium and finish with darkest shade
"Flick" small strokes in the same direction with each color
When flicking with the lightest color you can make the longer strokes
When flicking with the medium tone build in the color with slightly smaller strokes
When flicking in the darkest tone keep this shorter and in the place where we'd have shadow
Start with one section at a time, for example, start with Yeti's head, then arms, then body, etc. each time
Stroke upward - do not recommend - stroking downward (this gives a consistent, natural look)
(Optional) Rotate your image to stay consistent as you build your flicking strokes and colors
Hold your marker close to the tip and try to stay vertical for this flicking technique (when you hold marker angled to the side it could create thicker strokes and you could lose that detail stroke appearance of hairs)
Practice makes perfect! The great thing about alcohol markers is that ability to blend and if you go too dark in one spot you can go over it with a lighter color and lighten it back down.
STAMPIN' BLENDS FOR BIGFOOT
Basic Black Light (Darkest Hair)
Soft Suede Dark (Medium Hair)
Soft Suede Light (Light Hair)
Ivory (Face)
Polished Pink Light (Tongue)
INSTRUCTIONS FOR THE BIGFOOT CARD
Die Cut Aspen Die Tree Scene out of Sahara Sand Cardstock. Cut two footprints with the snowcap die in the lower right corner. I cut two footprints. Sponge a little Crumb Cake ink on the trees within the oval shape. Cut the tree pattern out of the Boughs of Holly DSP. Cut Basic White Card Base. Glue DSP to card base. Take a black marker and darken lower right corner where footsteps will be. Glue the tree panel to the DSP.
Color Bigfoot using Blends and flicking technique listed above. Pop up on dimensionals and place by footprints.
Stamp "I Believe in You" from Beauty of Friendship stamp set in Evening Evergreen ink in upper left corner.
STAMPIN' BLENDS FOR YETI
Smoky Slate Gray (Darkest)
Smoky Slate Light (Medium)
Gray Granite Light (Light)
Pool Party Light and Dark (Face, Horns)
Tahitian Tide Light (Tongue)
INSTRUCTIONS FOR THE YETI CARD
Cut tree scene on Silver Foil. Take Pearlized Enamel Effects in White and pipe onto tree branches in the "nook" areas where snow would lay. Set aside to dry. Color Yeti in the Stampin' Blends combo listed above using Flicking Technique.
Stamp snowflakes in Pacific Point ink. Stamp sentiment in Pacific Point ink. Die Cut Yeti, Scarf in Pacific Point Cardstock, Sentiment piece and snowflakes. Glue scarf to Yeti. Put Yeti on dimensionals and add to card. Put snowflakes on Mini Dimensionals and add to card.
A note about your sentiment piece. I chose to create a banner with one card and a stitched rectangle die cut with the other. It depends on the sentiment you choose for the size of your sentiment piece but any small die in a square or rectangle shape would work. Or just create a banner with your Banners Pick-a-Punch tool or Paper Snips scissors.
CARD MEASUREMENTS
Card Base: 4-1/4 x 11 Score: 5-1/2" (Pool Party for Yeti Card, Basic White for Bigfoot Card)
DSP Layer: 4 x 5-1/4" (Only for Bigfoot Card)
Aspen Die Cut Layer: 4 x 5-1/4" (Silver Foil for Yeti Card, Sahara Sand Cardstock for Bigfoot Card)
Remember the Perfect Partners promotion ends 9/30/22. I have listed all of the bundles in the product list below.
Today's cards feature the "A Little Cheesy" Stamp Set from Stampin' Up!
Today's blog is about how to choose a card layout: focal point stamping or stamping a background pattern with the Stamparatus. I created examples for all 4 of the images/ sentiments in the Stamp Set.
If you like puns, cookies, wine, cheese, pudding, being cheesy or all of the above then continue on with this blog post. Lots of pictures and a full product list with my September Host Code already linked. Spend $50 or more with me in the online store in September 2022 (before tax) and I'll send you an embellishment.
Here is the Background Stamped Version with the Paper Piecing Technique Sweetest Christmas DSP, Garden Green Ribbon Real Red/ Garden Green
Here is the Focal Point version of the Pudding card! Too cute!
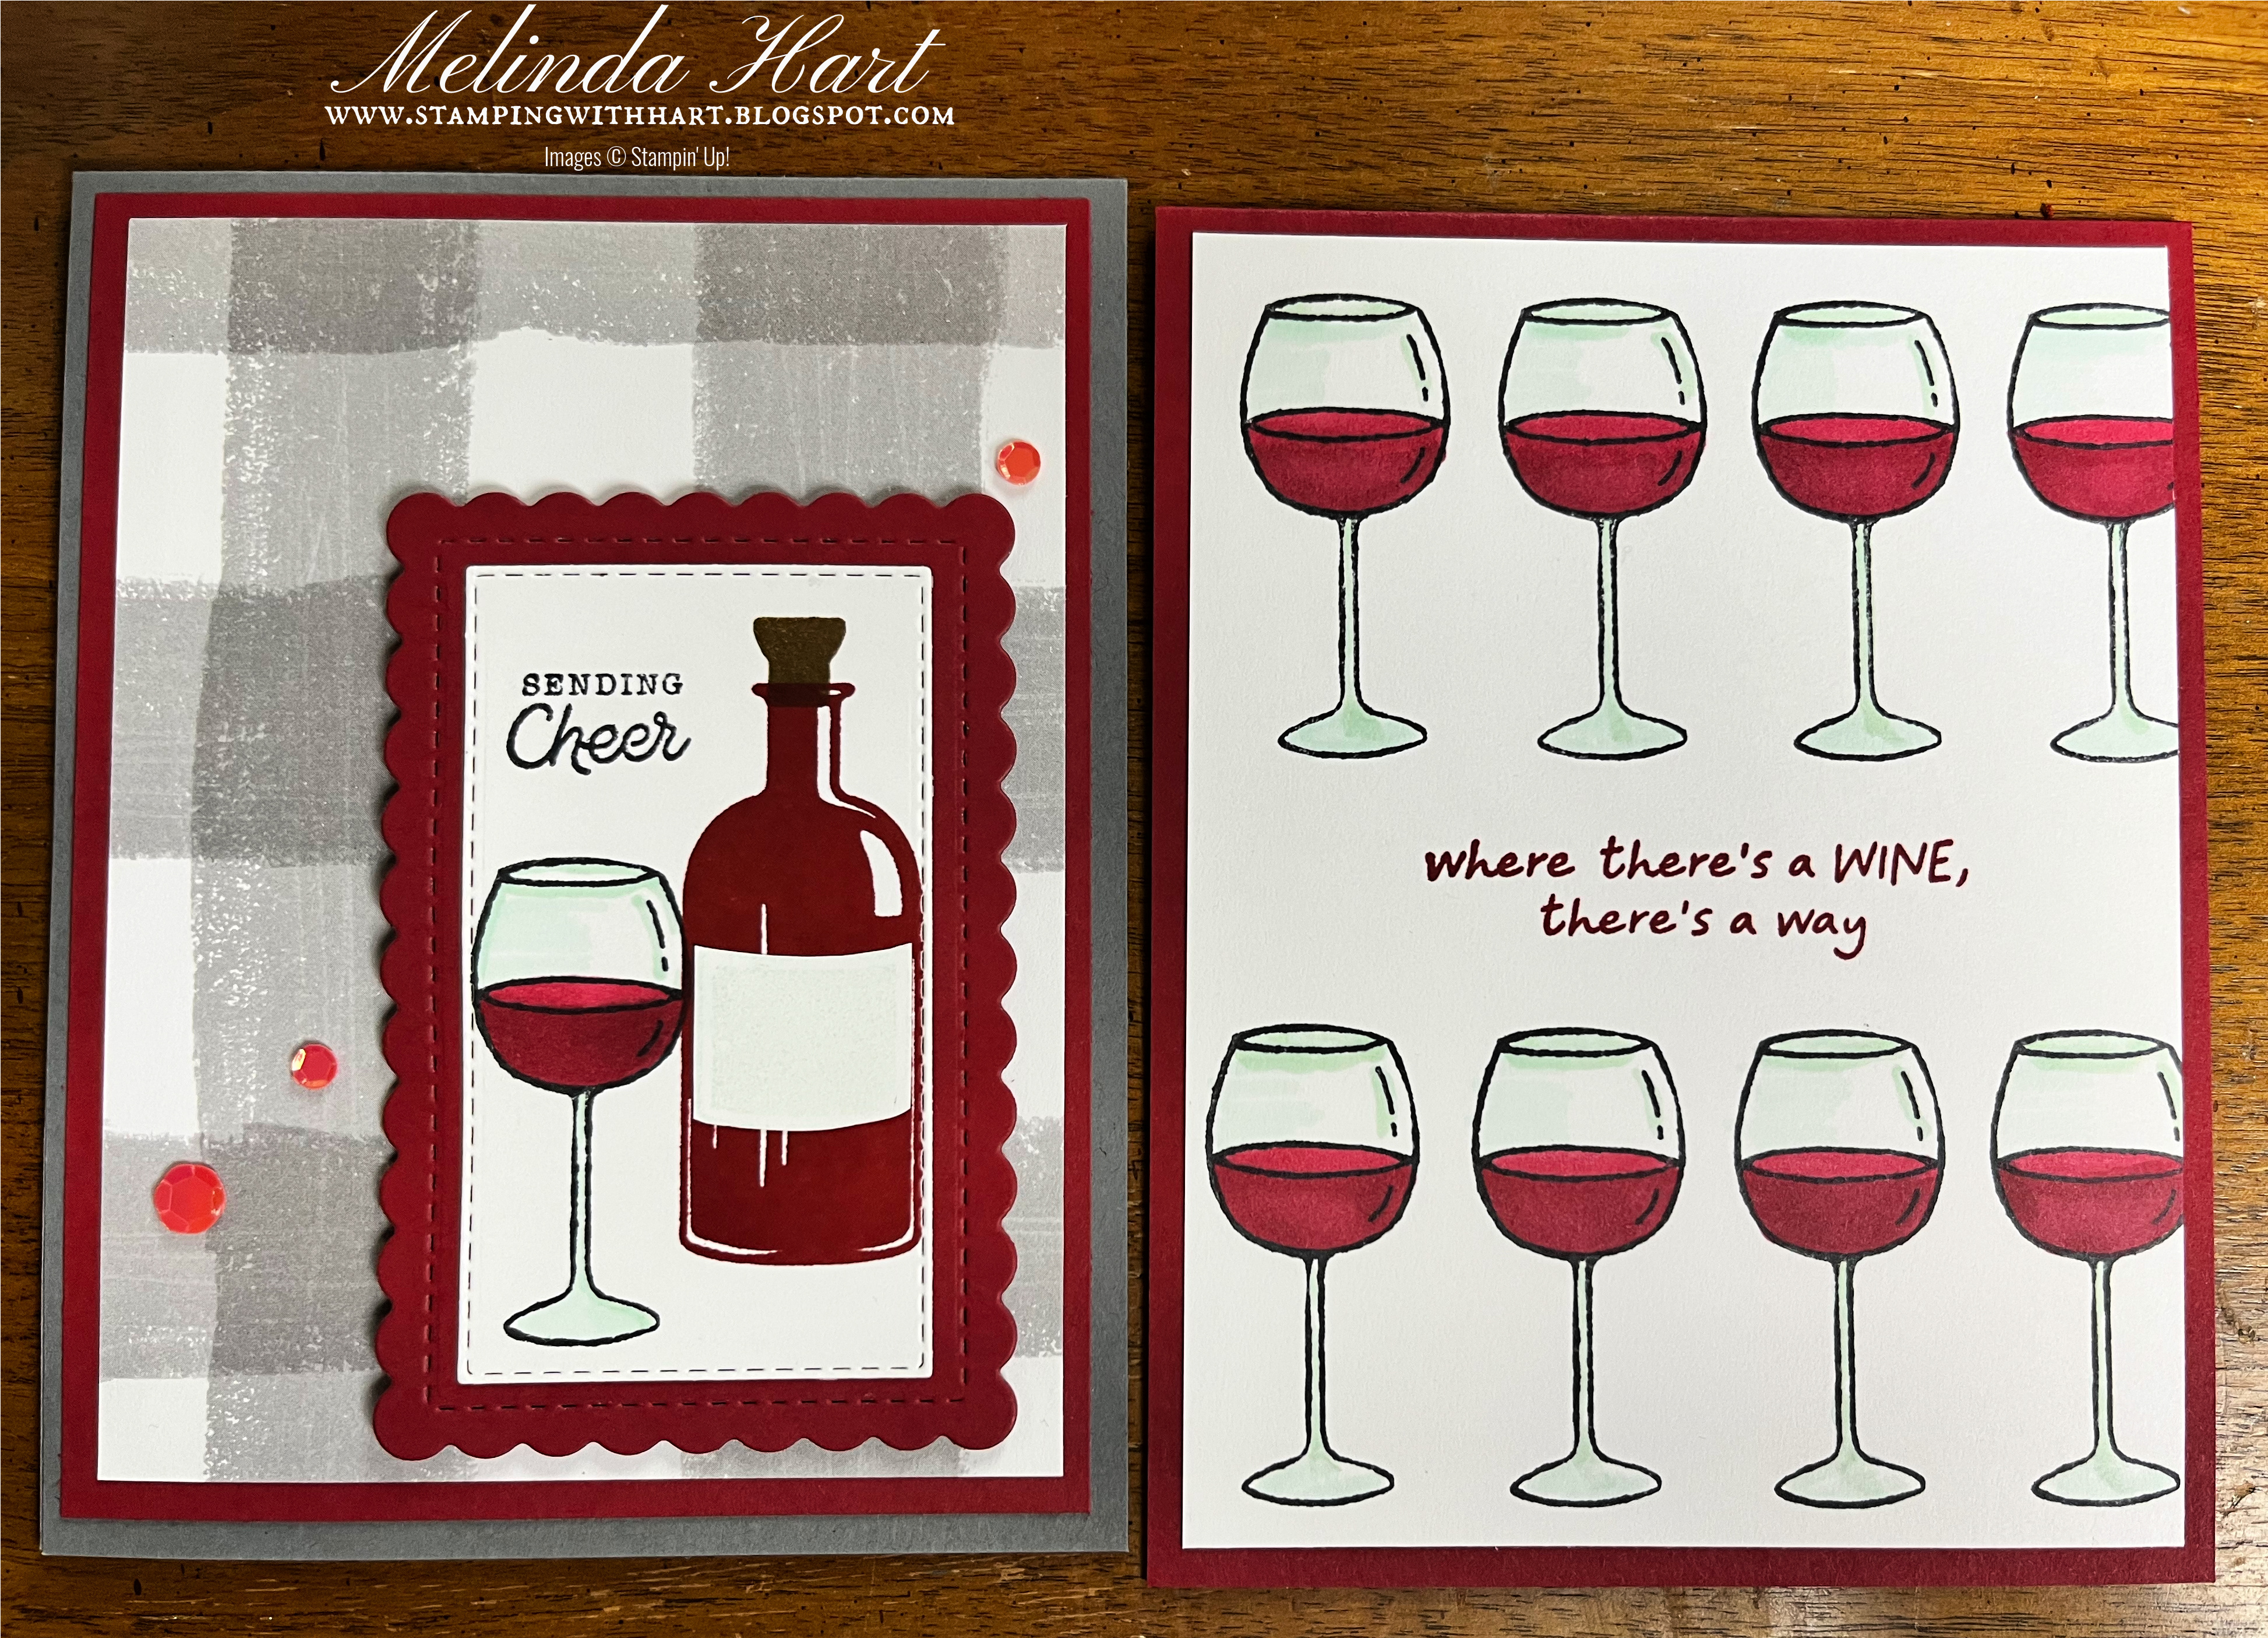
Focal Point of the Wine Card Also used: Bottled Happiness Stamp Set Gingham Cottage DSP/ Stampin' Blends Basic Gray/ Cherry Cobbler/ Memento Black Ink
Here is the Background Version of the Wine Card I also did a horizontal version of this card on Instagram Reels!
Focal Point Card (I did background stamp as well) This card double dips. Also used: Love You More Than Dies Crumb Cake, Early Espresso, Very Vanilla
This is the sentiment stamped using the Stamparatus Also using the Love You More Than Dies and Nothing's Better Than Stamp Set
CARD MEASUREMENTS:
For the Background Card:
Card Base: 5-1/2 x 8-1/2" Score at 4-1/4"
Basic White Layer: 4 x 5-1/4"
You choose your favorite die for sentiment or stamp right onto the panel with background stamping
INSTRUCTIONS:
The fun of a stamped background is that you stamp the same image in repeat to create your own pattern. Stamp your desired image using the Stamparatus. Color images or try the Paper Piecing technique. You can see this in my video tutorial as well where I do a little of both.
With paper piecing you stamp the same image as what you used on your background but you stamp it on your favorite DSP patterns, fussy cut it out - in this case the bowl for our pudding card - you will need 6 for the stamped background and just 1 for the Focal Point version of the card.
Add your paper pieces and coloring. I recommend coloring the pudding before you glue on your paper pieces.
For the Focal Point Card:
Card Base: 5-1/2 x 8-1/2" Score at 4-1/4"
DSP Layer 1: 4 x 5-1/4"
DSP Layer 2: 3 x 5-1/4"
DSP Layer 3: 1 x 5-1/4"
Your favorite Die Cut (I used the Scalloped Contour Die)
Cut an inside panel for sentiment if you use dark color cardstock like I did
INSTRUCTIONS:
This is a much more traditional layout. You see these with card sketches all of the time but what I mean by "focal point" is just one stamped image (cheese, wine, etc) and just one stamped sentiment and then the rest is the layers of your favorite Designer Series Paper and so on.
With a stamp set like "A Little Cheesy" I am drawn to do background stamping but I wanted a simpler version too, so you can decide what you like best to create or maybe if you'd like to try something new.
A FEW STAMPARATUS TIPS
Consider the length and width of your stamp for repeat stamping
The wine glass, for example, is the same size as 1 notch for your plate so you can stamp this image very close together to create a perfect line because you can stamp "every notch" and move your plate along the hinges on your layer
If you have a stamp that is wider than the hinge (like the pudding) you need to stamp EVERY OTHER HINGE which means more space between your stamps unless you re-position the stamp each time
It's ok to have more space! Just take that into consideration for your stamping
Lastly, I chose to stamp the cheese free hand with a clear block because I knew I would be changing the angle of the cheese with every stamp. With the Stamparatus your angle remains the same unless you reposition between stamping.
I hope you enjoyed today's card ideas! Did you know you can sign up for my email list and learn more about Facebook Live projects, classes, new promotions and products from Stampin' Up! and more? Sign up here: https://lp.constantcontactpages.com/su/GLk7fdL
Here's today's product list for what was used on the cards! Thank you and happy crafting!
10 EASY and FABULOUS Fun Fold Cards for the holidays!!!!!! I wasn't sure what the official name of it was. I saw "Tri-Fold" "Triple Fold" "Accordion Fold" so I'm settling on Fun Fold.
Showcase your favorite Designer Series Paper with these cards!
Lights Aglow Designer Series Paper Trimming the Tree Stamp Set
Boughs of Holly Designer Series Paper Trimming the Tree Stamp Set Glimmer Paper (Gold)
Painted Christmas Designer Series Paper Cottage Wreaths Bundle Glimmer Paper (Gold)
Santa Express Designer Series Paper Silver Foil for Train Track
Storybook Gnomes Designer Series Paper Santa's Delivery Stamp Set
Sweetest Christmas Designer Series Paper Trimming the Tree Stamp Set
Left: Celebrate Everything Designer Series Paper Right: Black and White Designer Series Paper Hello Harvest Stamp Set (Pumpkin) Cottage Wreaths (Boo! and Spider)
All 10 Cards
MEASUREMENTS:
Card Base: 5-1/2 x 12" - Score: 1-3/4, 4-3/4, 7-3/4"
3 Different sheets of Designer Series Paper Cut in the following sizes:
4 x 5-1/4"
2-3/4 x 5-1/4"
1-1/2 x 5-1/4"
You will also need a panel for your sentiment: 2-3/4 x 5-1/4" (Basic White Cardstock)
Belly Band: 1 x 11" (it could be a little shorter if you are using scraps)
I used a variety of different size dies and stamp sets to decorate the belly bands. You can use whatever you have on hand. I will include a list of the products used on these cards. I would say small to medium size circle, squares or rectangles. The hexagons would also be cute!
INSTRUCTIONS:
Cut and score your card bases and Designer Paper Panels. Adhere panels to card. You can see the video tutorial for the full demonstration.
Stamp sentiment on the inside panel that goes next to the largest piece of DSP. Stamp your greeting or sentiment for the outside belly band.
Decorate belly band. If you have coordinating stamp sets or bundles then use what you have. If you don't have the coordinating sets try mixing and matching like I did with Trimming the Tree stamps and several different Designer Paper Patterns. I also paired Santa's Delivery with the gnomes.
Have fun with these! These will fit into your Medium Size envelopes as well!
If you have questions reach out to me. stampingwithhart@gmail.com
The Trimming the Tree Stamp Set I used for these cards has a die set that you can get in the month of September! Check out the Perfect Partners promotion which ends 9/30/2022
I hope you enjoyed today's card ideas! If you plan to spend more than $99 on your crafts for the upcoming cardmaking holidays then consider purchasing the Starter Kit. You choose the products you want up to $125 in value and only pay $99 before tax. You get FREE SHIPPING and 20% as a hobby demonstrator. You enjoy first access to catalogs and product launches before they are available to customers and you can return to being customer if you like. No obligation to sell. If you have questions contact me! If you have a wish list you'd like to turn into your Starter Kit then click here: https://www.stampinup.com/join?demoid=2212777
The full list of products is below. Host Code already added to the links for your shopping convenience. Thank you and happy crafting!