Friday, December 31, 2021

Die Cut Cards You HAVE to Try in 2022! Beautiful Shapes Dies and the Abstract Beauty Suite or Hello Beautiful Bundle

The coolest card ever...


That's my opinion...


Beautiful Shapes Dies from the Brand New Abstract Beauty Suite

I was going through the brand new Mini Catalog January to June 2022 (it goes live on January 4, 2022) and came across a card that, at first, I thought was a cool Designer Series Paper pattern. When I went through the papers I had pre-ordered it wasn't there. I took a closer look and realized this pattern was created using the Beautiful Shapes Dies which is part of the Abstract Beauty Suite.

I couldn't wait to make the card because my 6 year old son, Connor, LOVES die cutting, shapes, patterns and puzzles. He is autistic and we do many activities involving shapes, puzzles and patterns like this one. 

It's a very sensory experience using the Stampin' Die Cut and Emboss Machine. Turning the handle and the pressure of the plates being run through the machine not to mention the satisfying end result of getting cut out shapes in whatever color Connor wants. Connor is a sensory seeker which means he likes a lot of physical movements like push, pull, jump, squeeze... etc. We use lots and lots of scraps.

If you have a loved one on the spectrum or with sensory needs this could be a great project for them depending on what they enjoy. My son hasn't perfected fine motor skills yet so he can't quite perfectly line up these shapes and glue them yet, but he can die cut like crazy (gross motor skills using the whole arm to crank) and he can help with sorting colors and counting the pieces. Connor is very drawn to puzzles and patterns so he loved this card. He ran his fingers over the finished project many times. (Because it is all die cuts it also has a very cool texture - more sensory seeker fun)

If you are a teacher, a parent, grandparent or caregiver - if you are teaching little ones about shapes - the Beautiful Shapes Dies have circles, pentagons, triangles, diamonds and trapezoids. It's SO COOL. There are endless activities you could create with this but for today I'll stay focused on the cards.

I had to actually figure out how to assemble this pattern so I studied the card in the catalog and then changed my card layout slightly, but I completely owe my thanks to the very talented Stampin' Up! designer who created that layout! If I find out who made it I will be sure to update this blog post. I cannot show the sample because I cannot show the inside of the catalog until January 4th but if you have a catalog in front of you, go the Abstract Beauty suite and you will see it!

If you do not currently have a demonstrator and would like to receive a catalog please reach out to me and I will be happy to help. I'd love the opportunity to work with you! My email is stampingwithhart@gmail.com. You can also direct message me on Instagram or Facebook.

MAKING THE BEAUTIFUL SHAPES HEXAGON CARD

You will need:

  • 24 Misty Moonlight Hexagons
  • 24 Balmy Blue Diamonds
  • 24 Night of Navy Diamonds
  • Multipurpose Glue
  • Misty Moonlight Card Base - Measurements: 2-1/2 x 8-1/2" (scored at 4-1/4)
  • Basic White Layer - Measurements: 4 x 5-1/4"
  • Hello Beautiful Stamp Set (or part of the Abstract Beauty Suite)*** Available 1/4/22
  • Misty Moonlight Ink
  • Stampin' Cut & Emboss Machine (Mini will also work for these die sizes)
MAKING THE HAPPY NEW CARD


Abstract Beauty Specialty Designer Series Paper in a new size: 4 x 6

If you are interested here are the coordinating colors for Abstract Beauty Suite


You will need: 
  • Abstract Beauty Cards & Envelopes *** Available 1/4/22
  • Beautiful Shapes Dies *** Available 1/4/22
  • Abstract Beauty 4 x 6 Specialty Designer Series Paper *** Available 1/4/22
  • Supple Shimmer Specialty Paper *** Available 1/4/22
  • Word Wishes Dies
  • Expressions in Ink Ephemera Pack (Gold Hexagon & Iridescent Sequins)
  • Adhesive (Stampin' Dimensionals, Tear and Tape, Stampin' Seal +)
  • Stampin' Cut & Emboss Machine (Mini will also work for these die sizes
I used a precut card pack so no measurements necessary. I used the second to largest hexagon die (2 inches) and the next one down (1-3/4")

Die cut your hexagons and the words "Happy New Years" from the Word Wishes Dies. I trimmed off the "s" at the end of Years so it just read "Happy New Year."

The other Happy New Year card is very similar in design and style. I used different gold accents from the Expressions in Ink Ephemera pack and I cut the words in Night of Navy cardstock. I did use the Hexagon embellishments in Just Jade as well.

I hope you enjoyed this walkthrough of the Abstract Beauty Suite available for purchase January 4, 2022. If you cannot wait, you can actually put brand new items in the Starter Kit! The Starter Kit is also Stampin' Up!'s best deal.


Host Code KFCG22TU expires end of day today! 12/31/22 

I wish you and your families a very safe and Happy New Year! See you in 2022!

Happy Crafting,

Melinda


Friday, December 24, 2021

Paper Pumpkin December 2021Alternative Ideas: Lots of Pun


December 2021 Paper Pumpkin Kit: Lots of Pun (and it is)! 

Stamping in repeat is one of my absolute FAVORITE things to do! It's also a go-to technique for Paper Pumpkin alternative ideas.

Before we dive into the tutorial, let me tell you a little about Paper Pumpkin. It's a monthly craft subscription box from Stampin' Up! You can pay month to month (currently $22.00 per month as of the time of this blog) or you can purchase pre-pay options of 3, 6 or 12 months. 


You can pause or cancel anytime with month-to-month option. Refills are often available. You will receive a clear block with your first kit that you can use with your stamps for all subsequent kits, meaning you get one block. 

You must be subscribed by the 10th of the month to get that month's kit. December subscription period is over but you can get the January kit as long you sign up by 1/10/2022 and you will not want to miss that kit! Here's a sneak peek:

January 2022 Paper Pumpkin Kit: Kisses & Hugs
Sign up by 1/10/2022


Stayz On Ink Jet Black, Re-Inkers in Cherry Cobbler,
Granny Apple Green and Pool Party

WHAT YOU'LL NEED:

Stayz On Ink
Watercolor Paper
Clear Blocks
Re-Inkers in desired shades - I chose the Paper Pumpkin Coordinating Colors and Cherry Cobbler
Water Painters
December 2021 Paper Pumpkin Kit
Striped Grosgrain Ribbon in Pool Party (from Sweet Stockings Suite)


Card Measurements:

I used the Card Bases from the Paper Pumpkin kit. I trimmed the alternate background layer to 3-3/4 x 5 on two of them and then 3-1/2 x 4-3/4 on the card with the yellow plaid pattern.

Colors: Pool Party, Daffodil Delight and Stayz On Ink in Jet Black

I chose to stamp the same image over and over again going in the same direction for a fun and bold pattern. Using Stayz On ink and the watercolor paper will ensure a smooth printed look when its finished!


Stayz On Ink, Water Painters, Re-Inkers and Paper Pumpkin Block


I hope you enjoyed today's tutorial!

Have a very Merry Christmas and I'll see you again on my Facebook Live Sunday evening. 

Happy Crafting!

Melinda

Monday, December 20, 2021

Beauty of the Earth: WINTER EDITION + Friendly Hello

 This week as life gets crazy busy counting down to Christmas I wanted to move into Winter inspiration. I chose Friendly Hello *a brand new Saleabration stamp set launching January 4, 2022* more on that in a minute and the Beauty of Friendship bundle (the Beauty of the Earth Suite works as well).


The fun part of this project is the Shimmery White Embossing Paste to give a 3D snow effect. These are cards with dimension and sparkle and they will wow your recipients!


Beauty of Friendship or Beauty of the Earth is an all season bundle/ suite and the Friendly Hello stamp set was a perfect pairing, in my opinion because it's about hello, support and friendship. Winter a very good time to send cards and show that support and care for our friends and loved ones.


Here is my current Host Code. If you are planning to shop with me (and I greatly appreciate your business) here is a link that already includes the Host Code as you shop. https://www.stampinup.com?hostcode=KFCG22TU When you spend $50.00 or more (before tax) in the online store I will send you a FREE Embellishment as my gift for shopping with me in the end of December.

PRODUCTS FOR THIS PROJECT (3 Cards, one theme):
Card Measurements:

I am using my usual template for these cards. 
  • If you want to get two card bases out of 1 sheet of 8-1/2 x 11" piece of cardstock (I chose Sahara Sand card bases) score a full sheet at 5-1/2" and then turn it length wise and cut at 4-1/4" - you will have two card bases. These cards open up-down. If you want a card that opens like a book (right-left) then cut a piece of cardstock at 5-1/2 x 8-1/2" and score at 4-1/4"
  • The Basic White layer is 4 x 5-1/4" 
  • The Designer Series Paper layer is 3-3/4 x 5"
For the Tree:

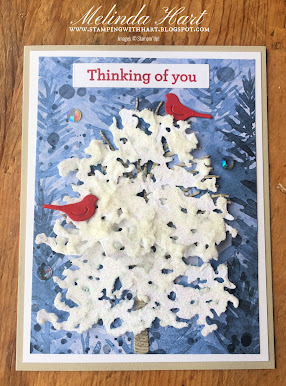
In this tutorial my focus is on the die cut tree rather than the tree stamp. I have a chart showing just the die cut tree which is the simplest version. If you want to step it up then try inking the front of the embossing folder (I used the Timber) with Sahara Sand ink and running the cardstock through. This gives great texture and dimension to your tree. If you really want to have fun with it, add embossing paste to the branches to make it look like snow. Just simply use your palette knife to smooth some paste over the branches and set on your silicone mat to dry. I recommend scraping off any excess embossing paste on the back of your tree so it can lay flat when you adhere it to the card. Give it a few minutes to dry and wash or wipe any excess embossing paste off of the silicone mat. Silicone mats make for easy clean up. You will also want to wash the palette knife when you are done and for easier cleanup, have a wipe or paper towel to wipe off any excess paste on your palette knife throughout the project.

Close up of Shimmery White Embossing Paste (lots of dimension)


Card 1 of 3

For Card 1: Once you have added paste your tree and adhere it to the Designer Series Paper layer, you can also add a little snow at the bottom. This is optional. Let this dry before you adhere it to the card. Add your red bird, sentiment and iridescent rhinestones.

Card 2 of 3

For Card 2, you will do the same steps with the tree as card 1 except once its dry, cut the tree in half and turn it into two branches. I used Mini Glue Dots to adhere the branches. I chose to add a thin border of the embossing paste around the Designer Series Paper layer. Be sure it is dry before gluing down on the card. I stamped the bird image from the Friendly Hello stamp set, colored with Stampin' Blends and fussy cut so the bird looks perched on a branch. Add iridescent rhinestones.

Card 3 of 3

For Card 3, I wanted to have a really big snowy tree so I die cut two of the leafy die cut in Basic White and covered them both in Shimmery White Embossing Paste. As with the other pieces, be sure these are fully dry before assembling your card. On this card, you do not add snow to the branches just the leafy layer. Add your red birds and iridescent rhinestones.

DID YOU KNOW....

You can place preorder items (new catalog products like the iridescent rhinestones in today's project) in your STARTER KIT!!!! The Starter Kit is Stampin' Up's BEST SAVINGS and you'd get first access before it launches in January! You choose $125.00 in products but only spend $99.00 and get FREE SHIPPING!

What a great way to start the New Year! Enjoy a 20% discount on purchases as a demonstrator, enjoy the perks of first access to new products and preorders and a fun crafting community called the Luvly Stampers! No obligation to sell. The majority of demonstrators simply enjoy the discounts and benefits.

PURCHASE THE STARTER KIT: https://www.stampinup.com/join?demoid=2212777

Once you purchase your kit, when you place your first demonstrator order you could even earn Sale-a-bration rewards before they launch to the public January 4th. Spend $50 or $100 and you'll qualify! So, the Friendly Hello stamp set used today? You could earn that free before January 4 as a demonstrator!

Don't miss out on this opportunity! If you have any questions you can email me: stampingwithhart@gmail.com

I will have lots more new inspiration coming your way! Stay tuned! I plan to post one more blog prior to Christmas Eve but I want to wish you a very Merry Christmas and a very Happy New Year! Thank you for spending time with me on the blog today!

Happy Crafting!

Melinda

Friday, December 17, 2021

Unboxing Brand New 2022 Stampin' Up! Products: Mini Catalog Haul


It's like Christmas for demonstrators! Opening that first NEW CATALOG PREORDER! Everything fresh and new and full of crafty possibilities!

Your new catalog is on the way if you are a customer and have purchased with me in the past 12 months!


If you are looking for a demonstrator I'd love the chance to work with you! Let me know if you would like a catalog. You can email me at stampingwithhart@gmail.com

The products I unboxed in this video will be available to customers starting January 4, 2022 and that includes the Sale-a-Bration launch as well.

Demonstrators are not able to open catalogs prior to their debut date (January 4, 2022) but we are able to share what we purchase and what we make with our preorder items! It's one of my FAVORITE things about this job!

DID YOU KNOW...

You can place preorder items (new catalog products) in your STARTER KIT!!!!! So, if you get your catalog and spot some "must have" items, you can get them in the Starter Kit! The Starter Kit is Stampin' Up's BEST SAVINGS and you'd get first access before it launches in January! You choose $125.00 in products but only spend $99.00 and get FREE SHIPPING!

What a great way to start the New Year! Enjoy a 20% discount on purchases as a demonstrator, enjoy the perks of first access to catalogs, new products and preorders and a fun crafting community called the Luvly Stampers! No obligation to sell. The majority of demonstrators simply enjoy the discounts and perks.

PURCHASE THE STARTER KIT: https://www.stampinup.com/join?demoid=2212777

Once you purchase your kit, when you place your first demonstrator order you could even earn Sale-a-bration rewards before they launch to the public January 4th. Spend $50 or $100 and you'll qualify!

*Note: No Sale-a-Bration items with Starter Kit because it is already discounted but new catalog items can be placed in the Starter Kit!

I hope you enjoy this unboxing! Let me know what you've purchased or what your favorite new product might be!

One more thing... if you are not planning on the Starter Kit at this time but do plan to place an order just know I have a new Host Code from December 16-31, 2021. Spend $50.00 (before tax) with me in the online store and get a FREE embellishment as my gift for shopping with me during this busiest month of the year. Enter Host Code KFCG22TU at checkout or click this link to have the Host Code already included when you shop with this link...


Thank you for spending time here on the blog and happy crafting!

Tuesday, December 14, 2021

Holidays and Heat Embossing: Metallics


I often see tips and techniques I want to try. With the holidays fast approaching and with the conversations I've been able to have with some of you I know we are all still working on getting those cards finished and mailed.

The Metallics Heat Emboss Powders: Gold, Silver, Copper

One tip I learned years ago was to create a sort of "faux metallic" cardstock by heat embossing the edges of the layer. This way if you've run out of metallic paper you still have an option for your metallic heat embossed cards. This is also a PERFECT match to your heat embossed images and/ or sentiments.

If you are new to heat embossing or have never tried it please do not stress or worry. We all learn through doing, right? I will be the first to admit to you if I'm trying something new and today - heat embossing with a stencil - that was NEW for me too. Think of this as the "bonus" section of the tutorial. While I try many techniques off camera prior to a live, I'll admit this stencil thing was done live for the first time but I have the best audience who was supportive and offered great tips.

Here is what I used to heat emboss a stenciled image:
VersaMark Ink, Sponge Dauber, Stencil, Heat Emboss Powder, Heat Tool and Tape

THE HEAT EMBOSSING TOOLS YOU NEED:

  • Heat Embossing Powder
  • Heat Tool
  • VersaMark Ink Pad (you can use other inks but I recommend starting here)
  • Anti Static Tool (like an embossing buddy)
  • Optional: Sponge Dauber and Stencils to Create Heat Emboss Backgrounds

Before I get fully into the tutorial I have a Host Code you can shop with. Use this Host Code until December 15, 2021. When you spend $50.00 with me in the online store (before tax) you will receive a Wink of Stella Glitter Pen and 2 Christmas Cards from me.


SHOP WITH HOST CODE HERE: https://www.stampinup.com?hostcode=4YZE6QWF

SHOP SPECIFIC ITEMS WITH HOST CODE:

Stampin' Emboss Powders (Metallics Trio): https://www.stampinup.com/products/metallics-stampin-emboss-powders?hostcode=4YZE6QWF

VersaMark Ink Pad: https://www.stampinup.com/products/versamark-pad?hostcode=4YZE6QWF

Heat Tool: https://www.stampinup.com/products/heat-tool?hostcode=4YZE6QWF

For Unto Us Stamp Set: https://www.stampinup.com/products/stamp-set-cling-religious?hostcode=4YZE6QWF

MAKING THE CARDS

My focus was on the heat embossing and featuring the Metallics trio for this tutorial but the card base sizes are 4-1/4 x 5-1/2" (Take an 8-1/2 x 11" sheet of cardstock, score at 5-1/2 and then cut at 4-1/4" and you will have two card bases)

Layering piece 4 x 5-1/4" for the Snowflake background and faux metallic backgrounds.

The angel layer varied in sizes. See video for more details.

Prep your surface with an anti-static tool like the embossing buddy. This will help remove any oils from your fingers so that the embossing powder only sticks to the versa mark ink. This step isn't necessary for the faux metallic layer but I do recommend it for stamped images and sentiments. Keeps it crisp and clean. 

Stamp your images with the Versamark ink and place on the paper. 


Get a piece of scrap paper and fold it in half (like printer paper for example) to easily catch the leftover embossing powder so you can easily place it back in the container. I know many crafters keep their embossing powders in tupperware containers with a spoon and you can certainly do that too and not need the scrap paper. My embossing powder is in the original containers so however you want to handle this step the main point to make the clean up as easy as possible for you.

Once you are happy with the powder on the cardstock, take your heat tool and let it warm up for a moment and then place it close to the powder to heat set it. You will see your embossing powder start to turn into that fabulous metallic finish! So beautiful. 

Once you start embossing you'll never go back! It's so much fun!

I hope you enjoyed today's blog post. I forgot to mention (but its in the video) that I also heat embossed a sentiment on the inside of the card. Nice finishing touch!

IF YOU WANT TO STENCIL & HEAT EMBOSS

I personally tried this technique by taping the stencil down to the cardstock and using a sponge dauber to add the VersaMark ink to the stencil. Fellow Demonstrator from Australia, Tracy Bish, was on the live and said she has also successfully done this technique by applying the whole VersaMark ink pad directly to the stencil. She said to give a slight twist and pressure but to be sure the stencil is secure. There you have it! Two different ways to try this fun technique! And be sure to check out Tracy Bish. She is on Facebook and YouTube.

DID YOU KNOW...

Stampin' Up! has a Starter Kit and it's the best value in the catalog! 

PURCHASE STARTER KIT HERE:

https://www.stampinup.com/join?demoid=2212777

What can you expect with the Starter Kit?

1.) GREAT VALUE, GREAT SAVINGS

You choose $125.00 worth of Stampin' Up! products PAY ONLY $99.00

FREE SHIPPING on the Starter Kit

20% Discount as a Demonstrator NOTE: YOU DO NOT HAVE TO SELL PRODUCTS

First look at NEW catalogs and NEW Products!

This catalog goes live to customers January 4, 2022
With the Starter Kit, you can get first access now! 

Stampin' Up! has a new catalog coming in January! When you purchase the Starter Kit now -you actually can choose brand new items not yet available to customers and as a demonstrator you will be able to see the new catalog and get Saleabration rewards early! Demonstrators get the opportunity to earn Saleabration rewards first! When you place your first demonstrator order you could earn free products in pre-order Sale-a-bration time! Isn't that a thrill! 

Get in on the perks and the fun! Be part of an amazing and crafty community called the Luvly Stampers!

PURCHASE YOUR KIT HERE: https://www.stampinup.com/join?demoid=2212777 

Questions? Email me: stampingwithhart@gmail.com

Thank you and happy crafting! 


Friday, December 10, 2021

A Simple Masking Technique for Mass Producing Christmas Cards


 Hello! 

I tried my hand at assembly style cardmaking.


 I can't make any promises about being fast because frankly I'm a slow stamper and, well, I like to "step up" cards with masking and coloring and blending.

The Be Jolly Stamp Set can be as simple as you would like or if you want to color the images and mix and match them like I do, you'll love today's blog/ card ideas.

I created 10 cards. 2 Designs - 5 Cards Each

SHOP HERE WITH HOST CODE Spend $50.00 with me in the online store (before tax) and get a FREE Wink of Stella Glitter Pen and 2 Christmas Cards! (This Host Code expires December 15, 2021) 

https://www.stampinup.com?hostcode=4YZE6QWF

Products used for today's project:

  • Be Jolly Stamp Set
  • Penguin Place Stamp Set (optional) I only used the snowflake stamp from this one
  • Basic White Cardstock
  • Shaded Spruce Cardstock
  • Real Red Cardstock
  • Misty Moonlight Classic Stampin' Pad
  • Blending Brush
  • Memento Tuxedo Black Ink Pad
  • Stampin' Blends (for coloring) I chose: Real Red, Just Jade, Daffodil Delight, Ivory, Bronze, Basic Black, Polished Pink, Evening Evergreen, Misty Moonlight
  • Adhesive: I used Stampin' Seal+, Stampin' Dimensionals
  • Paper Trimmer (No dies or punches needed for this project)
  • Clear & Silver Epoxy Essentials (Embellishments)
  • Gingham Ribbon
Card Measurements:

Card Base: 1 Sheet of Basic White Cardstock (8-1/2 x 11 cut in half and scored at half mark) 4-1/4 x 5-1/2" (You will need 10 of these so 5 sheets of cardstock)

Real Red Layer - 3-1/2 x 4-1/2"
Shaded Spruce Layer - 3-1/4 x 4-1/4"
Basic White Layer - 3 x 4"

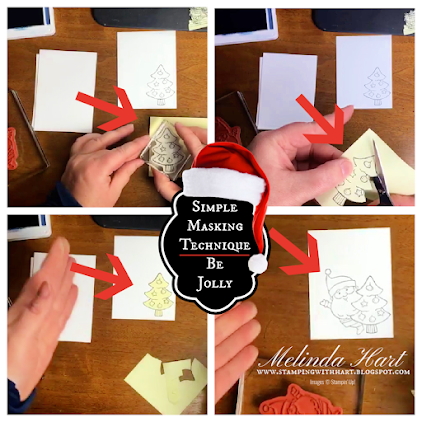
Let's Make These Super Cute Cards! My favorite aspect of these cards is the masking technique!

I recommend Post Its for Masking. Simply stamp image on post it,
cut out, place over stamped image on your project and stamp the next image.
Remove Post It and have a seemless combo of stamped images!


There are many demonstrators out there who do the assembly or mass produce stamping incredibly well and my takeaway from those tutorials is to cut everything ahead of time to make that assembly process easier. Cut everything. Stamp everything, assemble everything done... very systematic.

My style of stamping, adding in techniques here and there doesn't always lend itself to this type of cardmaking but I did want to see what would happen if I did try this "my way."

If you want simplified choose a stamp set that you don't have to color (I love coloring personally) and don't worry about ink blending or adding layers of ribbon. There are ways to keep it super simple and super cute.

However, you are here so if you do want to re-create these cards just as I made them then get out that blending tool, ribbon, markers and let's have some fun making wow cards!

Here are all of the cardstock pieces cut ahead of time and ready to go

If you want to create the appearance of sky, use Misty Moonlight ink
with your Blending Brush for a soft airbrushed type look

Stamp background onto card base using Misty Moonlight ink

Assembling multiple card pieces is really fun! I have to say

Grab those Stampin' Blends and start bringing these images to life!

Finished Santa with Tree Cards (no ribbon, more embellishments)

Finished Santa with Sleigh Card

I really enjoyed this project! I'll have to plan more of these in the New Year! 


DID YOU KNOW...

Stampin' Up! has a Starter Kit and it's the best value in the catalog! 

PURCHASE STARTER KIT HERE:

https://www.stampinup.com/join?demoid=2212777

What can you expect with the Starter Kit?

1.) GREAT VALUE, GREAT SAVINGS

You choose $125.00 worth of Stampin' Up! products PAY ONLY $99.00

FREE SHIPPING on the Starter Kit

20% Discount as a Demonstrator NOTE: YOU DO NOT HAVE TO SELL PRODUCTS

First look at NEW catalogs and NEW Products!

Stampin' Up! has a new catalog coming in January! When you purchase the Starter Kit now -you actually can choose brand new items not available to customers yet and as a demonstrator you will be able to see the new catalog! Isn't that a thrill! 

This is a great gift for yourself! (You must purchase your own kit.)

Get in on the perks and the fun! Be part of an amazing and crafty community called the Luvly Stampers!

PURCHASE YOUR KIT HERE: https://www.stampinup.com/join?demoid=2212777 

Questions? Email me: stampingwithhart@gmail.com

Thank you and happy crafting! 


Monday, December 6, 2021

How to Make a Simple Igloo Card for those Adorable Penguins!


What's better than stamping and punching adorable penguins? Creating an igloo for them to live in!
Let's make one!


A Simple Igloo for Your Penguin Cards!

Before I get into the details of the tutorial I want you to know I have a Host Code and when you spend $50.00 (before tax) between December 1-15, 2021 you will receive a FREE Wink of Stella glitter pen and 2 FREE Christmas Cards from me as a thank you! 


Here is what you need to make this card:

  • Basic White Cardstock (Igloo, Penguin)
  • Vellum (Igloo)
  • Basic Black Cardstock (Penguin)
  • Night of Navy Cardstock (Card Base & Sentiment Piece)
  • Bark 3D Embossing Folder
  • Stampin' Cut & Emboss Machine (or some embossing device)
  • Elegant Tag Punch
  • Penguin Place Bundle
  • Beauty of the Earth Designer Series Paper (Winter Woods Pattern)
  • Embellishments for Snowflake Look (I chose sequins from Expressions in Ink Ephemera Pack)
  • Memento Tuxedo Black Ink
  • Pumpkin Pie Ink
  • Adhesive (I used Stampin' Seal+, Multipurpose Glue and Stampin' Dimensionals)
  • Paper Snips and Paper Trimmer
  • *A saucer plate from your kitchen or round object about 5-1/2 or 6" wide
If You Plan to Heat Emboss Sentiment (like I did) add:
  • Versamark Ink
  • Anti Static Tool
  • White Heat Emboss Powder
  • Heat Emboss Gun

Card Measurements:
  • Card Base: (Night of Navy Cardstock) 5-1/2 x 8-1/2 and scored at 4-1/4"
  • DSP Layer: 4 x 5-14"
  • Sentiment Layer (Night of Navy) 1/2 x 3"
  • Igloo: 5-1/2" Length 2" Deep

Bark 3D Embossing Folder
I used this because I think it also looks like ice

Use a saucer plate (something about 5-6 inches) line up plate at
 corners of a 6" sheet of embossed Basic White Cardstock and trace.

Cut out igloo just under the traced line (aim for 5-1/2" length)
if you want it to be big on your card like I did (pictured above)


Use Elegant Tag Punch to Create a Door. If your igloo is 2" deep or about
you place the curved side as far as it will go into the punch and punch out door

This step is optional but if you want an "icy" doorway look. Emboss a piece of vellum
with the bark 3D embossing folder as well. Adhere the igloo to the vellum with
Stampin' Dimensionals and then trim off the excess vellum. You have an icy doorway!


Don't forget Beauty of the Earth Designer Series Paper pack has
this gorgeous Winter paper. I used this as the layer trimmed 4 x 5-1/4"

NOTE: Not pictured here but in the video tutorial (link above) I show briefly that I heat embossed the Sentiment "Be Cool Be Chill Be Merry" in White Heat Emboss Powder. If you have white ink that also works. I do not so I heat embossed it.

For heat embossing, if you are new to it - you will need an anti static tool like an embossing buddy, your desired color powder, versa mark ink and heat emboss gun. You stamp in Versa mark, add your embossing powder, tap off excess and heat set with your heat emboss gun. If you do heat embossing often you know what a fun technique this is but don't feel obligated. Do what's best for your style of stamping. I wanted white words against the Night of Navy cardstock for dramatic flare!

Stamp and punch your penguin and he will fit perfectly in the doorway!
You have a simple Igloo card!

I hope you enjoyed today's igloo tutorial for those adorable penguins! 

DID YOU KNOW...

We have a new catalog coming soon!!!!!!!!!!!!!!! For Demonstrators we are in preorder mode and when you purchase the Starter Kit you can actually place brand new preorder items not even available to the public yet into your Starter kit! If you can't wait... this is a great way to get new products first! As a demonstrator you will get to see the catalog before it launches in January. You will also enjoy a 20% discount on your purchases and be part of an amazing crafting community called the Luvly Stampers!


Have a great day and happy crafting! 

My 2024-2026 In Color Club Starts May 1st! IMPORTANT CHANGES!

Questions? Email me: stampingwithhart@gmail.com