
This week as life gets crazy busy counting down to Christmas I wanted to move into Winter inspiration. I chose Friendly Hello *a brand new Saleabration stamp set launching January 4, 2022* more on that in a minute and the Beauty of Friendship bundle (the Beauty of the Earth Suite works as well).
The fun part of this project is the Shimmery White Embossing Paste to give a 3D snow effect. These are cards with dimension and sparkle and they will wow your recipients!

Beauty of Friendship or Beauty of the Earth is an all season bundle/ suite and the Friendly Hello stamp set was a perfect pairing, in my opinion because it's about hello, support and friendship. Winter a very good time to send cards and show that support and care for our friends and loved ones.

- Beauty of Friendship Bundle https://www.stampinup.com/products/beauty-of-friendship-bundle-(english)?hostcode=KFCG22TU
- Friendly Hello Stamp Set (available January 4, 2022)
- Shimmery White Embossing Paste https://www.stampinup.com/products/embossing-paste-shimmery-white?hostcode=KFCG22TU
- Palette Knives https://www.stampinup.com/products/palette-knives?hostcode=KFCG22TU
- Sahara Sand Ink https://www.stampinup.com/products/classic-stampin-pad-sahara-sand?hostcode=KFCG22TU
- Sahara Sand Cardstock https://www.stampinup.com/products/cardstock-8-1-2-x-11-sahara-sand?hostcode=KFCG22TU
- Real Red Ink https://www.stampinup.com/products/classic-stampin-pad-real-red?hostcode=KFCG22TU
- Real Red Cardstock https://www.stampinup.com/products/cardstock-8-1-2-x-11-real-red?hostcode=KFCG22TU
- Stampin' Blends in Poppy Parade https://www.stampinup.com/products/poppy-parade-stampin-blends-combo-pack?hostcode=KFCG22TU
- Stampin' Blends in Cherry Cobbler https://www.stampinup.com/products/cherry-cobbler-stampin-blends-combo-pack?hostcode=KFCG22TU
- Beauty of the Earth Designer Series Paper https://www.stampinup.com/products/beauty-of-the-earth-designer-series-paper?hostcode=KFCG22TU
- Basic White Cardstock https://www.stampinup.com/products/basic-white-8-1-2-x-11-cardstock?hostcode=KFCG22TU
- Timer 3D Embossing Folder https://www.stampinup.com/products/timber-3d-embossing-folder?hostcode=KFCG22TU
- Iridescent Rhinestone Basic Jewels (available January 4, 2022)
- Paper Trimmer https://www.stampinup.com/products/paper-trimmer?hostcode=KFCG22TU
- Stampin' Cut & Emboss Machine (need plates for embossing and cutting) https://www.stampinup.com/products/stampin-cut-emboss-machine?hostcode=KFCG22TU
- If you want to get two card bases out of 1 sheet of 8-1/2 x 11" piece of cardstock (I chose Sahara Sand card bases) score a full sheet at 5-1/2" and then turn it length wise and cut at 4-1/4" - you will have two card bases. These cards open up-down. If you want a card that opens like a book (right-left) then cut a piece of cardstock at 5-1/2 x 8-1/2" and score at 4-1/4"
- The Basic White layer is 4 x 5-1/4"
- The Designer Series Paper layer is 3-3/4 x 5"
 |
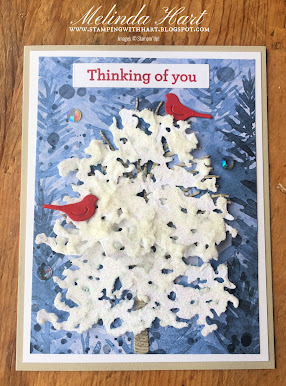
| Close up of Shimmery White Embossing Paste (lots of dimension) |
 |
| Card 1 of 3 |
For Card 1: Once you have added paste your tree and adhere it to the Designer Series Paper layer, you can also add a little snow at the bottom. This is optional. Let this dry before you adhere it to the card. Add your red bird, sentiment and iridescent rhinestones.
 |
| Card 2 of 3 |
For Card 2, you will do the same steps with the tree as card 1 except once its dry, cut the tree in half and turn it into two branches. I used Mini Glue Dots to adhere the branches. I chose to add a thin border of the embossing paste around the Designer Series Paper layer. Be sure it is dry before gluing down on the card. I stamped the bird image from the Friendly Hello stamp set, colored with Stampin' Blends and fussy cut so the bird looks perched on a branch. Add iridescent rhinestones.
 |
| Card 3 of 3 |


No comments:
Post a Comment