
Hello!
I tried my hand at assembly style cardmaking.
I can't make any promises about being fast because frankly I'm a slow stamper and, well, I like to "step up" cards with masking and coloring and blending.

The Be Jolly Stamp Set can be as simple as you would like or if you want to color the images and mix and match them like I do, you'll love today's blog/ card ideas.
I created 10 cards. 2 Designs - 5 Cards Each
SHOP HERE WITH HOST CODE Spend $50.00 with me in the online store (before tax) and get a FREE Wink of Stella Glitter Pen and 2 Christmas Cards! (This Host Code expires December 15, 2021)
https://www.stampinup.com?hostcode=4YZE6QWF
Products used for today's project:
- Be Jolly Stamp Set
- Penguin Place Stamp Set (optional) I only used the snowflake stamp from this one
- Basic White Cardstock
- Shaded Spruce Cardstock
- Real Red Cardstock
- Misty Moonlight Classic Stampin' Pad
- Blending Brush
- Memento Tuxedo Black Ink Pad
- Stampin' Blends (for coloring) I chose: Real Red, Just Jade, Daffodil Delight, Ivory, Bronze, Basic Black, Polished Pink, Evening Evergreen, Misty Moonlight
- Adhesive: I used Stampin' Seal+, Stampin' Dimensionals
- Paper Trimmer (No dies or punches needed for this project)
- Clear & Silver Epoxy Essentials (Embellishments)
- Gingham Ribbon
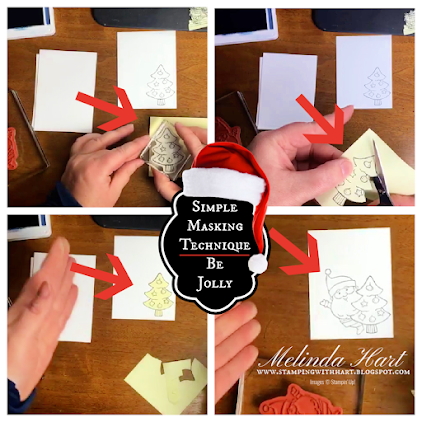 |
| I recommend Post Its for Masking. Simply stamp image on post it, cut out, place over stamped image on your project and stamp the next image. Remove Post It and have a seemless combo of stamped images! |
There are many demonstrators out there who do the assembly or mass produce stamping incredibly well and my takeaway from those tutorials is to cut everything ahead of time to make that assembly process easier. Cut everything. Stamp everything, assemble everything done... very systematic.
My style of stamping, adding in techniques here and there doesn't always lend itself to this type of cardmaking but I did want to see what would happen if I did try this "my way."
If you want simplified choose a stamp set that you don't have to color (I love coloring personally) and don't worry about ink blending or adding layers of ribbon. There are ways to keep it super simple and super cute.
However, you are here so if you do want to re-create these cards just as I made them then get out that blending tool, ribbon, markers and let's have some fun making wow cards!
 |
| Here are all of the cardstock pieces cut ahead of time and ready to go |
 |
| If you want to create the appearance of sky, use Misty Moonlight ink with your Blending Brush for a soft airbrushed type look |
 |
| Stamp background onto card base using Misty Moonlight ink |
 |
| Assembling multiple card pieces is really fun! I have to say |
 |
| Grab those Stampin' Blends and start bringing these images to life! |
 |
| Finished Santa with Tree Cards (no ribbon, more embellishments) |
 |
| Finished Santa with Sleigh Card |
I really enjoyed this project! I'll have to plan more of these in the New Year!
DID YOU KNOW...
Stampin' Up! has a Starter Kit and it's the best value in the catalog!
PURCHASE STARTER KIT HERE:
https://www.stampinup.com/join?demoid=2212777
What can you expect with the Starter Kit?
1.) GREAT VALUE, GREAT SAVINGS
You choose $125.00 worth of Stampin' Up! products PAY ONLY $99.00
FREE SHIPPING on the Starter Kit
20% Discount as a Demonstrator NOTE: YOU DO NOT HAVE TO SELL PRODUCTS
First look at NEW catalogs and NEW Products!
Stampin' Up! has a new catalog coming in January! When you purchase the Starter Kit now -you actually can choose brand new items not available to customers yet and as a demonstrator you will be able to see the new catalog! Isn't that a thrill!
This is a great gift for yourself! (You must purchase your own kit.)
Get in on the perks and the fun! Be part of an amazing and crafty community called the Luvly Stampers!
PURCHASE YOUR KIT HERE: https://www.stampinup.com/join?demoid=2212777
Questions? Email me: stampingwithhart@gmail.com
Thank you and happy crafting!


No comments:
Post a Comment