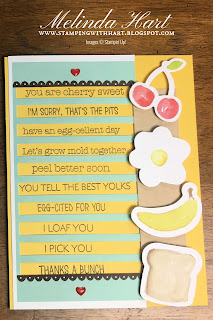
Today's blog is specifically about creating alternate projects with the December 2021 Paper Pumpkin Kit: Lots of Pun with the Stamparatus. I have the video tutorial here but I'll also get into specifics in the blog today. This kit had a very special element - all of the word stamps were about the same size!
Typically, Paper Pumpkin offers a variety of stamps in each kit. They range in size, font, theme, sentiments and images. They are rarely all the same size.
This month's kit there are several fonts. Some is upper case, some is lower case and they vary in length but the width was narrow for all of them which meant the Stamparatus would make stamping a BREEZE. 10 Sentiments stamped in under two minutes.
So who does this help?
- Stampers crunched for time, to start. And, yes, I'm raising my hand on this option
- Stampers who make kits in bulk for charities or causes close to their hearts
- Stampers who enjoy repeat stamping or patterns
- Stampers who like a streamlined process or appreciate efficiency
- New stampers afraid of making a mistake can use this tool to stamp again and again until they get their image, ink and positioning just right and gain their confidence
- Simple Stampers - crafters who like simple projects
If this is you, you probably already own a Stamparatus but if not then definitely consider it.
The Stamparatus from Stampin' Up! is one of the most useful and efficient tools in your craft room guaranteed. Whether or not you are using it is another conversation.
If you do not have one and you stamp on a regular basis (weekly or monthly), I highly recommend you get one.
Link to Shop Stamparatus: https://www.stampinup.com/products/stamparatus-(imperial-measurements)?demoid=2212777
I have a Host Code that ends on January 17, 2022. If you purchase $50.00 in product before tax with me in the online store you will receive a free embellishment. Shop with Host Code here: https://www.stampinup.com?hostcode=YAHKGWQV
HERE'S WHY I USED THE STAMPARATUS ON THE DECEMBER KIT:
This die cut sheet right here caught my eye. When I first received the kit I didn't really notice how similar all of the sentiment sizes were but there were so many pieces of this think rectangle die cut I went back to the instructions and looked at the Paper Pumpkin card layouts. Sure enough, it was for those pun phrase stamps.
Light bulb moment. Now, I'm not perfect so before stamping 10 sentiments all at once and getting it wrong on the Pool Party side, I decided to turn the entire die cut over to the back (the Basic White side) and do a test run to make sure my line up was good.
So what are some ways you can be sure your line up is perfect on the Stampartus before stamping?
1.) Positioning
I have found the best way to do this is to take a clean stamp and lay it directly onto the die cut where you want it stamped and then pick it up with the Stamparatus plate.
2.) Mark the position of your cardstock or die cut so you can put it back should the paper get moved accidently during stamping
- If you have the grid paper sheets you can mark this easily with a pen
- You can use a template (for example, if you cut out a stitched rectangle and you will be stamping 20 of that exact rectangle in the same place, use the negative (the piece the rectangle was cut from) to line up the rectangle perfectly and stamp each time
- Use the magnets to secure your paper once your positioning is correct
- Use a Stampin' ink spot (from a Paper Pumpkin kit) instead of a full ink ink pad to ink your stamps on the Stamparatus plate
- Use one of your stamp cases to get your plate to lay flat while inking if its hinged onto the Stamparatus
- Keep a Simply Shammy or quick cleaner nearby to wipe stamps and/ or plates/ magnets clean easily between rounds of stamping
- Make sure your plate in the hinges are able to move to the right if you are stamping left to right
 |
| Cherries positioned at slight angle so I could stamp images close together (Every hinge instead of every other hinge on Stamparatus) |
- The size of the stamp matters because of the space between hinges on the Stamparatus
- If you have a stamp about 1 inch in width you're fine for every hinge stamping
- If you have a stamp 2 inches or 3 inches you may have to angle it slightly to avoid overlap of the stamped images or stamp every other hinge
- Practice, practice! Get that scrap paper out and play with your favorite images
- If you are ok with an overlapped look consider masking the image for a cool pattern effect
- It's a monthly subscription box from Stampin' Up! Mostly card kits, occasionally treat boxes or bag kits around holidays
- It's $22.00 per month if you pay as you go (month-to-month) there are cost saving options with pre-paid options as well
- You can suspend or cancel anytime
- It's all-inclusive meaning you have everything you need in your kit to make the cards (except scissors)
- Every month is a different theme, ink and stamp set
- Every kit has "extras" you can use for alternate projects or future kits
- You get a teaser each month but the whole kit reveal doesn't happen until you receive it in the mail
- You have to be subscribed by the 10th of the month to receive that month's kit (Febuary Kit you must sign up by February 10th and so on)
- Subscribers have an option for refills
- I provide alternate ideas each month
 |
| Subscribe by February 10, 2022 for this Kit |


No comments:
Post a Comment