How to Create a Lovebirds Theme Card with the Mirror Image Stamping Technique
Love birds are timeless, aren't they? It's such sweet imagery and it gives us all the feels!
You will really enjoy creating this card whether it's for your sweetheart or a cute couple of love birds you know.
The good news is birds are a popular theme for crafters and stampers so chances are you have a bird stamp in your collection, and you can create the mirror image technique with just about any stamp as long as you have a silicone mat. I also recommend a stamping tool, but it isn't a must - we have the phenomenal Stamparatus - and it's handy to have post-its if you need to mask off certain parts of a stamp like I will be today.
FRIENDLY HELLO - That is what we will be using today to create these cards. What is Friendly Hello? It's actually a Sale-a-Bration item! When you spend $100 or more you qualify for the Friendly Hello bundle (Stamp Set and pack of 12 x 12 Coordinating Designer Series Paper).
Sale-a-Bration rewards are good from January 4 through February 28, 2022.
If you watch my tutorials, you know I am in love theme/ valentine cardmaking mode right now hence the love birds idea that popped up when I was working with the Friendly Hello stamp set.
I want to point out a few things before we get into the tutorial.
I have two more free online card classes coming up on Facebook Live January 18 and February 1, 2022.
Sign up for my email list if you are interested in the classes. My email list is the first place I share sneak peeks, new classes, events, product launches, etc. Sign up here: https://lp.constantcontactpages.com/su/GLk7fdL
HOST CODE:
My ordering special ends today but this Host Code is good until January 17, 2022 where you can receive a FREE embellishment for spending $50.00 or more (before tax) with me in the online store. https://www.stampinup.com?hostcode=YAHKGWQV
During Sale-a-Bration, at checkout when your order is $50.00 or more before tax you will also get to choose a Sale-a-Bration item (or items depending on your total). The order ships from Stampin' Up! the free embellishment ships from me. Don't hesitate to ask if you have questions.
Stampin' Blends pictured: Granny Apple Green, Fresh Freesia, Pool Party, Daffodil Delight, Petal Pink
PRODUCTS USED FOR THIS CARD:
Friendly Hello Bundle (Sale-a-Bration item)
Fresh Freesia Cardstock, Ink
Granny Apple Green Cardstock, Ink
Basic White Cardstock
Stamparatus
Memento Tuxedo Black Ink *Because we are coloring birds with Stampin' Blends alcohol markers*
Silicone Mat
Wet Paper Towl or Simply Shammy (something to wipe ink from your silicone mat)
Post Its (or scraps) for Masking
Stampin' Blends Combos in the Following Colors: Fresh Freesia, Granny Apple Green, Pool Party, Daffodil Delight, Petal Pink
Fresh Freesia Open Weave Ribbon
Multipurpose Glue
Stampin' Dimensionals
Tear & Tape Adhesive
Stitched Rectangle Dies
Small Heart Die (from Love & Happiness Bundle)
Paper Trimmer
Stampin' Cut & Emboss Machine
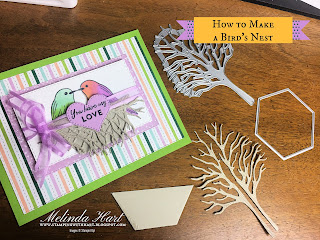
NOTE: I did two versions of this card. The second version has a nest that the birds are sitting in so if you want to create the nest you will need the following:
Pictured: Tree Die (Beautiful Trees), Hexagon Die from Beautiful Shapes
Beautiful Trees Dies (Large Tree Die)
Sahara Sand Cardstock and Ink
Timber 3D Embossing Folder
Paper Snips Scissors
Large Shape Die (I chose Hexagon from Beautiful Shapes but honestly any shape is fine (circle, square, rectangle) You will cover this piece with branches just go for the nest look
HOW TO MAKE THIS CARD/ MEASUREMENTS:
Card Base (Fresh Freesia Card 1, Granny Apple Green Card 2)
Measurements: 5-1/2 x 8-1/2 score: 4-1/4"
Note: DSP is short for Designer Series Paper
Stitched Rectangle Sizes:
For the birds: 2-1/8 x 3-1/2"
For the DSP (dotted pattern) 3 x 4-3/8"
for the DSP (leaf and branch pattern) 3-3/4 x 5-1/8
For the inside layer
Basic White Cardstock 4 x 5-1/4"
For the Die Cut Heart
Fresh Freesia Cardstock 2 x 2
I do want to reference the video tutorial here if you've never seen or tried the mirror imaging technique before.
I recommend a stamping tool so you can ink a strong image (not faded) when you transfer the stamped image from the silicone mat to the paper.
Before I go through the mirror image part, I also masked off the flower cluster next to the bird with two Post Its. You can cut your stamps if that is your preference but I do not typically cut or separate my stamp images. I just usually put a post it on anything I do not want inked and then remove the post it just before stamping the part of the image I did ink, in this case, the bird. You will also mask in the same exact spot for the mirror image stamp on the silicone mat.
Here's how you do it:
Stamp your first image as normal on cardstock in the desired ink, set aside
Place a clean silicone mat on your Stamparatus
Ink your image and stamp onto silicone mat
I recommend re-inking and stamping a second, even a third time before transferring image to cardstock
When you have a good image on the silicone mat, you are going to position the image on the silicone where'd you like it on the cardstock with the first stamped image.
NOTE: Take your time here
I wanted the beaks to touch (the birds kissing) so I positioned it that way before setting the silicone mat down and gently pressing to transfer ink to cardstock
That's it! You just did mirror image stamping! It seems intimidating but its actually pretty easy!
STAMPING THE SENTIMENT (AND MASKING AGAIN)
I chose the sentiment "You Have My Love and Support" and masked off the "and support" part of the stamp with a Post It. I know some people like to cut their stamps. I do not typically cut them. I just mask.
Whether or not you choose to color your image is up to you. Some prefer just the stamped image. I prefer to color and I chose Stampin' Blends. (Alcohol Markers ideal for blending multiple shades)
I googled "Love Birds" to get an idea for how to color my birds. On the first card, I chose a multicolor bird. Lower half Granny Apple Green combo, upper half Petal Pink and Daffodil Delight, blending into the Granny Apple Green until it looks natural. Dark Granny Apple Green on the wing feathers.
Also, on the first card, with Pool Party Light I colored all around the birds for a very faint blue sky look.
On the second card, the boy bird is half Pool Party and Granny Apple Green and the girl is Fresh Freesia and Petal Pink with a touch of Daffodil Delight.
The rest of the card assembly is just die cutting the stitched rectangles and heart. I stamped my sentiment directly onto the heart die cut. It's so cute!
Glue the largest rectangle onto the card base first.
Take a strip of ribbon long enough to wrap around the middle rectangle and adhere it to the back. I chose Tear and Tape Adhesive.
The Birds rectangle will get popped up on Stampin' Dimensionals. The die cut heart will also get a dimensional and place right between the birds!
If you like to stamp the inside of your cards, try the large double flower and the line art leaf (meaning just the outline leaf stamp). Stamp flowers in Fresh Freesia and the leaves in Granny Apple Green. I stamped three leaves.
VARIATIONS FOR THE NEST CARD
If you want the extra wow of your birds sitting in a nest then take that tree die cut, cut in half. Take the hexagon in Sahara Sand and cut in half. Glue the trapezoid (half hexagon) to the the perch area for the birds. Place your two halves of the die cut tree (branches pointing to bottom of nest) and trim any excess off. Glue down so branches are covering the trapezoid and it looks like a nest.
Instead of the ribbon being on the middle rectangle I wrapped it around the edge of the nest and I tied a bow with a second piece of the Fresh Freesia ribbon for a polished finish. On this version, the birds are different colors and there's no background Stampin' Blends shade.
I opted for the Striped DSP pattern and the Fresh Freesia splatter pattern DSP. No matter which of the paper you choose your card will be bright and beautiful and full of love!
DID YOU KNOW...
When you purchase the Starter Kit during Saleabration you can choose TWO ADDITIONAL stamp sets for free in 100% customizable starter kit. You choose $125 in products (plus those two additional stamp sets) and only pay $99. Did I mention FREE Shipping!!!!!! This deal is fabulous!
Plus, as a Demonstrator you get to order products that are not yet available to the public. Right now there's a brand new early release collection called "All Together" with brand new Stampin' Blends in skin tone shades available for preorder!
All Together Available to Customers February 1, 2022
But, guess what, you can place these preorder items in your starter kit TODAY. TODAY! If you love the Stampin' Blends as much as I do then this is incredible! All of the savings plus be the first to get this exciting new collection! Or whatever part of the collection you want.
That's just one of the many benefits of being a demonstrator and you do not have to sell. Enjoy the hobby. Enjoy the discount. Enjoy the inspiration and creativity. Save 20% on all of your orders and if you want to go back to being a customer then that's ok. You just go back to being a customer.
If you have any questions I am here! stampingwithhart@gmail.com
What a way to start your New Year with fresh new and exciting products with an incredible savings!


No comments:
Post a Comment