
It's halfway through October so if you still need some last minute Halloween packaging ideas I have them for you!
Festive and Bright + Ombre Gift Bags + Tailored Tags will get you some WOW results! Also, grab that Stamparatus. It's your best friend for this project and, well, if you like to follow me. I use it all of the time.

Last week on my live I was pleasantly surprised by how well the Ombre Gift Bags heat embossed so I decided to give another go using Festive & Bright. I used the Bundle but you can also just use the stamp set.
Festive & Bright is my favorite bundle in the holiday catalog (aka the Mini July to December 2021 Catalog from Stampin' Up!) It is so unique and it covers multiple holidays and occasions. I like sets that do multiple things. I also like to stamp in repeat - - a lot. (Hence, the Stamparatus)
PRODUCTS USED ON THESE GIFT BAGS:
Ombre Gift Bags*
Festive & Bright Bundle*
Frightfully Cute Bundle
Cutest Halloween Stamp Set
Tailor Made Tags Dies*
Stamparatus*
Black Glitter Paper*
Gingham Ribbon (Black & White / Bumblebee)*
2021-2023 In Color Ribbon: Pale Papaya & Evening Evergreen
Stampin' Cut & Emboss Machine*
Starred items were used on almost or every bag.
SHOP WITH ME! I have a Host Code and when you shop online with me as your demonstrator and spend $50 before tax you will receive a FREE EMBELLISHMENT from me between October 7-31, 2021. Use this HOST CODE 4MFA2P3N at Checkout so I know to send you the embellishment. Expires 10/31/2021.
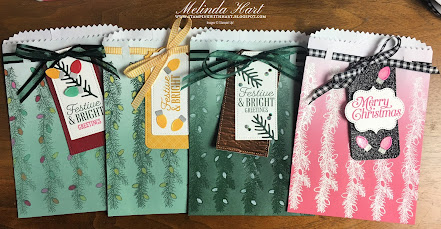
Here are some photos of the Ombre Gift Bags to give you lots of ideas and options. I may have added something here or there from another set but overall you will need: Stamparatus, Ombre Gift Bags, Festive & Bright Bundle and Tailored Tags.
 |
| Polished Pink Ombre Gift Bag Perfectly Plaid Sentiment Stamp/ Polished Pink Ink White Heat Emboss Powder Black Glitter Paper Stampin' Blends in Smoky Slate Light & Polished Pink Light Color Lifter |

 |
| Pale Papaya Ombre Gift Bag Black Heat Emboss Festive & Bright Background Stamping Tailor Made Tags: Black Glitter Paper & Basic White Witches Hat and Sentiment are from Frightfully Cute Cute Stars Adhesive Backed Sequins |
 |
| Soft Succulent Ombre Gift Bag Festive & Bright Garland Stamped in Evening Evergreen Mango Melody Light/Dark and Smoky Slate Light Stampin' Blends for Bulbs Bumblebee Gingham Ribbon, Bumblebee 6 x 6 DSP |
 |
| Soft Succulent Ombre Gift Bag Evening Evergreen Stamped Garland, Ribbon and Die Cut Branch Stampin' Blends for Bulb Shading: Real Red, Bermuda Bay, Mango Melody, Polished Pink, Pumpkin Pie |
 |
| Pale Papaya Ombre Gift Bag Gingham Ribbon Festive & Bright Background Garland in Memento Tuxedo Black Stampin' Blends: Pumpkin Pie, Blackberry Bliss, Basic Black Tailor Made Tags Dies in Black Glitter Paper & Basic White Sentiment from Cutest Halloween Witch from Frightfully Cute |
 |
| Evening Evergreen Ombre Gift Bag Evening Evergreen Ink, Ribbon, Branches and Gems Clear Heat Emboss Garland Festive & Bright/ Sentiment Brushed Metallic Cardstock Embossed with Bark 3D Embossing Folder |
 |
| Fresh Freeshia Ombre Gift Bag Cute Halloween Bundle Ghosts are from the Festive & Bright Bundle Gray Granite Ribbon Black Glitter Paper and Basic White Tailor Made Tags Dies |
I wanted ink stamped images and heat embossed images so you could decide what you'd like to try. I also colored some of the images with Stampin' Blends and left others just stamped or heat embossed, to give options there as well. Both are adorable!
Personally, I like to add a specialty element when I can so with Tailor Made Tags Dies I used the Black Glitter Paper for the larger tag and also the Brushed Metallic Cardstock on a Large Tag.
The ribbon I liked best was the Gingham (Black and White or Bumblebee) but the 2021-2023 In Color Ribbon *that perfectly matches the Ombre Gift Bags* were also fantastic with these projects.
If you are part of an "In Color Club" and you aren't using your bags or inks or ribbons, get them out because this is the perfect project! And even if you don't need a gift bag, this is also perfect for a card layout.
You can decide how simple or how advanced you'd like your gift bags to be. I think the die cuts from Festive & Bright are SO SWEET and SO PERFECT on the tags. Between those vintage lights, the ghost and the branch, it couldn't be more perfect.
I did incorporate an exacto knife or craft knife to make small slits in the gift bag so I could slide the ribbon through. This is an optional step. You may not want ribbon all the way around. Maybe you just want an accent or bow. I like to give options and I wanted to thread my ribbon in to the top of the bag.
Place a ruler across your gift bag and cut at the 3/4 and 1 inch mark. Also cut at 3-3/4 and 4 inch marks. Press down but be careful not to rip the bag. It should penetrate the front and back of bag but if not you can cut the marks on the back as well. I chose to hold up my bag to make sure I did not re cut the front. I just followed the impression with the craft knife and it sliced easily. See video for instructions.
Thread your ribbon through the back and front grooves. You want your ends in the front so you can add tags and tie your bow. I used anywhere from 28-32 inches of ribbon. You can decide how big you want your bow/ tails.
TIP: You can test opening your gift bag. The ribbon shouldn't affect your ability to put anything in it and when tying your ribbon just be mindful of not tying bow too tight. You do not want to curl in the edges of the bag.
TIP: If you color with the Stampin' Blends place a piece of scrap cardstock inside the bag first so your blends don't bleed through the back of the bag.
TIP: If you you heat emboss your bag be sure to use your anti static tool. I stamped two garlands, heat embossed, then the other three. I used the Versa Mark ink for the heat embossing with the "Basics" pack (black and white heat embossing).
I hope you enjoyed these gift bag ideas! Thank you so much for spending time here on the blog with me.
THE STARTER KIT
Stampin' Up! offers an incredible deal when you purchase the starter kit. $26 in savings and FREE SHIPPING! You choose $125 in product, pay only $99 and that's just the beginning of the fun. As a demonstrator you get first access to catalogs, new products and preorders! You get to join an amazing crafting community and you do not have to sell. You will enjoy a 20% discount and gets lots of inspiration. If you love a great savings or want to get the biggest bang for your buck I suggest this option. If you have questions I am happy to answer them. Contact me anytime: stampingwithhart@gmail.com.
Ready to Save & Get that Starter Kit? CLICK HERE FOR STARTER KIT
Have a wonderful weekend and happy crafting!


No comments:
Post a Comment