
January Paper Pumpkin is here! Woo!
 |
| Two quick alternate cards ideas |
 |
| The original Paper Pumpkin Card Designs |
I was able to do a walk through and assembly of the kit and I had enough time to make two quick alternate projects. More to come but since my kit arrived yesterday I wanted to get out to you as quickly as possible! You are going to love it. It is sooo sweet!
PAPER PUMPKIN, WHAT IT IS & HOW TO SUBSCRIBE
What is Paper Pumpkin? If you are brand new to this kit it is a monthly craft subscription box from Stampin' Up! It's $22 per month in the US if you go with the month to month option. You can suspend or cancel your subscription at any time and everything you need to make your kits is in the box (except for scissors). It's all inclusive. The first kit you receive will also include a Paper Pumpkin clear block for your stamps.
How to Subscribe: Click this link to sign up for the February 2022 Paper Pumpkin Kit: https://www.paperpumpkin.com/en-us/sign-up/?demoid=2212777
Each month Paper Pumpkin releases a "teaser" of what the theme of the kit is but the full reveal comes to your mailbox! You need to sign up by the 10th of the month to receive that month's kit so, for example, for February you need to subscribe by February 10, 2022 to receive that kit. Here's the sneak peek!
 |
| Sneak Peek of February 2022 Kit |
If you have any other questions about Paper Pumpkin don't hesitate to reach out to me. If you've been a subscriber and know you love the kits then consider Prepaid Subscriptions. When you purchase a prepaid option you will receive Saleabration rewards until February 28, 2022.
THE JANUARY PAPER PUMPKIN ALTERNATE CARDS (How To)
Alternate Products Used:
Gray Granite (full size ink pad)
Flirty Flamingo Ink & Cardstock
Very Vanilla Ink & Cardstock
Stampin' Seal+
VersaMark Ink
Stampin' Emboss Powder in Gold
Heat Tool
Anti Static Tool (Embossing Buddy)
Stampin' Blends in Flirty Flamingo (Both Colors)
Scallop Contour Dies
Stampin' Cut & Emboss Machine
Paper Trimmer
*Heart Die from Love & Happiness Bundle
CARD 1 - LOVE YOU

Flirty Flamingo Card Base: 5-1/2 x 8-1/2 score at 4-1/4"
Envelope X O Liner as Layer Cut to: 4 x 5-1/4"
Scalloped Contour Rectangle in Very Vanilla: Die Size: 3-1/8 x 4-1/4"
Note: I am going to start instructions after the cutting, scoring and die cutting steps but if you want me to include detailed step-by-step instructions for this part as well, just let me know in the comments!
Instructions:
Stamp the solid heart image from the stamp set in Flirty Flamingo Ink onto the Very Vanilla Scalloped Rectangle (within the stitched border). I stamped 8 Hearts. Set your ink with the heat tool. If you skip this step the emboss powder may stick to the ink on the second pass when you add the "love you" sentiments.
Once the pink hearts are heat set then run your anti static tool across the hearts. Take the VersaMark ink and stamp "love you" over the center of each heart.
Sprinkle with Stampin' Emboss Powder. I use a scrap paper to catch the powder but if you keep your powder in a container than do what you would normally do with your powder.
Wipe away any excess or unwanted powder and then set the powder with heat tool. It never gets old watching that powder turn to shiny gold words!
Assemble your card. Glue the XO layer (from the envelope liner) to your card base.
The next step is optional. The easiest way to add a pop of Flirty Flamingo between the scalloped rectangle and card base is to add a piece of cardstock. I chose to color the frame of the scalloped die cut with Flirty Flamingo Dark in the Stampin' Blends. If you like coloring you will enjoy this option! If not, just add a cardstock piece.
Place Stampin' Dimensionals on the Scalloped Rectangle and adhere to card.
Add sequins from the kit! And you're all set.
CARD 2 - SENDING YOU LOVE
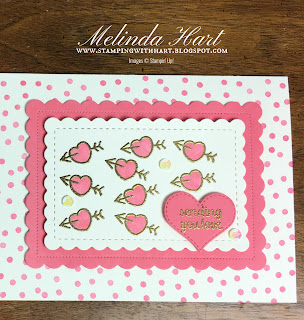
Measurements:
Very Vanilla Card Base: 5-1/2 x 8-1/2 score at 4-1/4"
Scalloped Contour Rectangle in Flirty Flamingo: Die Size: 3-1/8 x 4-1/4"
Scalloped Contour Rectangle in Very Vanilla: Die Size: 2-3/8 x 3-5/8"
Die Cut Stitched Heart (from Love & Happiness Bundle) in Flirty Flamingo
Instructions:
Stamp with the dots pattern stamp in Flirty Flamingo ink all around the border of your Very Vanilla card base.
Adhere the Flirty Flamingo Scalloped Rectangle in the 3-1/8 x 4-1/4" size to the card base centered.
Stamp the Heart/Arrow in VersaMark ink after you run the anti static tool across your Very Vanilla scalloped rectangle. I suggest three rows so you don't have overlap like I did on my card project in the live. 9 stamped hearts and arrows total.
Stamp "Sending you love" onto the Die Cut Heart. Same steps with anti-static tool and VersaMark ink.
Repeat the heat emboss process of adding powder and heat setting each piece with the heat tool.
Once the embossed images are set and cool to touch then color in the hearts with Stampin' Blends in Flirty Flamingo Light, Dark or a Combination. I showed both options in the video.
Place the Very Vanilla Rectangle on Dimensionals and center inside of the Flirty Flamingo Rectangle.
Place your Sentiment Die Cut Heart wherever you like. On the first card I chose the lower right of the stamped layer. In the second card, I had accidentally overlapped an image and covered with by centering the heart over it. Both looked cute! Whatever you think is best.
Add your sequins from the kit! Make someone's day! Send them love. Send them hearts. Send them a handmade card from the heart. There is nothing better in my opinion.
Thank you so much for spending time with me on the blog today!
To subscribe to Paper Pumpkin, click here: https://www.paperpumpkin.com/en-us/sign-up/?demoid=2212777
Have a great day and Happy Crafting!


No comments:
Post a Comment