The countdown to the catalog6 going live is on! Tomorrow, January 4th we can finally open those catalogs with you online and you can start ordering the brand-new products!

The countdown to the catalog6 going live is on! Tomorrow, January 4th we can finally open those catalogs with you online and you can start ordering the brand-new products!
The coolest card ever...

That's my opinion...

 |
| Beautiful Shapes Dies from the Brand New Abstract Beauty Suite |
I was going through the brand new Mini Catalog January to June 2022 (it goes live on January 4, 2022) and came across a card that, at first, I thought was a cool Designer Series Paper pattern. When I went through the papers I had pre-ordered it wasn't there. I took a closer look and realized this pattern was created using the Beautiful Shapes Dies which is part of the Abstract Beauty Suite.
I couldn't wait to make the card because my 6 year old son, Connor, LOVES die cutting, shapes, patterns and puzzles. He is autistic and we do many activities involving shapes, puzzles and patterns like this one.
It's a very sensory experience using the Stampin' Die Cut and Emboss Machine. Turning the handle and the pressure of the plates being run through the machine not to mention the satisfying end result of getting cut out shapes in whatever color Connor wants. Connor is a sensory seeker which means he likes a lot of physical movements like push, pull, jump, squeeze... etc. We use lots and lots of scraps.
If you have a loved one on the spectrum or with sensory needs this could be a great project for them depending on what they enjoy. My son hasn't perfected fine motor skills yet so he can't quite perfectly line up these shapes and glue them yet, but he can die cut like crazy (gross motor skills using the whole arm to crank) and he can help with sorting colors and counting the pieces. Connor is very drawn to puzzles and patterns so he loved this card. He ran his fingers over the finished project many times. (Because it is all die cuts it also has a very cool texture - more sensory seeker fun)
If you are a teacher, a parent, grandparent or caregiver - if you are teaching little ones about shapes - the Beautiful Shapes Dies have circles, pentagons, triangles, diamonds and trapezoids. It's SO COOL. There are endless activities you could create with this but for today I'll stay focused on the cards.
I had to actually figure out how to assemble this pattern so I studied the card in the catalog and then changed my card layout slightly, but I completely owe my thanks to the very talented Stampin' Up! designer who created that layout! If I find out who made it I will be sure to update this blog post. I cannot show the sample because I cannot show the inside of the catalog until January 4th but if you have a catalog in front of you, go the Abstract Beauty suite and you will see it!
If you do not currently have a demonstrator and would like to receive a catalog please reach out to me and I will be happy to help. I'd love the opportunity to work with you! My email is stampingwithhart@gmail.com. You can also direct message me on Instagram or Facebook.
MAKING THE BEAUTIFUL SHAPES HEXAGON CARD
You will need:

 |
| Abstract Beauty Specialty Designer Series Paper in a new size: 4 x 6 |
 |
| If you are interested here are the coordinating colors for Abstract Beauty Suite |
 |
| December 2021 Paper Pumpkin Kit: Lots of Pun (and it is)! |
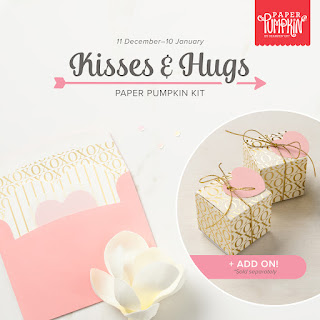 |
| January 2022 Paper Pumpkin Kit: Kisses & Hugs Sign up by 1/10/2022 |
 |
| Stayz On Ink Jet Black, Re-Inkers in Cherry Cobbler, Granny Apple Green and Pool Party |
 |
| Colors: Pool Party, Daffodil Delight and Stayz On Ink in Jet Black |

 |
| Stayz On Ink, Water Painters, Re-Inkers and Paper Pumpkin Block |


This week as life gets crazy busy counting down to Christmas I wanted to move into Winter inspiration. I chose Friendly Hello *a brand new Saleabration stamp set launching January 4, 2022* more on that in a minute and the Beauty of Friendship bundle (the Beauty of the Earth Suite works as well).
The fun part of this project is the Shimmery White Embossing Paste to give a 3D snow effect. These are cards with dimension and sparkle and they will wow your recipients!

Beauty of Friendship or Beauty of the Earth is an all season bundle/ suite and the Friendly Hello stamp set was a perfect pairing, in my opinion because it's about hello, support and friendship. Winter a very good time to send cards and show that support and care for our friends and loved ones.

 |
| Close up of Shimmery White Embossing Paste (lots of dimension) |
 |
| Card 1 of 3 |
 |
| Card 2 of 3 |
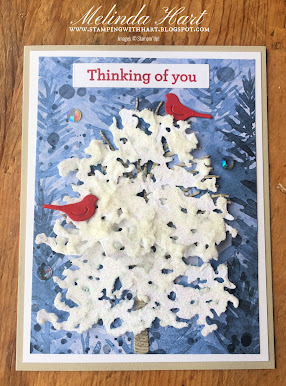 |
| Card 3 of 3 |


I often see tips and techniques I want to try. With the holidays fast approaching and with the conversations I've been able to have with some of you I know we are all still working on getting those cards finished and mailed.
 |
| The Metallics Heat Emboss Powders: Gold, Silver, Copper |
One tip I learned years ago was to create a sort of "faux metallic" cardstock by heat embossing the edges of the layer. This way if you've run out of metallic paper you still have an option for your metallic heat embossed cards. This is also a PERFECT match to your heat embossed images and/ or sentiments.
If you are new to heat embossing or have never tried it please do not stress or worry. We all learn through doing, right? I will be the first to admit to you if I'm trying something new and today - heat embossing with a stencil - that was NEW for me too. Think of this as the "bonus" section of the tutorial. While I try many techniques off camera prior to a live, I'll admit this stencil thing was done live for the first time but I have the best audience who was supportive and offered great tips.
 |
| Here is what I used to heat emboss a stenciled image: VersaMark Ink, Sponge Dauber, Stencil, Heat Emboss Powder, Heat Tool and Tape |
THE HEAT EMBOSSING TOOLS YOU NEED:
Before I get fully into the tutorial I have a Host Code you can shop with. Use this Host Code until December 15, 2021. When you spend $50.00 with me in the online store (before tax) you will receive a Wink of Stella Glitter Pen and 2 Christmas Cards from me.

SHOP WITH HOST CODE HERE: https://www.stampinup.com?hostcode=4YZE6QWF
SHOP SPECIFIC ITEMS WITH HOST CODE:
Stampin' Emboss Powders (Metallics Trio): https://www.stampinup.com/products/metallics-stampin-emboss-powders?hostcode=4YZE6QWF
VersaMark Ink Pad: https://www.stampinup.com/products/versamark-pad?hostcode=4YZE6QWF
Heat Tool: https://www.stampinup.com/products/heat-tool?hostcode=4YZE6QWF
For Unto Us Stamp Set: https://www.stampinup.com/products/stamp-set-cling-religious?hostcode=4YZE6QWF
MAKING THE CARDS
My focus was on the heat embossing and featuring the Metallics trio for this tutorial but the card base sizes are 4-1/4 x 5-1/2" (Take an 8-1/2 x 11" sheet of cardstock, score at 5-1/2 and then cut at 4-1/4" and you will have two card bases)
Layering piece 4 x 5-1/4" for the Snowflake background and faux metallic backgrounds.
The angel layer varied in sizes. See video for more details.
Prep your surface with an anti-static tool like the embossing buddy. This will help remove any oils from your fingers so that the embossing powder only sticks to the versa mark ink. This step isn't necessary for the faux metallic layer but I do recommend it for stamped images and sentiments. Keeps it crisp and clean.
Stamp your images with the Versamark ink and place on the paper.

Get a piece of scrap paper and fold it in half (like printer paper for example) to easily catch the leftover embossing powder so you can easily place it back in the container. I know many crafters keep their embossing powders in tupperware containers with a spoon and you can certainly do that too and not need the scrap paper. My embossing powder is in the original containers so however you want to handle this step the main point to make the clean up as easy as possible for you.
Once you are happy with the powder on the cardstock, take your heat tool and let it warm up for a moment and then place it close to the powder to heat set it. You will see your embossing powder start to turn into that fabulous metallic finish! So beautiful.
Once you start embossing you'll never go back! It's so much fun!
I hope you enjoyed today's blog post. I forgot to mention (but its in the video) that I also heat embossed a sentiment on the inside of the card. Nice finishing touch!
IF YOU WANT TO STENCIL & HEAT EMBOSS
I personally tried this technique by taping the stencil down to the cardstock and using a sponge dauber to add the VersaMark ink to the stencil. Fellow Demonstrator from Australia, Tracy Bish, was on the live and said she has also successfully done this technique by applying the whole VersaMark ink pad directly to the stencil. She said to give a slight twist and pressure but to be sure the stencil is secure. There you have it! Two different ways to try this fun technique! And be sure to check out Tracy Bish. She is on Facebook and YouTube.

DID YOU KNOW...
Stampin' Up! has a Starter Kit and it's the best value in the catalog!
PURCHASE STARTER KIT HERE:
https://www.stampinup.com/join?demoid=2212777
What can you expect with the Starter Kit?
1.) GREAT VALUE, GREAT SAVINGS
You choose $125.00 worth of Stampin' Up! products PAY ONLY $99.00
FREE SHIPPING on the Starter Kit
20% Discount as a Demonstrator NOTE: YOU DO NOT HAVE TO SELL PRODUCTS
First look at NEW catalogs and NEW Products!
 |
| This catalog goes live to customers January 4, 2022 With the Starter Kit, you can get first access now! |
Stampin' Up! has a new catalog coming in January! When you purchase the Starter Kit now -you actually can choose brand new items not yet available to customers and as a demonstrator you will be able to see the new catalog and get Saleabration rewards early! Demonstrators get the opportunity to earn Saleabration rewards first! When you place your first demonstrator order you could earn free products in pre-order Sale-a-bration time! Isn't that a thrill!
Get in on the perks and the fun! Be part of an amazing and crafty community called the Luvly Stampers!
PURCHASE YOUR KIT HERE: https://www.stampinup.com/join?demoid=2212777
Questions? Email me: stampingwithhart@gmail.com
Thank you and happy crafting!
Hello!
I tried my hand at assembly style cardmaking.

The Be Jolly Stamp Set can be as simple as you would like or if you want to color the images and mix and match them like I do, you'll love today's blog/ card ideas.
I created 10 cards. 2 Designs - 5 Cards Each
SHOP HERE WITH HOST CODE Spend $50.00 with me in the online store (before tax) and get a FREE Wink of Stella Glitter Pen and 2 Christmas Cards! (This Host Code expires December 15, 2021)
https://www.stampinup.com?hostcode=4YZE6QWF
Products used for today's project:
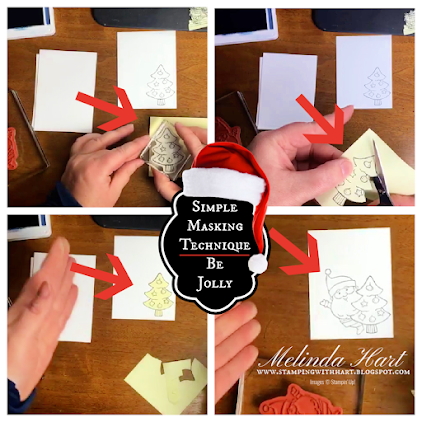 |
| I recommend Post Its for Masking. Simply stamp image on post it, cut out, place over stamped image on your project and stamp the next image. Remove Post It and have a seemless combo of stamped images! |
My style of stamping, adding in techniques here and there doesn't always lend itself to this type of cardmaking but I did want to see what would happen if I did try this "my way."
If you want simplified choose a stamp set that you don't have to color (I love coloring personally) and don't worry about ink blending or adding layers of ribbon. There are ways to keep it super simple and super cute.
However, you are here so if you do want to re-create these cards just as I made them then get out that blending tool, ribbon, markers and let's have some fun making wow cards!
 |
| Here are all of the cardstock pieces cut ahead of time and ready to go |
 |
| If you want to create the appearance of sky, use Misty Moonlight ink with your Blending Brush for a soft airbrushed type look |
 |
| Stamp background onto card base using Misty Moonlight ink |
 |
| Assembling multiple card pieces is really fun! I have to say |
 |
| Grab those Stampin' Blends and start bringing these images to life! |
 |
| Finished Santa with Tree Cards (no ribbon, more embellishments) |
 |
| Finished Santa with Sleigh Card |
I really enjoyed this project! I'll have to plan more of these in the New Year!
DID YOU KNOW...
Stampin' Up! has a Starter Kit and it's the best value in the catalog!
PURCHASE STARTER KIT HERE:
https://www.stampinup.com/join?demoid=2212777
What can you expect with the Starter Kit?
1.) GREAT VALUE, GREAT SAVINGS
You choose $125.00 worth of Stampin' Up! products PAY ONLY $99.00
FREE SHIPPING on the Starter Kit
20% Discount as a Demonstrator NOTE: YOU DO NOT HAVE TO SELL PRODUCTS
First look at NEW catalogs and NEW Products!
Stampin' Up! has a new catalog coming in January! When you purchase the Starter Kit now -you actually can choose brand new items not available to customers yet and as a demonstrator you will be able to see the new catalog! Isn't that a thrill!
This is a great gift for yourself! (You must purchase your own kit.)
Get in on the perks and the fun! Be part of an amazing and crafty community called the Luvly Stampers!
PURCHASE YOUR KIT HERE: https://www.stampinup.com/join?demoid=2212777
Questions? Email me: stampingwithhart@gmail.com
Thank you and happy crafting!
Today I am announcing that I am leaving Stampin' Up! as a demonstrator at the end of this month, August 31, 2026. This means you will b...


